


Learning how to screen record on Mac is more like a basic technique for work or school. From time to time, you may need to record a presentation, live streams, online conferences, lectures, and so on on your Mac screen. If you're new to MacBook Pro/Air/mini/iMac, it may take you some time to get the idea. Luckily, you're in the right place. There are 4 ways to screen record on Mac with audio and voice for free in this post. Now, check them out and choose your preferred way to get started.
Comparison: Quick Look at the Differences of 4 Methods
Before going any further, you may want to take a look at the comparison table below and save your time to make the right choice. Then, go directly that way and see how to screen record on Mac with audio.
| Record Internal Audio | Record Microphone Sound | Record Webcam Only | Record Screen with Webcam | Lock a Window When Recording | Add Real-time Annotations | Edit Recordings | |
| FonePaw Screen Recorder | ✅ | ✅ | ✅ | ✅ | ✅ | ✅ | ✅ |
| Screenshot Toolbar | ✅ | ❌ | ✅ | ✅ | ✅ | ✅ | ✅ |
| QuickTime Player | ❌ | ✅ | ✅ | ❌ | ❌ | ❌ | ❌ |
| Chrome Extension | ✅ | ✅ | ✅ | ✅ | ❌ | ✅ | ❌ |
Method 1. Screen Record on Mac with Audio/Voice via FonePaw Screen Recorder
⏰ This method can let you record: the Mac screen, external audio, and internal audio
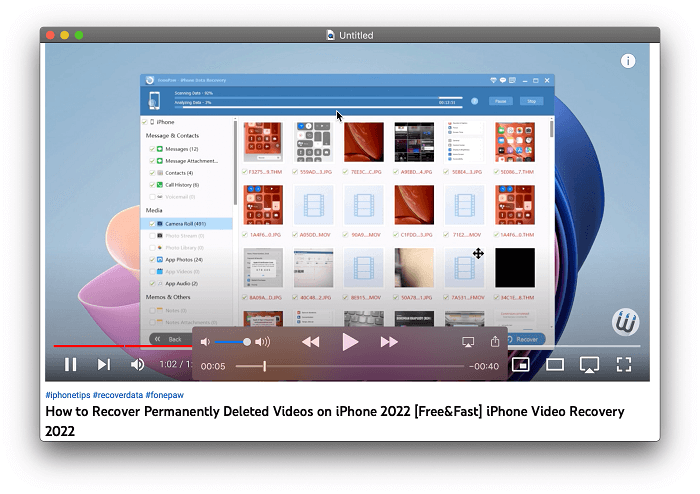
FonePaw Screen Recorder is an all-in-one recording program for Mac. With its over 20+ recording modes, it can easily handle any recording scenario like streaming videos, online webinars, gameplay, lectures, etc. If needed, you can record a webcam along with the screen as well. Plus, FonePaw can record Mac screen with system audio, while many Mac screen recorder cannot do that. After recording, it also offers you a toolkit to edit, trim, compress, merge, and convert your video with ease.
Free Download Buy with 20% off Free Download Buy with 20% off
More Sparkling Features to Explore- Real-time Annotation - Add text, lines, arrows, callouts, and so on to make a clear and detailed video.
- Lossless Quality - Support up to the lossless quality of recordings in MP4, MOV, FAV, WMV, MP3, AVI, etc.
- Scheduled Recording - Set a schedule to let FonePaw automatically start and finish recording by itself.
- Fixed Window - Set a fixed window to exclude unexpected disturbances and interruptions.
- Long Screenshots - Capture screenshots or make a long screenshot for the entire webpage or file.
Now let’s see how to use FonePaw Screen Recorder to screen record on Mac with sound. You can watch the video, or go directly to the text tutorial below which shows you the steps in detail.
📽 Video Guide: Record Screen Activity with Audio on Mac
Step 1. Launch FonePaw Screen Recorder for Mac
After you download and install FonePaw Screen Recorder for Mac, launch it and select "Video Recorder".
Free Download Buy with 20% off Free Download Buy with 20% off
Step 2. Adjust Recording Settings
Before recording, you can customize the region to capture. If you need to screen record with sound on Mac, adjust the system sound volume, and turn on/off the microphone. Also, you can choose to record your webcam. When you get ready for recording, click the REC button.
Step 3. Record Screen with Voice on Mac
While recording, you can adjust the voice volume of both the computer system sound and the microphone as you like, and add annotations to highlight some important points.
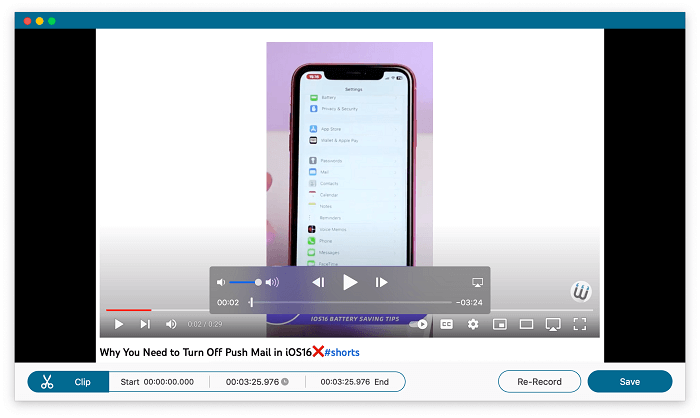
Step 4. Save Screen Recording on Mac
As all things have been recorded, just hit the REC button again to stop capturing. Then, you can preview and trim the video with audio that you have captured. Finally, you can save the video to the computer drive, and you can also easily find it in the Recording history of FonePaw.
Pros
- Can screen record on Mac with internal audio and microphone sound.
- Add a customizable overlay of the webcam.
- Record videos for any recording needs.
- Enable you to record Android/iOS on Mac.
- Add real-time notes when recording.
- Output to lossless video and audio files.
- Provide post-processing tools.
- Make a long screenshot.
Cons
- Record a 3-minute video in the free trial.
Method 2. Screen Record on Mac with Audio via Screenshot Toolbar
⏰ This method can let you record: the Mac screen, external audio (internal audio is not available)
For Mac users, the most convenient way is to use its built-in screen recorder. if your Mac is in macOS Mojave or later, you can use the screenshot utility. This method has limited features, but you can control it flexibly. With a few hotkeys, you can easily finish your screen recording on Mac. The screenshot toolbar is available on almost all Mac OS, like Mac Pro, MacBook Pro, MacBook Air, etc. Let’s see how to do it:
Step 1. Launch the Screenshot Utility on Mac
Simply press Command+Shift+5, the screenshot floating bar will appear on your Mac desktop. There are several icons denoting different features, and that’s what each icon means. Basically, you can quickly capture a snapshot or a video with this tool.
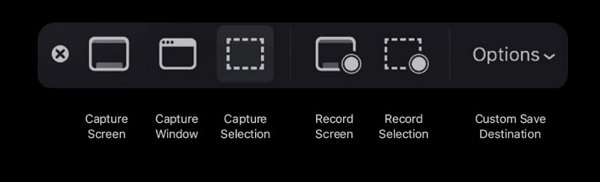
Step 2. Make Your Screen Recording Settings
As you can see, you can choose to record the whole screen or a selected portion on your Mac. Also, you can open the options and customize some other settings, for instance, the save location, timer, microphone, highlight features.
 Note:
Note: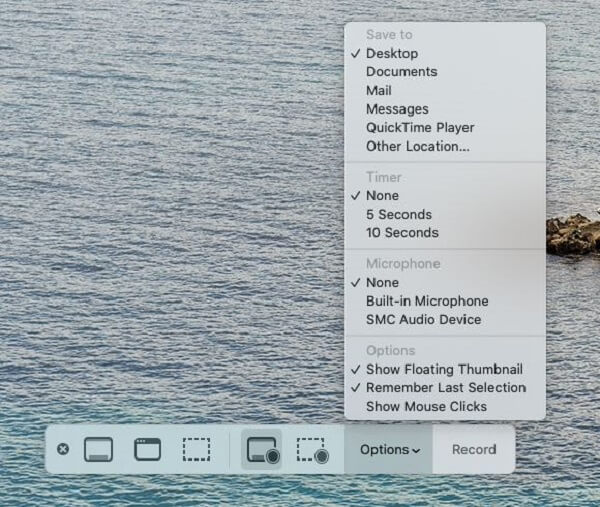
Step 3. Start and End Recording the Mac Screen
With all the settings done, hit the Record button to begin your recording.

It’s also very easy to end the recording, but sometimes the End button is hard to notice. There are actually three ways:
- One is to hit the End button at the top right of the Apple menu bar;
- Another one is to press Command+Shift+5 again and hit End at the toolbar;
- The last one method is to use the hotkeys Command+Control+Esc.

Now you can check you recorded video on Mac at the saved location.
Note:
- For a more detailed instruction about how to use the screenshot tool to take screenshot and record videos, check How to Take Screenshots and Screen Videos on macOS Mojave to see.
Pros
- Easy and free to use without any software.
- Screen record on Mac with sound from a microphone.
Cons
- Do not record internal audio on Mac.
- Do not record a webcam when recording.
- Do not let you edit videos afterward.
- Save recording to MOV files only.
- Support macOS 10.14 Mojave and later.
Method 3. Screen Record on Mac with Sound via QuickTime Player
⏰ This method can let you record: the Mac screen, external audio (internal audio is not available by default)
A universal way to record screen on Mac is to use QuickTime. It’s also Mac’s built-in recording program, you have no need to install any other application if you just want to record a video with your voiceover. If you find your Mac cannot launch the screenshot toolbar or is too old to use it, you can try this way.
By the way, if you don’t pursue high quality of the audio, you can also try recording the system voice by enabling the internal microphone function, which might fulfill your instant need.
Here’s how to use QuickTime to record screen on Mac:
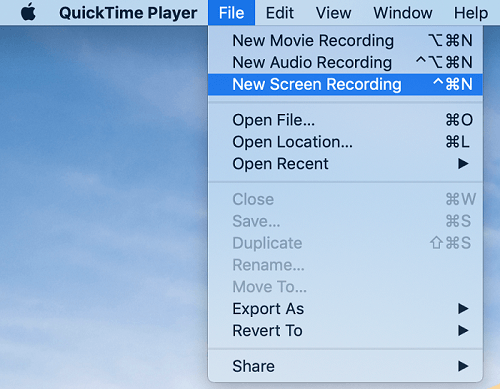
Step 1. Launch QuickTime to Record the Screen
On your iMac, MacBook, use Finder to locate QuickTime player and launch the program.
Click File on the top menubar and choose New Screen Recording.
Step 2. Choose Audio Sources and Start Recording on Mac
On the Screen Recording box, click the down arrow icon next to the record button.
On the drop-down menu. You can choose record audio from the internal microphone or an external microphone. If you don't need a high quality of sound, you may just record screen with audio from Mac's microphone.
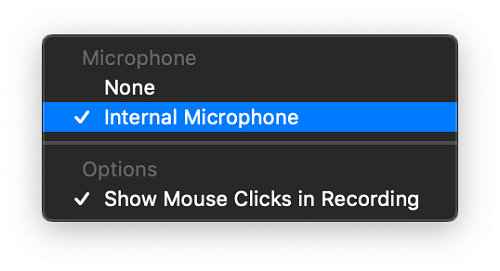
After setting up, click the red record button to begin capturing the Mac screen with sound. Then you will be asked to select the full screen or an customized area and click Start Recording.
📝 Note:
- To record system audio on Mac, you can use Soundflower with QuickTime screen recording. Soundflower is an audio system extension that allows an application to pass audio to another application. And you can install and set up this plug-in to make your QuickTime Player capable to screen record the Mac screen with both internal and external audio.
- Some users reported that Soundflower doesn't work on Mac OS Sierra. If this problem is happening on your Mac, you can try to record your screen with FonePaw Screen Recorder instead.
Step 3. Stop QuickTime Screen Recording
When you have captured everything you need with your Mac screen, you can click the record button again to stop the QuickTime screen recording. Or you can right-click on the QuickTime in the Dock and select Stop Recording. Finally, you can preview and save the video.
Note:- If you encounter lagging while recording with QuickTime, or find your recorded video is too large, click How to Stop QuickTime Lags and Reduce File Size to solve the problem.
Pros
- Preinstalled to use for MacBook Pro/Air/mini/iMac.
- Enable you to record the screen or record a video via webcam on Mac.
- Can trim the video after recording.
Cons
- Do not record a Mac screen with your webcam at once.
- Do not screen record with system sound on Mac.
- Do not capture screenshots.
- Support outputting recordings to MOV files only.
Method 4. Screen Record on Mac with Internal Audio via Chrome Extension
⏰ This method can let you record: the Mac screen, external audio, and internal audio
If you don't want to use both default apps and third-party apps on Mac, an extension may come to help you out. Awesome Screen Recorder is a browser add-on for Google, Firefox, Edge, and Safari that enables you to directly capture webpages, record video with a camera, and screen record on Mac with audio and sound.
Moreover, it allows you to integrate with tools like Trello, Slack, Asana, and Jira to boost efficiency. When done recording, you can directly share your recording with colleagues or friends via a link or save it to a local disk. Meanwhile, this extension is easy to get down to as follows.
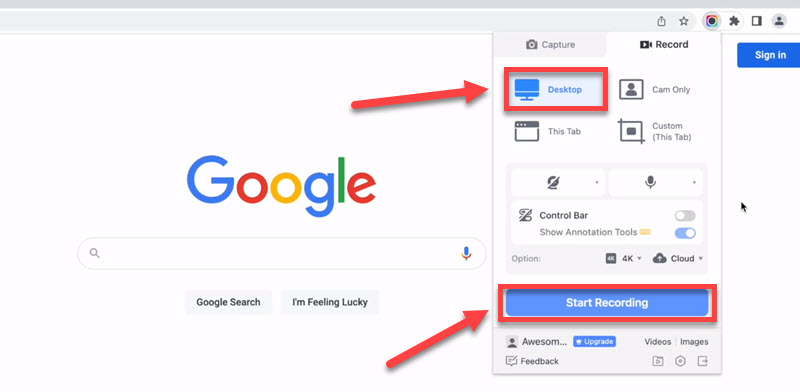
STEP 1. Add Awesome Screen Recorder to your browser.
STEP 2. After that, click the icon on the extension bar and choose the "Record" tab.
STEP 3. Then, choose "Desktop" and adjust the volume of the microphone and system sound.
STEP 4. Click "Start Recording" to screen record on Mac with audio and sound. When done, click "Stop" to stop the recording and download it as an MP4 file.
Pros
- Easy to use on popular browsers.
- Record Mac screen with internal audio and microphone sound.
- Directly share your recording via a link.
- Capture screenshots for web pages.
Cons
- Allow up to 100 screenshots and 20 recordings.
- Support SD video resolution of up to 720p only.
FAQs About Screen Record on Mac
Does Mac have a default screen recorder?
Yes. Screenshot Toolbar and QuickTime Player are 2 built-in screen recorders on Mac. But the recording feature on Screenshot Toolbar is only available for Mac computers running on macOS Mojave or higher. Although they can screen record on Mac, they can only capture external sound/microphone sound. If you want to capture internal sound as well, it is advisable to opt for a professional screen recorder like FonePaw Screen Recorder.
Are there any shortcuts for screen recording on Mac?
The embedded Screenshot Toolbar has shortcuts. Simply long press "Shift + Command +5", the app will pop up. Then you can start screen recording. Once finished, press "Command + Control + Esc" to stop.
If you are using third-party screen recorders, they often have the feature as well. The notice may pop up or you can find the shortcuts in the "settings". You can even customize the shortcut to your preferences.
Bottom Line
For Mac users, the easiest way is to use default apps like Screenshot Toolbar and QuickTime Player to record your Mac screen. However, preinstalled apps are only able to record the microphone sound. The Awesome extension is a nice choice if you don't want to download any software while the drawbacks are a limited amount of recordings and poor video quality in 720p.
Therefore, FonePaw Screen Recorder outperforms all of them with no doubt. This intuitive recorder caters to any recording needs and enables you to screen record on Mac with internal audio, microphone sound, and webcam overlay. Better yet, it supports the lossless quality of recordings. Give it a shot and you'll definitely be into it.
