


'How do I record a video of myself on my Mac?'
'How to record yourself on a Mac?'
'How to record video on Mac with external camera?'
Have you ever come across such posts in Apple Communities? Some Mac newbies are still unknown how to record video on Mac, but this is actually an easy-peasy task. To be specific, there are 3 native applications in macOS that let you make a video/movie with the web camera, such as QuickTime Player, Photo Booth, and iMovie. Alternatively, you may also look for a more powerful and functional screen recorder for Mac. Now, let's see how to record videos on Mac in 4 ways and you can pick a preferred method to get started.
Before going any further, you may want to ensure that you have a webcam attached to your Mac. An in-built web camera is included in all MacBooks and iMacs. However, if you have Mac minis or Mac Pros, you have to pay for an external webcam as an add-on. When everything is ready, let's go over the methods below.
How to Record Video on Mac with QuickTime Player
QuickTime Player is both a media player and a recorder for capturing on-screen activities and recording videos with your camera. Amazingly, Apple's QuickTime is a technology that was released years ago and is still maintained by Apple.
As for its recording feature, QuickTime Player enables you to record a video using a webcam and save the recording files to MOV files. Then, you can split, trim, rotate, or remove the audio of the recording. However, you cannot record both your Mac screen and webcam together. Let's see how it works below.
Step 1. Open QuickTime Player from your Finder - Applications on Mac.
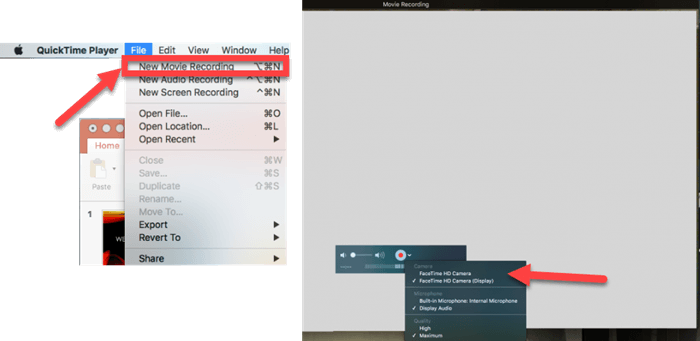
Step 2. Click File and then New Movie Recording. You should ensure that your webcam is on, so you'll be able to record yourself on Mac.
Step 3. Click the Down Arrow in the control bar to select which camera to record if you have multiple webcams, whether to record the microphone or system audio, and to save the recording in High or maximum quality.
Step 4. Hit the Red Circular button to start recording a video on your Mac.
Step 5. When done, click the button again to stop recording and select File - Save to store the video.
How to Record Video on Mac with Photo Booth
Photo Booth is an intuitive app preinstalled on Mac that is able to take a sequence of four photos, take a single photo, or record a video with your webcam. Also, you can apply effects to your video to bring more fun to the audience.
There are 20+ available effects including Space Alien, Nose Twirl, Chipmunk, Lovestruck, Dizzy, Frog, and so on. Also, you can trim the recordings when watching the video, but you cannot edit, split, merge, or add effects to your recordings. Similar to QuickTime Player, Photo Booth cannot record your computer screen as well. If you just want to record a video of yourself with various effects, it's an easy tool for new starters.
Step 1. Go to Finder - Applications and launch Photo Booth on your Mac.
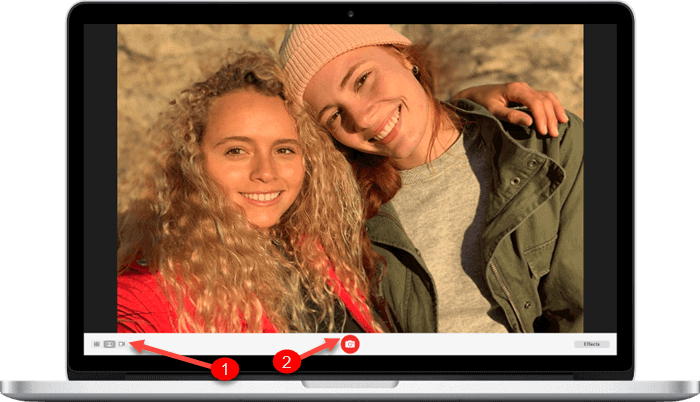
Step 2. Switch to Video Mode by clicking on the camera-like icon at the bottom left.
Step 3. Click Effects at the bottom right and pick a preferred effect to render your video vivid.
Step 4. Click the Record button in the middle to start recording a video using your webcam.
Step 5. When ready to finish, you can click the Record button again to stop recording. Then, click the video thumbnail in the filmstrip to check out your recording. Also, you can right-click on the thumbnail and select Export to save the video to another folder.
- you can turn off both the countdown by clicking the Record button while pressing down the Option and Shift keys.
How to Record Video on Mac with iMovie
iMovie is a free application developed by Apple that you can download from the Mac App Store. However, it works more like a movie maker with a variety of features. iMovie lets you arrange your videos with 20 storyboards, shift the focus to evoke a cinema-like feeling, apply special effects/filters, and add 100+ soundtracks to rock your video.
If you want to do complicated post-processing for your videos, you can use iMovie to record a video on Mac and then create your own masterpiece. Now, let's learn how to record video on Mac with iMovie using FaceTime HD Camera.
Step 1. Open iMovie in Finder - Applications on Mac. (If not, you need to install it first).
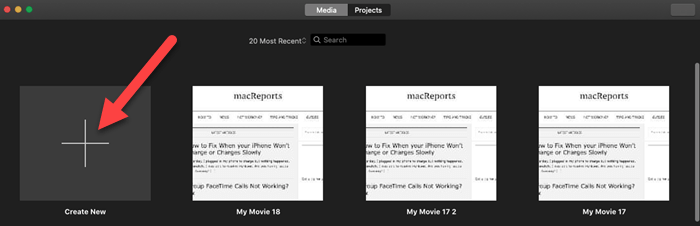
Step 2. Select File and then New Movie. Or, click Create New in the Media tab.
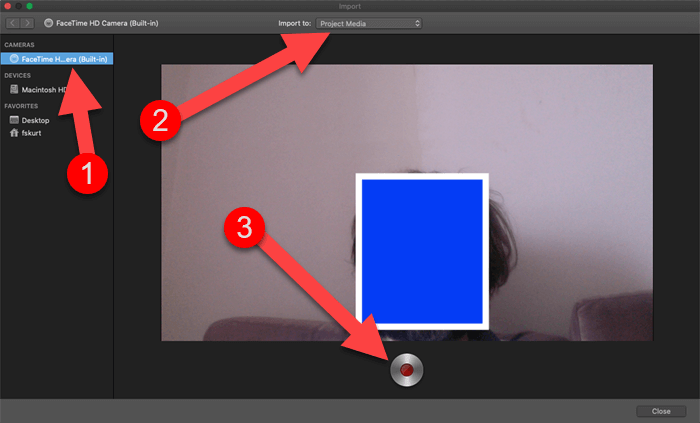
Step 3. Click the Down Arrow icon on the left top, and then choose CAMERAS from the left panel.
Step 4. Select Facetime HD Camera (Built-in)Facetime HD Camera (Built-in) and allow iMovie to access the microphone and webcam.
Step 5. Choose Import to at the top and choose where to save the recording. When everything's okay, click the Record button behind the preview. Then, click the button again to stop it.
How to Record Video on Mac with Third-Party Tool
If you just want to record yourself via a webcam, the applications mentioned above are enough for you to use. However, if you want to record both the computer screen and your selfie to make a professional video for tutorials, lectures, or online meetings, a functional recording expert should be the top priority.
FonePaw Screen Recorder is a professional and versatile video recorder with various recording modes. Compared to the 3 apps above, it can add real-time annotations, apply mouse effects, and highlight the important points when recording. Better yet, it offers an advanced trimmer, video compressor, video merger, and video converter to lead you through from the start to the end. If you're unfamiliar with it, let's dig out its silver lining as follows.
● Easy-to-Use Interface - No worries. This dedicated software is totally foolproof and cannot be easier to use. You'll instantly know how to use FonePaw Screen Recorder as long as you get down to it on your Mac.
● Various Recording Modes - It offers Video Recorder, Audio Recorder, Game Recorder, Webcam Recorder, Windows Recorder, and Phone Recorder to perfectly fulfill your recording needs in different scenarios.
● Professional Recording - During the recording, you can add annotations, highlight mouse cursor/keystroke, magnify keys, add texts, and so on to make your video professional and clean for the audience.
● High Quality Video Output - FonePaw Screen Recorder supports a range of output formats including MP4, MOV, WMV, F4V, MPEG-TS, and WebM. The video quality can be set to lossless at 60 fps for the best playback.
● Lossless Audio Quality - You can also solely record the system sound or your microphone to M4A, OPUS, MP3, WMA, AAC, FLAC, and WAV of up to lossless sound quality.
First off, you should download and install FonePaw Screen Recorder on your MacBook Air, MacBook Pro, iMac, and Mac mini. Now, let's see how to record a video on Mac using this amazing program.
Free Download Buy with 20% off Free Download Buy with 20% off
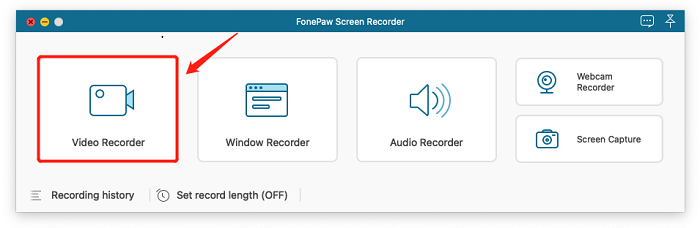
STEP 1. Choose a Recorder
Launch FonePaw Screen Recorder on your Mac and you'll see a clean interface. Now, pick up a recorder to proceed according to your needs, for example, Video Recorder.
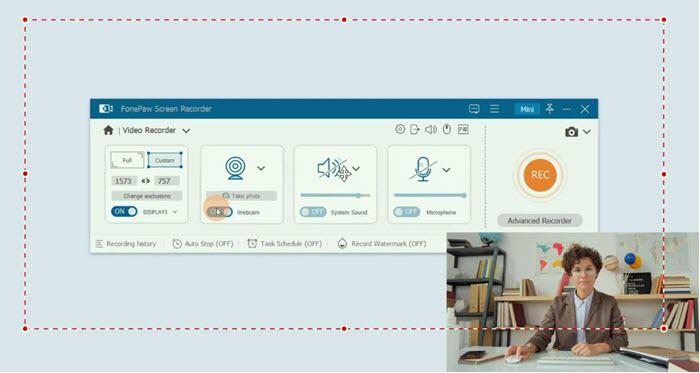
STEP 2. Preset Your Recording
Now, choose to record the full screen or the select region. Also, you can toggle on the webcam to record yourself with on-screen activities.
Click on the Settings button and you can determine the resolution, style, opacity, and location of your webcam. Then, choose whether to record system sound or microphone along with the recording, and click on the REC button to start recording.
STEP 3. Finish Recording
In the recording, you are able to use the toolbar to bring more details to your video. You can add annotations/texts, use step icons, upload pictures, highlight the key points, or focus on the mouse route if necessary.
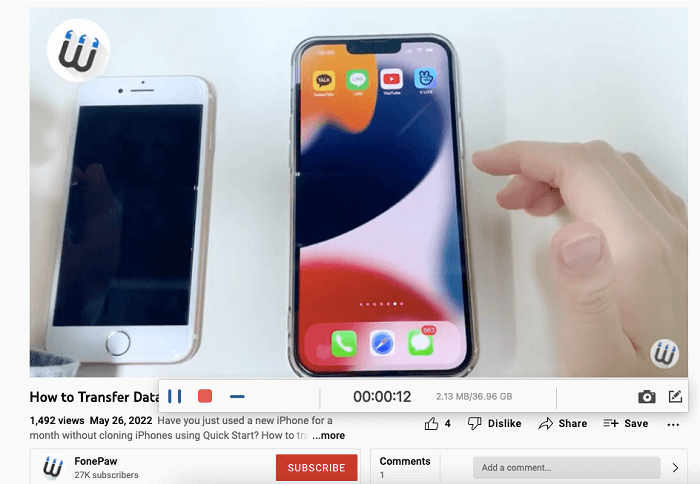
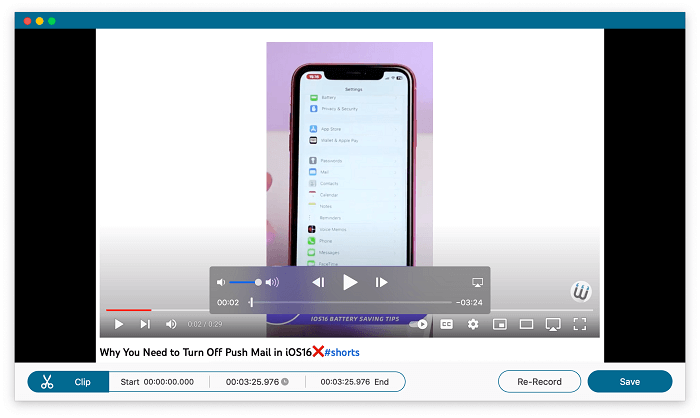
Also, you can take a snapshot when recording or set a schedule to auto-end the recording. When done, click the REC button again to stop recording. Then, you are able to trim your video, or use the Advanced Trimmer to do post-processing work.
Conclusion
The native apps on Mac enable you to record a video of yourself. However, they neither record the screen along the way, nor add extra explanations in the recording. If you just need to record a video with your webcam, it's enough to resort to QuickTime Player, Photo Booth, and iMovie.
However, if you're looking for a way to make a detailed video, FonePaw Screen Recorder is a leading recording tool on the market. As the above tutorial shows, it's easy to use with revolutionary features and powerful post-processing tools. Take a shot and you'll grasp the idea.
