


"How do I stop my QuickTime from lagging when I am recording my games?"
"How do I reduce QuickTime recordings file size?"
-- Users from Apple Community
Many MacBook users may come into the same problems mentioned above. As the built-in video player and screen recorder of MacBook and iMac, QuickTime can be counted as convenient and versatile. However, when it comes to its performance while recording Mac screen and the file size of the recorded videos it produces, QuickTime will lose its competitive edge.
Some Mac users complain that QuickTime will become choppy both when it is recording and playing videos. And it is common to find that the size of the recorded file can be way too big, like 1 GB for a 2-minute recording, which is hogging big chunks of disk space in his 128 GB MacBook Air.
But this doesn't mean you are out of luck. With the following methods, the QuickTime lagging issue will be fixed and QuickTime can create a smaller recording file for you.
How to Stop Lags and Reduce File Size in QuickTime
Before we go to the solution, you may also want to know some possible reasons that lead to lags in QuickTime recording. One possible reason is that you are using other third-party devices like the webcam or microphone at the same time, which can disturb the recording.
To resolve this kind of issue, you can try the following 2 methods:
- Try using safe mode to isolate issues with your Mac.
- Check if you are using an account with limited permission.
The 2 ways may not work every time, because the issue with lags and large size can relate to QuickTime itself and your macOS, which is complex. In order to solve the lagging issue and the large file size of QuickTime recording, we will first demonstrate 2 feasible methods that you can easily make in the QuickTime settings. But it’s noted that as the default format of QuickTime recording, MOV, cannot be changed, you may need to compromise to lower quality when you avoid the lagging problem.
Here are the two methods you can refer to:
Other than making adjustments in QuickTime, there are also workable ways when you make use of some third-party apps. For example, you can try to replace QuickTime with FonePaw Screen Recorder, so the recording will be more flexible and the recorded quality won’t be impaired. Or you can also use a video converter to help you compress the large-size QuickTime video and avoid quality loss.
Here are the details of the recommended methods and tools:
Method 1. Change Resolution from System Preferences in QuickTime
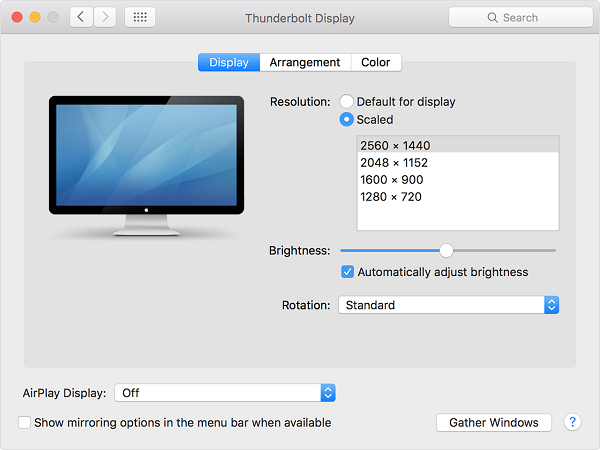
Changing display resolution on MacBook/iMac to lower resolution can somehow fix QuickTime lag and produce the recorded videos smaller in size. But notice that this may sacrifice a little visual quality.
- Double-click the gear icon (System Preferences) from the toolbar on the bottom.
- Click the menu icon on the top.
- Click the Displays on the window.
- Choose Resolution>>Scaled.
- Click a comparatively lower resolution.
Method 2. Export QuickTime Video as Medium Quality
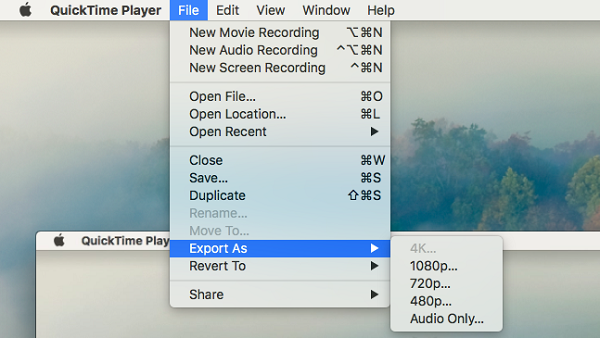
Another way to reduce the file size of QuickTime recordings is by exporting the recording in medium quality after the recording is finished.
- On QuickTime, choose File >> Export As after finishing recording and you will get 4 options from the QuickTime Player menu bar: 1080p/720p/480p/Audio Only.
- Select a medium or low definition like 720p or 480p.
Note: users with the older version of QuickTime should adjust the video quality from the drop-down menu on the recording-control panel.
Method 3. Record Screen Without QuickTime
After you read the first 2 methods, you will find that though there are ways to record Mac screen via QuickTime without lag in small size, it still hard to meet your expectations, because:
- You have to lose the high quality to some degree
- It’s difficult to record the screen, system audio & microphone at the same time
- Few output formats can be chosen
A shortcut to fix these QuickTime recording issues is by replacing it with a more multifunctional screen recording tool. FonePaw Screen Recorder for Mac is a professional QuickTime alternative when it comes to recording Mac screen. And it is now free to download.
Free Download Buy with 20% off
Best QuickTime Alternative - FonePaw Screen Recorder
Then, to maintain the high recorded video quality with sound but no lag in small size, it’s time to try another useful screen recording tool for Mac: FonePaw Screen Recorder. Here you can view its detailed features.
- ✅ Smaller size: The recorded video of the same length and quality by FonePaw is considerably smaller in size compared with QuickTime Player. In my experiment, a 40 seconds long video recorded by the FonePaw recorder is 304 KB while the same recording in QuickTime takes 3.1 MB.
- ✅ Never lag: FonePaw Screen Recorder supports recording your Mac screen in 60fps. This useful feature should create a smoother video and helps avoid lagging or delay in the picture when playing the recorded files.
- ✅ Various output formats: Compared to the MOV-only output format of QuickTime, FonePaw is available for a diversity of video formats, for instance, MP4, MOV, WMV, F4V, TS, AVI, and GIF to satisfy more viewing needs.
- ✅ Record system sound & microphone simultaneously: We’ve mentioned that QuickTime is hard to record internal sound & external sound at the same time, but if you use FonePaw Screen Recorder, it’s just a piece of cake.
- ✅ Multiple recording mode & allow real-time annotation: Apart from basic recording feature, you can also choose some advanced recording mode to ease your recording like window recorder, which allows you to record the selected windows and won’t stop you doing other desktop tasks. Besides, during recording, you can add texts, arrows, etc. for further reference.
How to use FonePaw Screen Recorder on Mac
Free Download Buy with 20% off
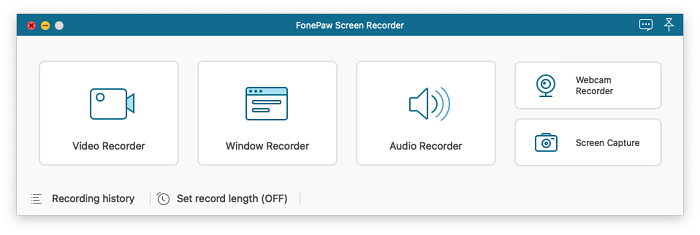
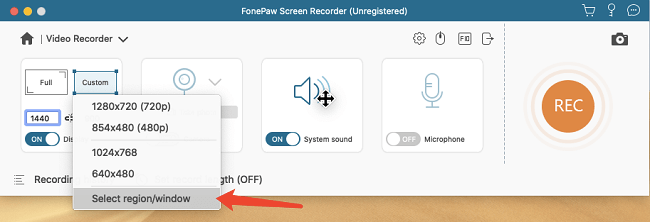
STEP 1. Double-click its icon to open FonePaw Screen Recorder on your Mac. Choose Video Recorder from the homepage.
STEP 2. You will see a floating bar where you can select a screen area, enable the webcam, record audio, and take screenshots.
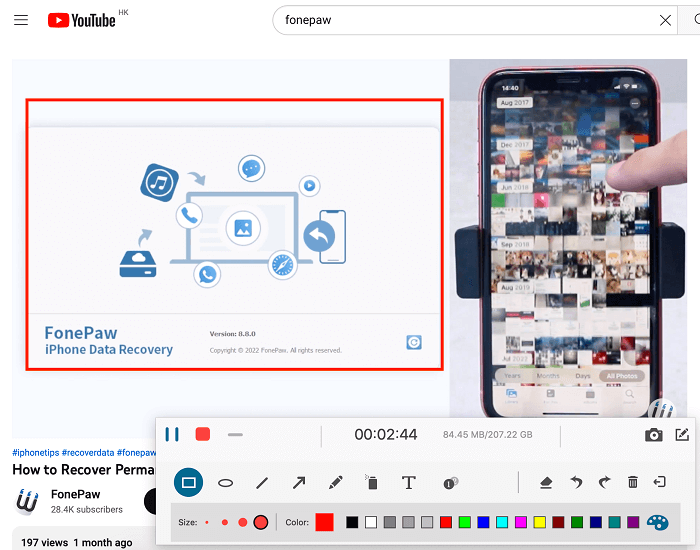
STEP 3. After you have selected the recording area and set up all the recording settings, click the REC button to start recording.
STEP 4. During the recording, you'll see a new toolbar, where you can pause or stop the recording. On the toolbar, you can also click the pen icon to add annotations to your screen.
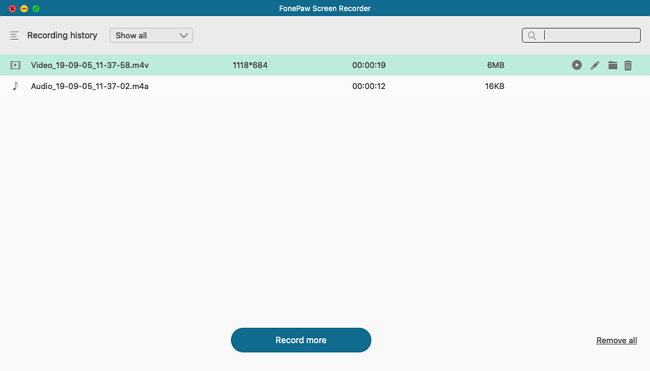
STEP 5. When you stop the recording, the recorded video will be saved in MP4. To access the recorded video, click the button on the top right corner to view the recording history, where you can see and share all recorded screen videos and screenshots.
Method 4. Reduce QuickTime Recordings File Size
QuickTime screen recordings are saved as .mov video files. Given the fact that MOV uses lossless compression, video stream encoded in MOV container is usually larger in size than in many other multimedia formats.
To reduce file size, it is advisable to convert the recorded MOV files to MP4 or compress the QuickTime video to reduce the file size. FonePaw Video Converter Ultimate is capable to handle both the compression and conversion job. If you worry that the video quality will be damaged after compressing or converting, you can also get ease because it’s usually hard to find the difference with naked eye.
Free Download Buy with 20% off
In fact, by converting QuickTime videos to MP4 or compress the video directly, you not only save the storage space of your MacBook but also enable the videos to be easily playable on PC with the Windows system.

FAQs About Reducing File Size When Recording Mac Screen With QuickTime
Q1. How to avoid getting videos with lags and in large size while recording screen on Mac with QuickTime?
To conclude, the direct way is to change the resolution and output quality on QuickTime. But if you don’t want to compromise to the lower video quality, you can also try FonePaw Screen Recorder Mac version as the screen recording tool. Besides, if you’ve got the recorded file, FonePaw Video Converter Ultimate will help you compress it to the smaller size.
Q2. Can I change the output format on QuickTime?
The video format and audio format can only be exported as MOV and AAC (Apple MPEG 4 audio) respectively, but for the video output, you can adjust the video coding to H.264 or H.265. Just choose File > Export As, then choose an option from the Export menu.
Q3. How do you stop QuickTime screen recording?
If you're unfamiliar with QuickTime player, you may wonder how to stop the screen recording of QuickTime. Actually, you can click the Stop button in the Menu bar, force quit the app, or close it in Activity Monitor to cease the recording. Also, if you can't stop QuickTime screen recording because it breaks down, turn to FonePaw Screen Recorder for help.
Above are the four methods that you can try to record Mac screen without lags and in smaller size. You can try to customize your recording settings in QuickTime. Or if you are fretting about the limited features of QuickTime, you can also turn to other useful recording tools like FonePaw Screen Recorder.
