


Video often takes up a lot of room in our devices for its large size, which gradually makes the devices run slowly. We usually choose to delete videos to release some memory, losing them permanently.
However, there's a better way to save our device's memory without deleting videos. Reducing video size is quite helpful. Not only does the video take a much smaller room in this way but also keeps its content effectively. In fact, videos of high quality are unnecessary in most cases. Take sending videos on the internet as an example, the small size of the video can improve the transmission speed.
By transforming the video format or lowing video quality, the storage space gets freed greatly. Methods of reducing video size are shown below. Have a try!
QuickTime Player
QuickTime Player, an extensive multimedia framework developed by Apple, is used to handle various formats of digital video, picture, sound, panoramic images, and interactivity. In QuickTime, you can easily lower the video's file size by transforming its quality.
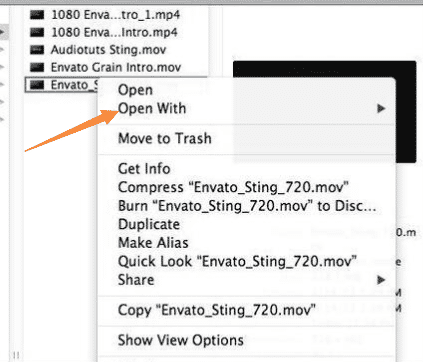
Step 1: Right-click a video.
Step 2: Move the cursor to Open With and select QuickTime Player.
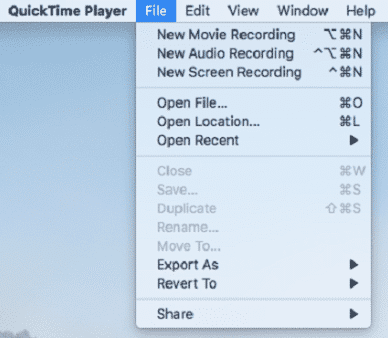
Step 3: In the QuickTime Player interface, click on File in the left-upper corner and click on Export As.
Step 4: Choose a video quality equivalent to or lower than the original quality of the video. Thus, the video size will be reduced.
Step 5: Now the Save window will pop up. Enter a new name for the video.
Step 6: Browse folders to choose a storage location.
Step 7: Click on the Save button. Now the compressing process will start immediately. Wait for a while until the Export window closes automatically. Then you can go to the saved location and open the video.
Video Compressor in FonePaw Video Converter Ultimate
Try QuickTime alternative here. As a multifunctional software, FonePaw Video Converter Ultimate (opens new window) is able to convert, edit, and play videos, DVDs, and audios. Supporting a great many video formats, the software can easily transfer videos to any platform or device. Just with a few simple steps to change the basic parameters, you can get a video with a small memory.
Step 1: Download and install FonePaw Video Converter Ultimate (opens new window) from the link below into your computer.
Free Download Buy with 20% off Free Download Buy with 20% off
Step 2: Launch the program and navigate to Toolbox on the top of the main interface.
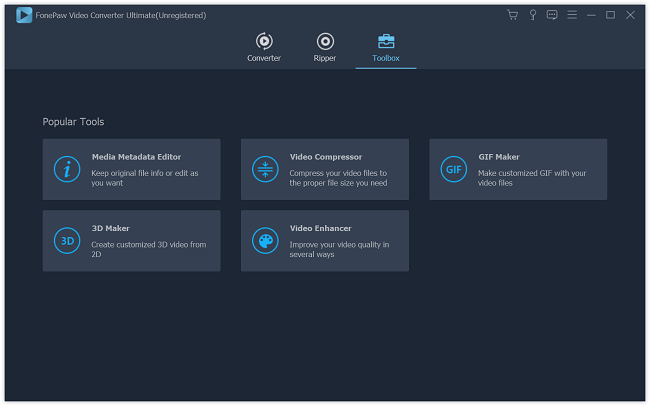
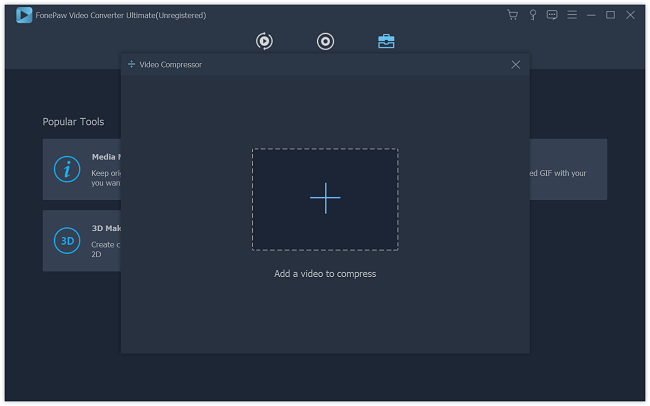
Step 3: In the list of tools, you can see the Video Compressor. Click on it and a window will pop up to ask you to add a video to compress. Click on the plus sign in the middle of the window to add the video. Or you can just simply drag-and-drop the video into the window.
Step 4: In the pop-up setting window, you can change the name, size, format, resolution, bitrate, and storage location of your exported video.
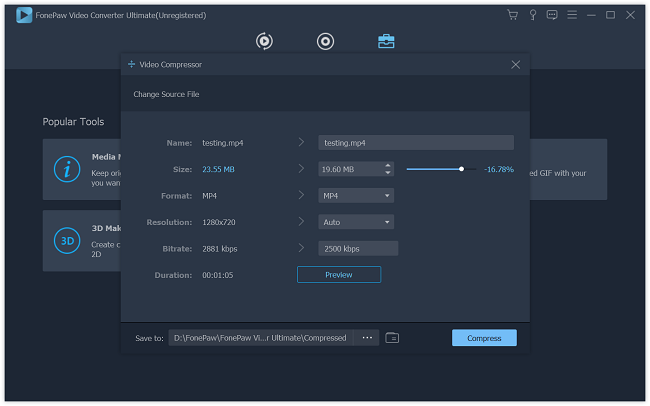
Note: You can have a quick look at the exported video by clicking on the Preview button.
Step 5: Click on the Compress button to start the conversion.
Comparing with QuickTime Player, FonePaw Video Converter Ultimate (opens new window) is more versatile. You can set the exact size, resolution, and even change the format of the compressed video. The most convenient point is that you can preview the video. Thus, if you are not satisfied with the result, you can change the size again before compressing. Just download and have a free trial!
Free Download Buy with 20% off Free Download Buy with 20% off