


Recording audio from computer can be a common task. When you want to record your singing, lecture, or other voiceover for videos with microphone, or record internet radio, online songs, podcasts, etc. from system sound, an audio recorder program is needed. If you are finding a good method to record either or both of the audios from computer, this post is for you.
In this article, we will show you the ways to record audio from computer with 5 popular audio recorder apps, which perfectly work on different platforms including Windows PC and Mac. Also, we will provide you with step-by-step guidance on how to record computer audio with them respectively.
Now, for any of you in need, just read on and choose the best tool to record audio on Max/Windows without hassle.
A Comparison Between Third-Party Audio Recorders and Built-in Tools
You may review this summary table to decide which audio capturing program can meet the best of your needs.
| Record both internal & external sound | Supported output audio formats | Easy to use | Allow editing audio | Free to use | |
| FonePaw Audio Recorder | √ | WMA, MP3, M4A, AAC | √ | √ | √ (Full functions need to be activated after purchase) |
| Audacity | √ | MP3, WAV, OGG | × | √ | √ |
| Windows 10 Voice Recorder | × (External sound only) | M4A | √ | √ | √ |
| QuickTime for Mac | × (External sound only) | AAC | √ | √ | √ |
| Screen Capture (Online) | √ (External sound only) | MP3 | √ | × | √ (But the free recordings will have watermarks) |
Simply comparing among these 5 voice recording apps to record audio from computer:
- Both Windows 10 Voice Recorder and QuickTime for Mac can help you record computer audio with no need to install extra software or pay a penny to get started;
- Other third-party audio recorders, FonePaw Audio Recorder and Audacity allow you to record audio on Mac/Windows in higher quality with more customizations;
- The online screen recorder, Screen Capture, gives you a hassle-free way to record screen and audio across platforms with the most intuitive and quick access.
Now, when you have grasped some basic understanding about these computer audio recorders, it’s time to pick up one for a try! With these helpful tools, you don’t have to hold up a smartphone but simply launch an audio recording app to record the sound coming from your computer. Keep reading and grasp how to record audio on Mac/Windows with ease!
Record Both Computer Sound & Microphone with the Best Desktop Audio Recorder🔥
The first and top recommendation for recording audio from computer is FonePaw Audio Recorder. It is a straightforward recording tool that helps skip all complicated setups and enables you to directly record internal sound on computers and external audio sources. You can conveniently record your microphone sound once it connects to the computer.
Besides, this audio recorder app supports noise cancellation so you don’t have to worry that there will be damage to the audio quality of the recorded sound. It’s also very easy to set up recording audio from internal and external sources respectively or simultaneously, and you can even record screen and audio or even with the webcam turned on at the same time if you want.
Free Download Buy with 20% off Free Download Buy with 20% off
The Windows version also supports a highlight feature—schedule recording, which allows you to end an audio recording automatically at a specific time so that you don't need to be around the computer all the time. When the recording ends, the recorded audio can be saved and converted to MP3, WMA, AAC, and M4A audio files.
More Highlights of FonePaw Audio Recorder:
1. Schedule record audio from computer: The Windows version also supports a highlight feature - schedule recording, which allows you to end an audio recording automatically at a specific time so that you don't need to be around the computer all the time.
2. Mainstream outputs available: This voice recording app also provides multiple mainstream formats such as MP3, WMA, AAC, and M4A to select, enabling the recordings to be well compatible with more devices and media players to stream without any limitation.
3. Streaming audio recorder app: Beyond recording computer sound, this audio recording app can serve as a convenient streaming audio recorder. You can use it to record streaming audio from Internet radio stations, music sites, video platforms (YouTube, Vimeo, etc.), record Skype/VoIP phone calls, and virtually every audio material.
 Tips:
Tips:- As audio recording is just one of the functions in the three-in-one recording software, you can utilize the program to record computer screen with audio, record gameplay, and take screenshots.
How to Record Audio on Computer with FonePaw Audio Recorder
💡This method is applicable to record: internal audio & external audio.
Now, follow this brief guide and grasp the way to record audio from computer via FonePaw Audio Recorder to output the audio recordings with great quality.
STEP 1. Free download FonePaw Audio Recorder and install it on your computer.
Free Download Buy with 20% off Free Download Buy with 20% off
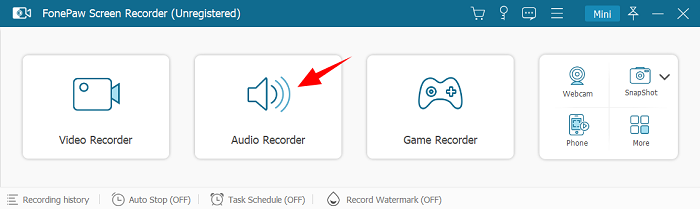
STEP 2. Launch the program and you'll find this intuitive screen recording tool is designed with three sections: Audio Recorder, Video Recorder, and Game Recorder. To record audios on the computer, simply select Audio Recorder.
STEP 3. Turn on System Sound button if you need to record the internal sound from computer. And turn on Microphone button when you need to capture your voice. Toggle on the two buttons if you need both. You may drag the slider to control the volume.
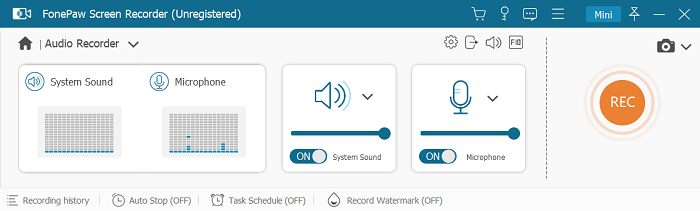
Tips:- If you are going to record the microphone sound, it’s recommended to turn on Microphone noise cancellation and Microphone enhancement to make your voice clearer in the audio output. Besides, it’s suggested to click on the settings icon and do a soundcheck beforehand in Preferences to guarantee a high audio recording quality.
STEP 4. When you are ready, click the REC button to start recording.
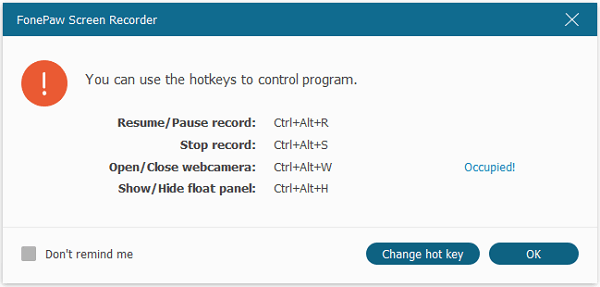
The pop-up prompt window shows that you can also use hotkeys to control. Click Preferences, you can set and change keyboard shortcuts to the ones you like.
STEP 5. During the recording, you can control the audio volume in real-time. To end the recording, click the rectangle icon.
Then just preview, trim (if you need), and save the audio recording to your computer.

Tips:- 1. If You need the recording to end automatically at a specific time, click the clock icon, and enter the expected duration of the recording. When the time is up, the recording process will stop and the program will save the recording automatically.
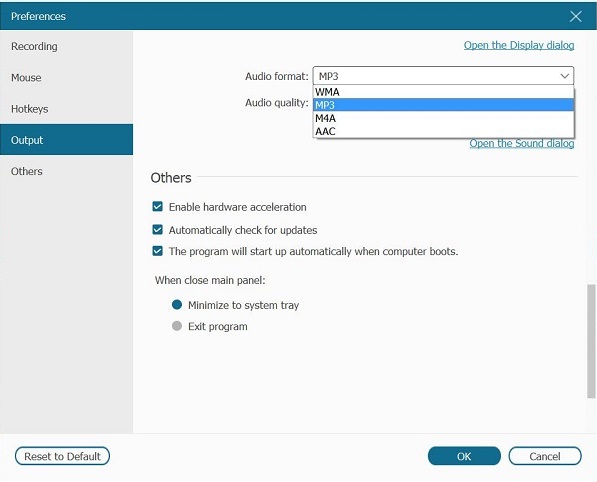
- 2. You can decide on what format the audio file should be saved by going to More Settings> Output > Audio Format.
- 3. If you accidentally quit the recording, you can relaunch the program to save the canceled project.
How to Record Audio on Computer with Audacity (Best to Record Music on Computer)
💡This method is applicable to record: internal audio & external audio.
To record audio on Windows 10, a professional and popular PC audio recorder alternative to FonePaw Audio Recorder is Audacity. It is an open-source and free computer audio recorder on PC that is perfectly compatible with Windows, Mac, and Linux. In addition to audio recording, this lightweight program also comes with options for editing audio. And while recording or editing audio, the sound will appear in waveforms helping you easily notice the noise and edit the unwanted parts.
Compared with FonePaw Audio Recorder, Audacity has the support for processing and mixing multiple soundtracks. Technically, you can record both your computer audio and microphone sound with Audacity. But if you have the need for recording multiple tracks, ensure that you have a sound card that has the ability to have multiple inputs simultaneously available for input.
Disadvantages: The overall interface and functionality of Audacity would be more complicated to grasp. If you are a computer green hand and desire a more intuitive audio recorder app to cope with daily recording tasks, FonePaw Audio Recorder will be your better choice.
Here we’ll offer you the simple guide on how to use Audacity to record audio from computer:
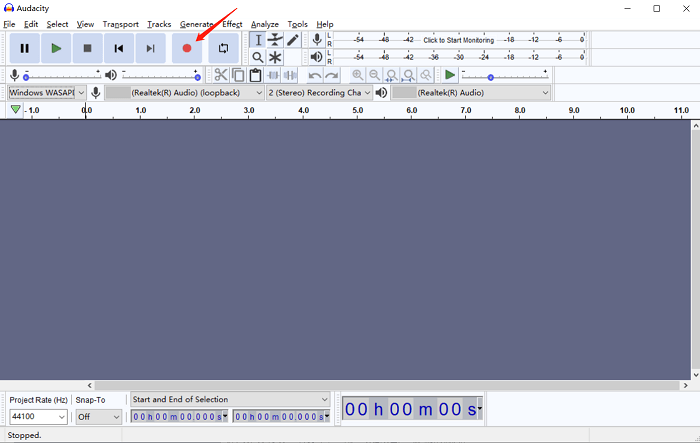
Step 1. Launch Audacity on your computer, and prepare the audio you want to record.
Step 2. Click the red button to start recording.
Step 3. When you finish recording, click the square button. Then, you can export the recorded audio as MP3, WAV, OGG, etc.
Still, you may prefer some solutions that don’t require downloading extra voice recording app. The following parts will show you how to record computer audio on Mac and Windows with some built-in tools.
How to Record Audio on Windows 10 with Stereo Mix (Built-in Recorder)
💡This method is applicable to record: internal audio & external audio.
We all know that Windows 10 computer has a built-in Voice Recorder, and disappointingly, the recorder can only record sound from the microphone. But once you enable the Stereo Mix option on your PC, you can record the sound on your computer system as well as the sound that comes out of your speakers simultaneously.
What is Stereo Mix?
Stereo Mix, also called "What you hear", is the name of the output stream after all channels have been mixed. Sound drivers on your computer probably support Stereo Mix, however, the option is usually disabled by default on most Windows (Windows 10/8/7). By enabling the Stereo Mix option, Voice Recorder can record system sound on your PC through Stereo Mix instead of microphone.
Note:- Some Windows PC may not come with the Stereo Mix option. In this situation, we suggest using third-party audio recording software on PC such as FonePaw Audio Recorder and Audacity mentioned above if you want to record audio from computer with quality guaranteed.
Free Download Buy with 20% off Free Download Buy with 20% off
How to Enable Stereo Mix to Record Computer Audio
Before to record computer audio on PC via Stereo Mix, you are required to set it up first. The following guide will show you the correct way to record audio from computer using this method. Follow and give it a try.
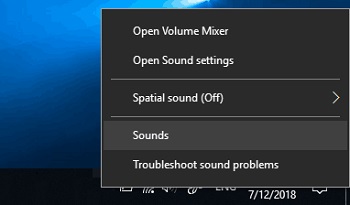
STEP 1. Right-click the audio icon in your system tray and choose Sound from the list to open Sound panel.
STEP 2. Under the Recording tab, right-click Stereo Mix, and click Enable.
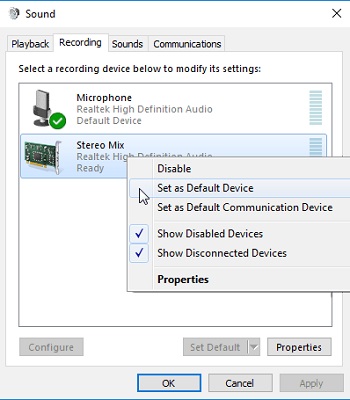
STEP 3. To ensure that your audio recorder uses Stereo Mix instead of Microphone to record computer sound, set Stereo Mix as your default input device.
When you successfully enable Stereo Mix, you can use any audio recorder app, like Audacity we mention above, to record audio from computer through Stereo Mix. Just choose the sound source as Stereo Mix on your recording program, and the system sound & microphone sound will both be recorded.
Tips:- If you don't see the Stereo Mix option, the option could be hidden. Under the recording tab, right-click the blank area and make sure Show Disabled Device and Show Disconnect Device is checked.
How to Record Audio on Computer with Windows 10
💡This method is applicable to record: external audio.
The biggest highlight of the Voice Recorder app on Windows 10 is that you can directly record internal audio on PC without the need to search and test a program. In most situations, Voice Recorder for Windows 10 can serve as a reliable PC sound recorder to capture audio. When recording sound or music, you can add markers to highlight important moments. The built-in voice recorder also gives the option to flexibly pause the process.
Here's how to record audio with Voice Recorder on Windows 10.
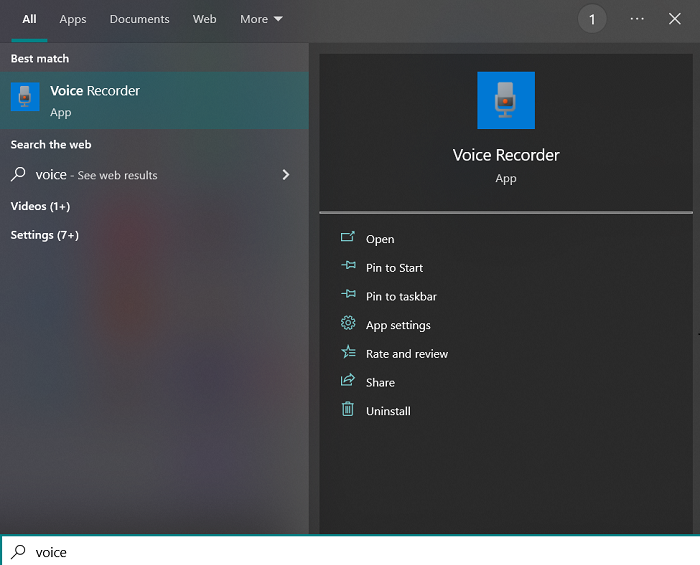
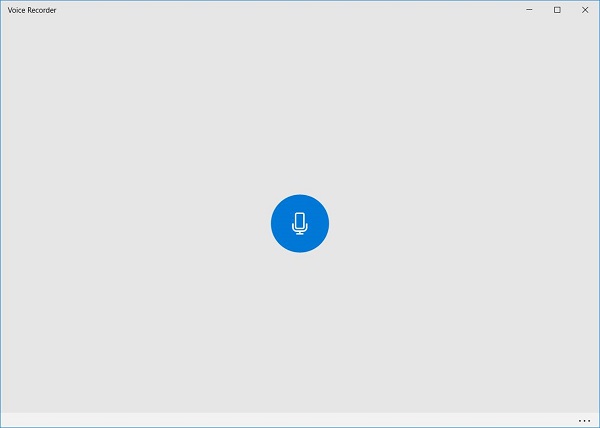
STEP 1. Launch Voice Recorder on your PC. You can right-click the Windows icon and use Search to locate the recorder.
STEP 2. The Windows Voice Recorder is super intuitive and simple-to-use. Just click the mic icon in the middle to start recording the audio that is playing on your computer.
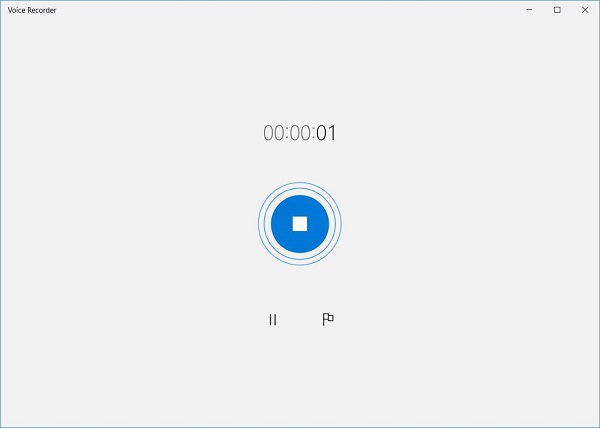
STEP 3. When the audio you need to record stops, click the blue button again to end recording. The recorded audio will be saved as M4A format in your local folder.
Recording Audio on Mac with QuickTime Player
💡This method is applicable to record: external audio.
If you are using a Mac computer, you can also record audio from a Mac computer in a simple way: by using QuickTime Player on Mac OS. As QuickTime Player is a built-in application pre-installed on Mac, you don’t need extra software installation to record audio from on Mac. Now, simply grasp how to record audio on Mac using QuickTime with the steps guided below:
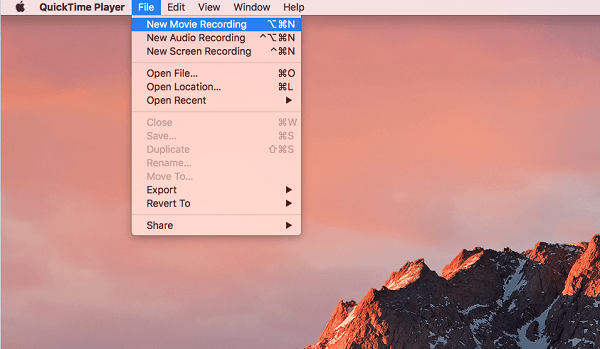
STEP 1. Launch QuickTime Player on your MacBook or iMac.
STEP 2. On the top, click File > New Audio Recording, which will open the audio recording panel.
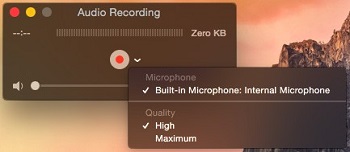
STEP 3. On the audio recording panel, you may adjust volume and audio quality. Click the red Record button to start recording audio on your Mac.
STEP 4. Click the Record button again when you feel like stopping the sound recording.
However, QuickTime Player can only record system audio and streaming audio on your Mac through microphone. To record the sound as it is outputting from your Mac's speaker, you can you can refer to this detailed guide: How to Record Audio on Mac [INTERNAL & EXTERNAL].
Record Audio from PC with Online Computer Audio Recorder
💡This method is applicable to record: internal audio & external audio.
For users who desire a software-free way to record audio from computer, Screen Capture can be an ideal online audio recorder you shall not miss. It doesn’t require installing any extension to process the recording. Simply by opening a browser and go to the recorder, you are able to select a mode and start recording audio right away. It’s intuitive functionality enables everyone to get started very quickly. More importantly, the tool is absolutely free to use!
Disadvantages:
- Unavailable to adjust output parameters like the format or quality as you desire;
- The free recordings will be inserted with watermarks, which would affect the later playback or video editing greatly;
- No audio-only mode offered to capture the sounds only.
Here will guide you through the steps to record audio from computer via Screen Capture online without installing extra audio recorder apps:
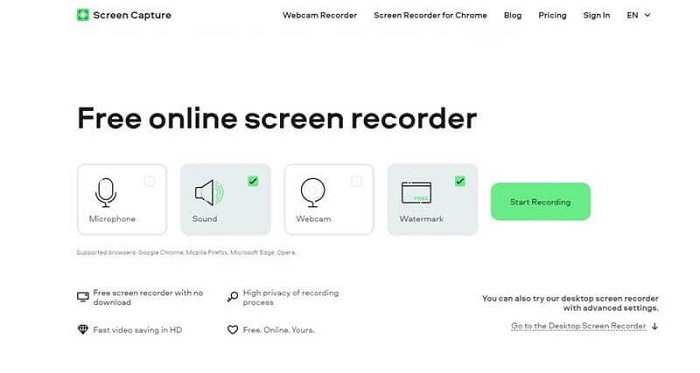
STEP 1. In browser, navigate to Screen Capture.
STEP 2. Select a mode to get started. You are allowed to choose recording microphone, system sound, webcam with the screen based on your requirements.
STEP 3. Simply tap "Start Recording" to process the screen recording on your computer.
STEP 4. Once the recording ends, tap "Stop" and the well-prepared recording will be provided for you to download offline right away.
Conclusion
Altogether 5 useful ways to record audio from computer have been introduced. Basically, both Windows and Mac have built-in audio recorders, but they are only applicable to recording microphone sound. If you want to capture internal sound on computer, you need to enable a certain feature or get help from other apps. For your convenience, it is advisable to use professional audio recorders. Among them, we recommend you to try FonePaw Audio Recorder which can help you record both system sound and microphone sound easily.
