


When you are streaming some interesting audio on YouTube, you may want to share the content with others or back it up, so that you can enjoy it anytime on other portable devices. What you need to do is to record the audio from YouTube and you could stream them anywhere and anytime. In this article, we will give you a full tutorial on how to record audio on Windows 10 in 3 easy methods. Now let's get started!
Record Audio on Windows 10 with Microsoft Voice Recorder
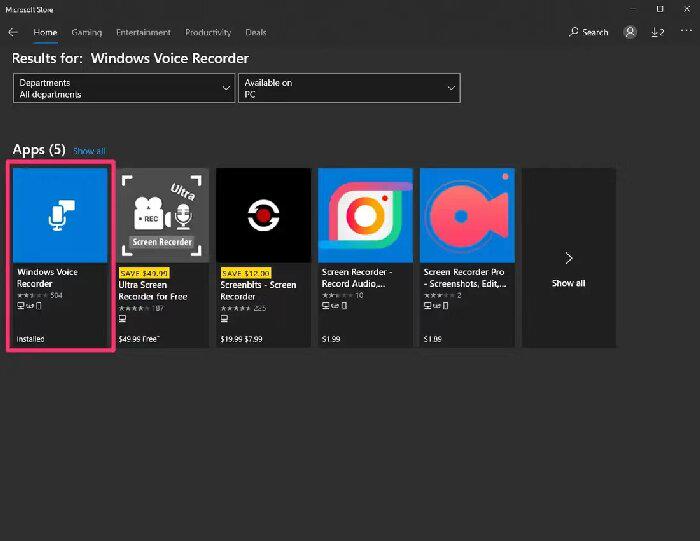
If you want to record the audio on Windows 10 without installing any third-party audio recorder software, Microsoft Voice Recorder is the one you need. It's a free built-in tool on your computer and you can find it from the start menu. If you can't find it, you still need to get it installed from the Microsoft Store. By virtue of Microsoft Voice Recorder, you can easily share your recordings with friends and family, or send recordings to other apps. Here's how:
Step 1. Run the Microsoft Store application. Click the “Search” icon on the upper right corner and type in Microsoft Voice Recorder, then press “Enter” on your keyboard to confirm your operation.
Step 2. Find the right program and click “Get” to download “Microsoft Voice Recorder”.
Step 3. Launch the application, and then click the “Record” icon to begin recording audio.
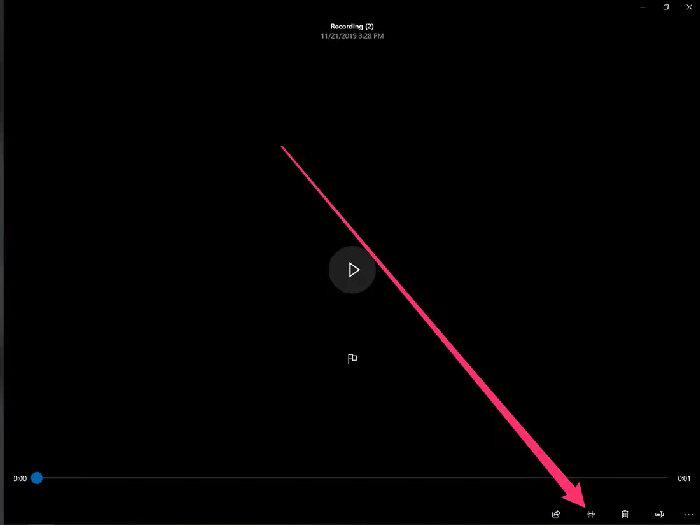
Step 4. When you're done, click the “Stop” icon and a new window will appear showing the audio recordings that are available.
Optional Step. If you want to trim the audio, you can click “Trim” icon between the “Share” and “Delete” icon on the bottom right side corner of the screen. Drag the start and end bars until you've edited the audio.
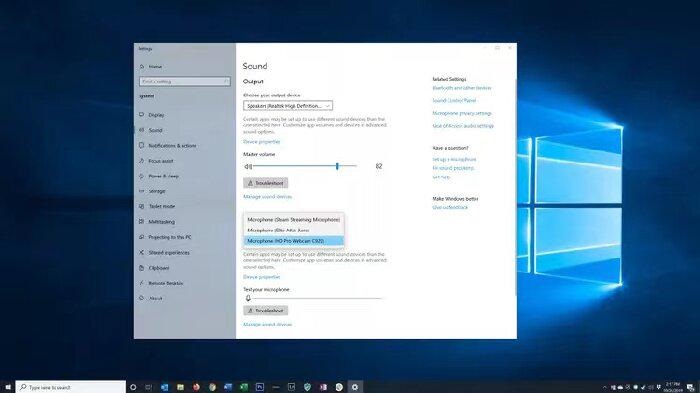
If you want to record your sound with the system audio, make sure you've connected a microphone to your computer and set it as the default recording device.
 Note:
Note:
- 1. Boot up your Windows 10 PC, select the “Start” menu, and then select “Settings”.
- 2. Type “Sound” in the Windows Settings search box and open the interface.
- 3. Find the “Input” section, and select your microphone as the input device in the drop-down menu.
Record Audio on Windows 10 with Free Professional Recorder
If you are not willing to perform such complex settings with Microsoft Voice Recorder, there is a professional and straightforward recording tool named FonePaw Audio Recorder. This recorder is able to record internal sound on computers and external audio sources from your microphone. It supports saving recorded audio to MP3 and other common formats in high quality. If you prefer lossless sounds, choose FLAC or WAV.
Free Download Buy with 20% off Free Download Buy with 20% off
Features of FonePaw Audio Recorder
- High output quality: Record audio in original quality without lag.
- Multiple output format: Save audio to MP3, M4A, AAC, FLAC, WAV, WMA, etc.
- Custom & Preference settings: Support to customize the recorded contents flexibly, including selecting recording areas or windows on your computer, customizing the hotkeys, choosing whether the mouse will be captured, and so on.
- Record video, audio & webcam: Record screen with internal and external audio automatically or separately. What's more, it supports recording screens and webcams together.
- Applicable to multiple scenarios: Record your screen under any scenario, including tutorials, meetings, phone calls, business presentations, etc.
- Intelligent recording clock: Smart clock is available to automatically start and stop recording at a specified time. You don't need to be around the computer all the time.
Here's how to record audio on Windows 10 using the professional recorder:
Video Tutorial
Step 1. Download & Install FonePaw Audio Recorder
Download FonePaw Audio Recorder by clicking the button below and install it on your computer.
Free Download Buy with 20% off Free Download Buy with 20% off
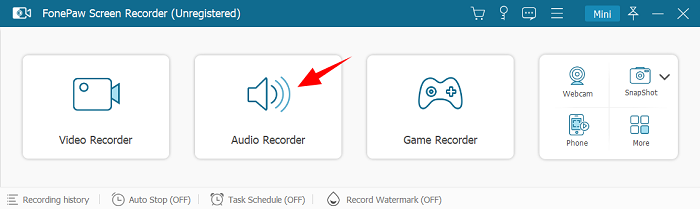
Step 2. Launch Audio Recorder
Launch the software, and you will find three sections (Video Recorder, Audio Recorder, and Game Recorder) on the interface. Click “Audio Recorder” to continue.
Step 3. Turn on System Sound & Microphone
Turn on “System sound” button to record the internal sound from the computer, and turn on “Microphone” button to capture your voice (if you want). You could drag the slider to control the volume.
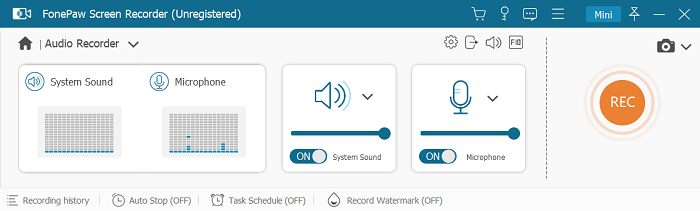
Tips:
- 1. It's recommended to turn on “Microsoft noise cancellation” to keep the audio output quality and turn on “Microsoft enhancement” to make your voice clearer in the audio output.
- 2. The default audio output format is MP3. If you wish to record audio to other formats, you need to hit the gear icon and change it.
Step 4. Start Recording
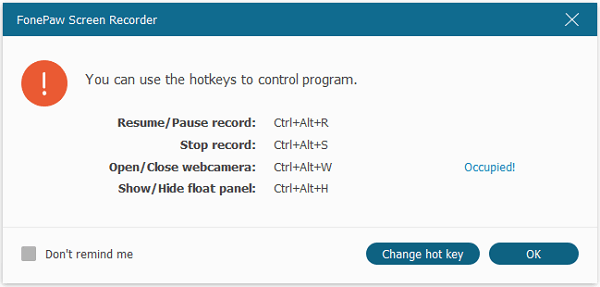
When you get ready, click the “REC” button to start recording. If you want to end the recording, click the “rectangle” icon. The pop-up window shows that you can also use hotkeys to control the program (You can set and change hotkeys on “Preference” settings page).
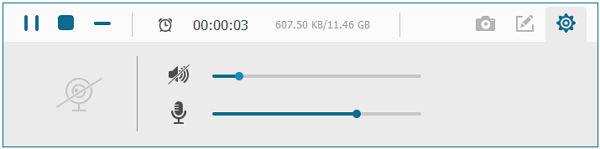
Step 5. More Operations on Recorded Audios
Then just preview, trim, and save the recordings to your computer.
Tip:
- You can set a specific time to automatically stop the recording by clicking “clock” icon. When the time is up, the recordings will stop and the program will save the recording automatically.
Record Audio on Windows 10 with Open-Source Sound Recorder
Besides Microsoft Voice Recorder and FonePaw Audio Recorder, there are also many third-party audio recording programs for Windows, Audacity is one of them that's totally free and open source. It is an easy-to-use, multi-track audio editor and recorder for Windows, macOS, GNU/Linux, and other operating systems.
Step 1. Download and install Audacity on your computer, then launch it.
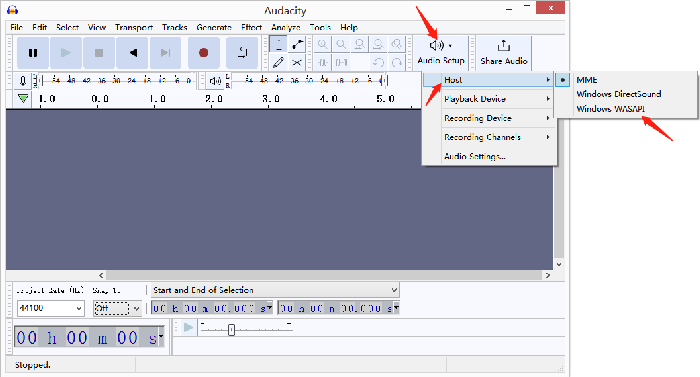
Step 2. Select the “Audio Setup” on the right of the toolbar, and then choose “Host” > “Windows WASAPI”, which allows Audacity to capture audio from other applications.
Step 3. Go to “Audio Setup” again and choose “Recording Device”, then select the speakers or headphones you're currently using to hear audio on the computer. This ensures the audio being captured is the only audio you can hear coming from the computer.
Step 4. When you get ready, select the “Record” icon in the Audacity toolbar to start the recording. When you're done, select the “Stop” icon to end the recording.
Step 5. Select the “Play” icon to check the recorded audio.
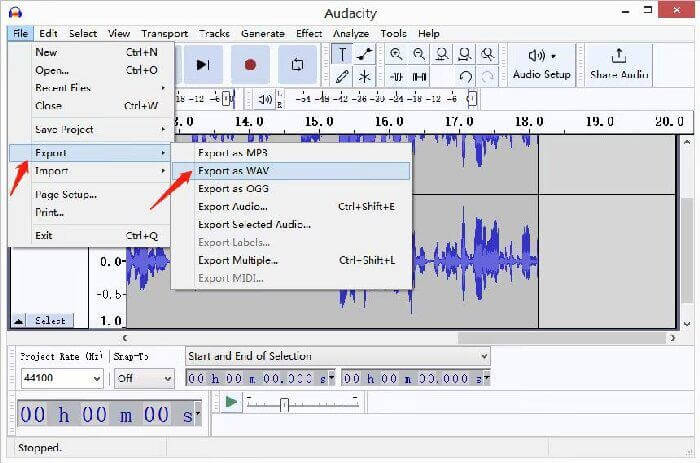
Step 6. Then you can save the audio by selecting “File” > “Export” > “Export as WAV”.
Conclusion
As mentioned above, you can record audios by using these three recording tools. They can all be used on Windows 10, but the settings of Microsoft Video Recorder are complicated by contrast with the other two. Audacity is free of charge and open source, which is widely used by creative professionals. As for FonePaw Audio Recorder, it has a user-friendly and intuitive interface, and it takes only 4 easy steps to get started. Thus, it is applicable to anyone even beginners.
