


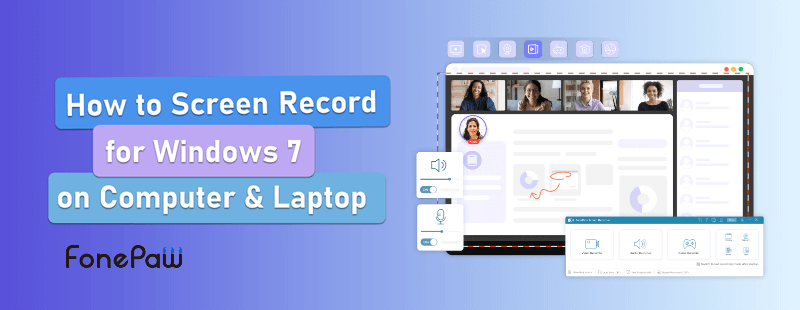
This post will guide you 3 ways to screen record on Windows 7. It's recommended to use FonePaw Screen Recorder, a powerful and trustworthy recorder to record screens in 1080p quality with audio.
Free Download Buy with 20% off Free Download Buy with 20% off
I'm sure many of you are still using the classic Windows 7 or Windows 8/8.1 like me. With the continuously increasing demand for screen recording, many types of screen recording tools have been launched these days. However, it is hard to find the ones that are compatible with Windows 7 computers or laptops.
But don't worry! Although you can not directly record the screen with a hotkey (press down Windows +G) like on Windows 10, there are 4 workable methods introduced in this post that can help you easily screen record on Windows 7. Now, let's dive in!
Method 1. Screen Record on Windows 7 Using a Screen Recorder
To record screens on Windows 7, there is no more convenient way than to use professional screen recording software directly. In this case, FonePaw Screen Recorder, an industry-leading screen recorder for Windows 7 32-bit and 64-bit computer, is strongly recommended to you.
Free Download Buy with 20% off Free Download Buy with 20% off
As an all-purpose desktop recorder, FonePaw Screen Recorder can be applied in various scenarios. Not only can it record screen, audio, and webcam on Windows 11/10/8.1/8/7, but it also specializes in gameplay recording. Meanwhile, not only are basic recording functions available in this comprehensive tool, advanced features, such as recording area customization, noise cancellation, real-time annotations, and trimming tools, are also handy to use to export audio-visual images flawlessly and entertainingly.
Not just that, many features can make it easy for you to record video on Windows 7, for example:
- Record screen, sound, and webcam on HP, Lenovo, Samsung, ASUS, etc.
- Customize recording and output parameters in 1080p and 60 fps
- Support various output formats, including MP4, MOV, AVI, F4V, MP3, WMA, AAC, etc.
- Add real-time annotations (text, arrow, or graphic) and make snapshots during the recording
- Export videos without lags and watermark
- Allow you to schedule tasks that can begin and stop the recording automatically
- Enable hardware acceleration to record screen more smoothly
- Customize hotkeys to control screen recording with ease
- Share videos to social media in one click
With these noticeable features, FonePaw Screen Recorder only requires simple steps to record the screen on Windows 7 with sound. Now you can walk through the tutorials below to start Windows 7 recording.
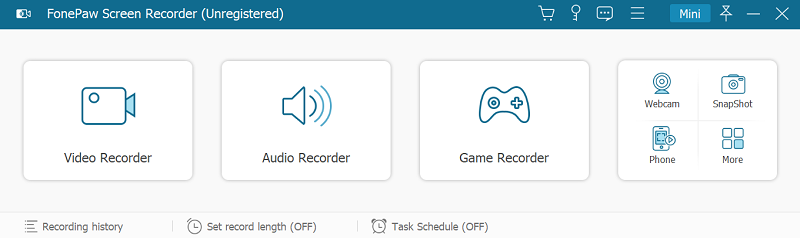
Step 1. Install and Launch FonePaw
Download and install FonePaw Screen Recorder on your computer. Launch FonePaw and click on Video Recorder for screen record.
Free Download Buy with 20% off Free Download Buy with 20% off
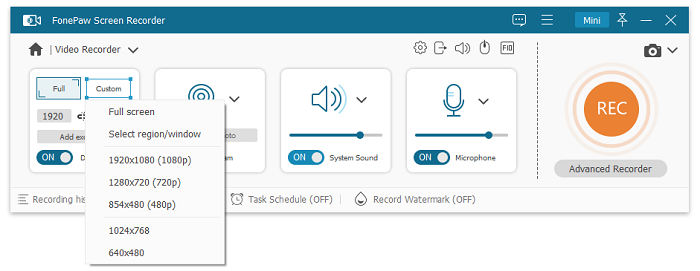
Step 2. Customize Recording Settings
Based on your needs, select the recording area, and adjust the webcam, microphone sound, or system sound.
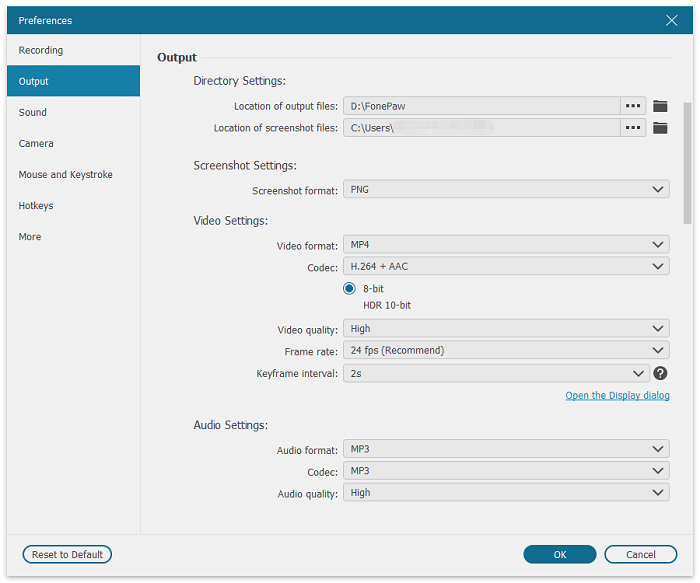
Step 3. Customize Output Settings
Head to the gear icon > Preferences. Click on Output/Sound/Camera to customize the parameters, such as Video Format, Audio Format, Noise Cancellation, and Resolution of the Camera.
Step 4. Start a Video Recording
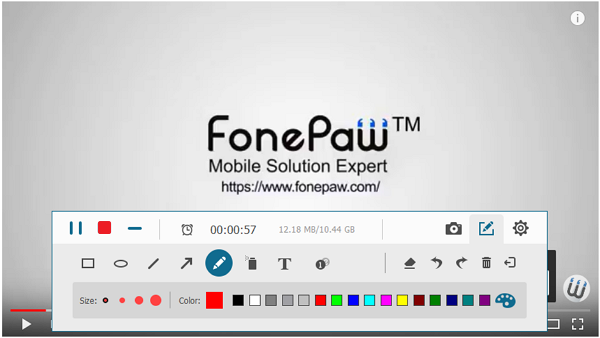
Click on the red REC button to start recording on Windows 7. During the recording, click on the toolbox icon on the control dock to add annotations (shapes, lines, texts, images, step icons, and mouse effects,) to your videos, or click on the camera icon to make a screenshot.
You can also schedule your recording by clicking the clock icon and entering the duration of the screen recording.
Step 5. Stop the Video Recording
To stop the recording, press the red square icon. Then, you can preview, edit, and save the video on Windows 7. You can also upload it to YouTube, Vimeo, and Twitch.

Method 2. Screen Record on Windows 7 Using Microsoft PowerPoint
If you do not want to install third-party software to record screen, some Windows 7 built-in tools can save your effort and be capable of recording screen free. One of them is PowerPoint.
PowerPoint, a frequently-used productivity application, can do you a great favor when it comes to screen record on Windows 7. It can not only record on Windows 7 with audio, but it can also allow you to save the recording as a separate video file. Here is how to record the screen on Windows 7 with PowerPoint.
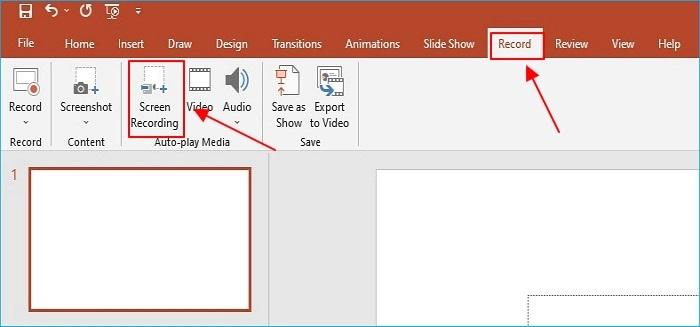
Step 1. Launch PowerPoint, and create a new slide. Then head to the Record tab and click Screen Recording.
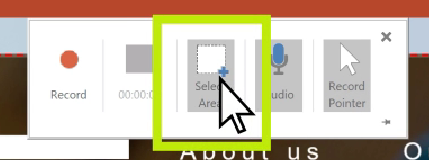
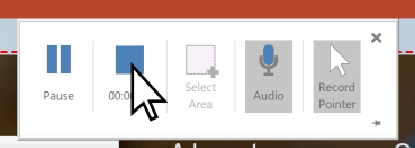
Step 2. Now you can see a screen recording dock appear. To proceed with recording, you need to click Select Area to customize a specific region that you want to record.
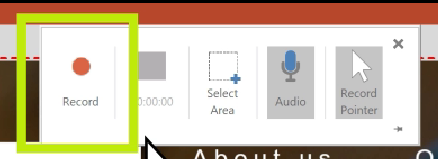
Step 3. Once you are ready, click on the Record button to start capturing your screen on Windows 7. During recording, you can do some annotations.
Step 4. When you want to finish the recording, you can click on the Stop icon. The recording will be saved and embedded on the slide you created.
Step 5. To save the recording videos, you need to right-click on the video frame and select Save Media as.
Method 3. Screen Record on Windows 7 Using Problem Steps Recorder
Problem Steps Recorder is another helpful embedded tool on Windows 7. It is not a video capture tool in the usual sense, but it can indeed record your activities, especially every step happening on your computer. It is often used to record problems that occur during the use of a computer or to show how to use a program or software step by step. The detailed process is as follows:
Step 1. To find Problem Steps Recorder: Start button > Accessories > Problem Steps Recorder
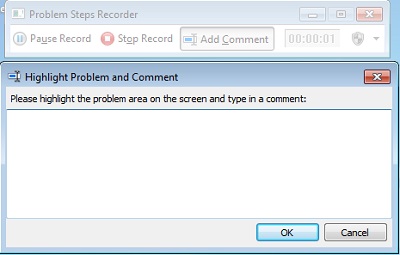
Step 2. The Problem Steps Recorder window will show up. Click Start Record to begin the recording on Windows 7.

Step 3. Go through all the steps you want to record. When recording, you can select Add Comment. Just use your mouse to select the part of the screen that you want to comment on, type your comment, and then confirm it.
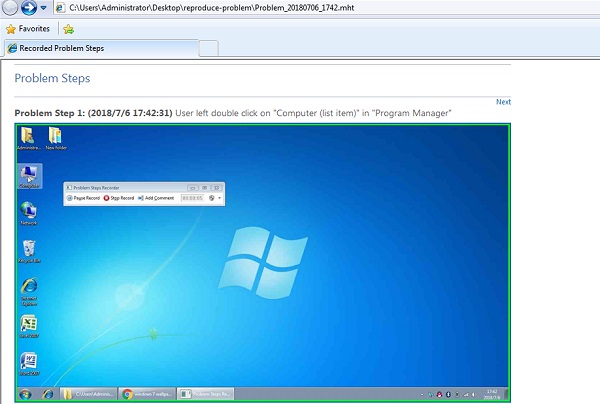
Step 4. When you are done, click Stop Record. The recording will be saved as an HTML file by default, which can only be viewed by web browsers. You can save the recording as a .zip file by changing the type manually.
Problem Steps Recorder can only record up to 100 steps in one file. If you want to record more, you have to start another recording.
Method 4. Screen Record on Windows 7 Using Online Recorder
If you find the built-in screen record tools unable to satisfy your needs, another viable option is to get support from online tools. Generally, they are easy to use, and work on mainstream web browsers, like Chrome and Firefox. But it is worth mentioning that since the image and sound quality can be easily affected by the network connection, you'd better make sure you are under a good connection before starting recording.
Among the online tools on the market, Screen Capture is one of the outstanding applications. This lightweight tool enables you to screen record on Windows 7/8 desktop, to capture webcam, system sound, and microphone sound. Most importantly, you can record screen free with it, though the watermark will be on the video.
Here are the instructions to screen record with Screen Capture.
Step 1. Enter the Screen Capture Website. Select the recording options (system sound, microphone sound, webcam), and then click on Start Recording.
Step 2. Select the recording area (Tap, Windows, Entire Screen).
Step 3. When you want to stop, click on Stop Recording. The page will navigate to a preview page. You can save the recording by clicking on Download.

FAQs About Screen Recording on Windows 7
Can I screen record on Windows 7 with VLC?
Yes, you can record screen and sound with VLC on Windows 7.
However, VLC is not a screen recorder, but a media player, leading to recording errors occurring from time to time:
- Cannot capture the mouse cursor
- Fail to record video and audio at the same time
What shortcut key can be used to record on Windows 7?
As Windows 7 does not support the Xbox Game Bar, there is no hotkey accessible. If you want to have a quick start with Problem Steps Recorder or Powerpoint, it's advisable to create a shortcut icon on the desktop. For those who want to efficiently record screen on Windows 7, you can gain great benefits from third-party software, such as FonePaw Screen Recorder, OBS Studio, and VLC.
Conclusion
To wrap up, 4 workable ways to record screens on Windows 7 have been introduced to you. In comparison, PowerPoint and Problem Steps Recorder are the most accessible, but too basic and rough to finish some complicated recordings on Windows 7.
By contrast, FonePaw Screen Recorder can complete the most diverse recording tasks with the simplest design and operation, and easily save 1080p videos with sound. If you are looking for a screen recording tool that is not only able to accomplish basic tasks but also fits most scenarios completed on Windows 7, FonePaw is a reliable and powerful helper. So why don't you try it now?
