


VLC is a popular media player for a range of video and audio formats. It functions mainly as a multimedia player, but it also has a screen capture feature. The VLC media player enables users to record desktop activities as well as YouTube live-streaming videos.
This full guide will show you how to record local videos, record YouTube live streams, and record part of the video with the VLC media player. You may want to check out the post and follow the tutorials below. Now, let's dive in.

How to Record Video with VLC Media Player
You may know that VLC Media Player works for video playback , but not yet realize the screen record feature. That's because the capture function is off by default. In this section, you will find out how to enable this function and use VLC to record video.
Part 1. Enable VLC Record Button
In the first place, you should download and install the VLC media player from its official site on your Windows or Mac computers. Then walk through the simple steps below to enable the VLC record button.
- Launch VLC on your Windows/Mac.
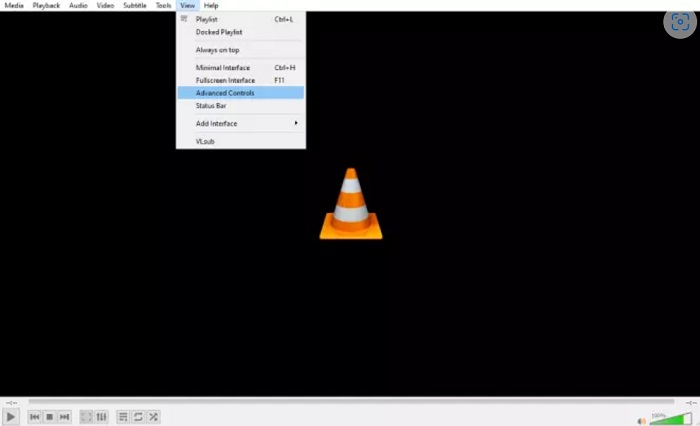
- Open View menu.
- Click on Advanced Controls.
- The VLC record button is successfully enabled.
Part 2. Start VLC Recording
Recording screen with VLC can be a breeze. Before getting started, make sure you have enabled the record button. If you did, follow the steps below to capture the video from your desktop.
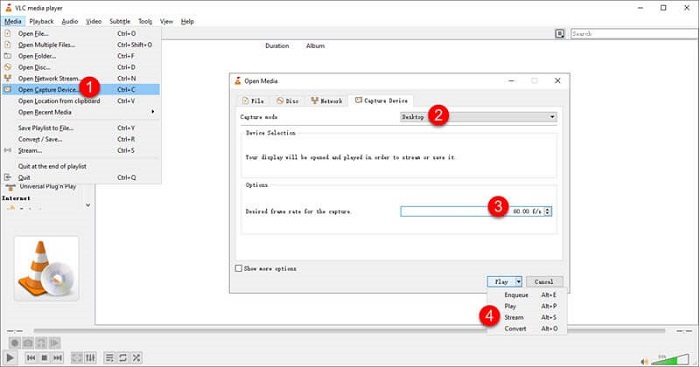
- Navigate to Media/File > Open Capture Device
- Select the Capture Device tab at the top.
- Click on Capture mode dropdown and choose Desktop. And set a Desired frame rate for capture.
- Click on Convert/Save at the bottom right.
- Click on Profile dropdown to choose your output preferences.
- Browse a destination for your output file and name the file. Click Save to confirm your choice.
- Click on Start to start recording video with audio.
- To stop recording, click the Square button on the VLC interface. Then go to the destination folder to view your recording.
Failed to Get VLC Record Screen with Audio? Try the Best VLC Alternative!
You can easily capture screen and record microphone audio with VLC. However, VLC is unable to record the system sound. It is inconvenient for someone who would like to record a meeting, a lecture, or a live performance. Also, you can not customize settings, since the VLC media player only provides users with basic recording features. Therefore, if you want to have a full recording experience and access more features to meet your needs, it is advisable to use a professional screen recorder.
FonePaw Screen Recorder is one of the top-tier screen recording software on the market. It runs smoothly on Windows 7/8/10/11 and macOS 10.12 or later. The program enables users to record an on-screen video with system sound and microphone sound. Moreover, you can customize parameters to your preferences, including showing mouse cursor, enhancing voice, choosing output formats, etc. What else can FonePaw do? Let's check it out.
Free Download Buy with 20% off Free Download Buy with 20% off
- Customize Recording Settings: Screen (full screen, customized area, specific window), webcam, system sound, and microphone can be easily captured with FonePaw. Other options like noise cancellation, voice enhancement, and output formats are also available to record the screen as you expect.
- Export Recordings in High Quality: FonePaw Screen Recorder enables users to save recordings up to the lossless quality of videos in MP4, MOV, WMV, FAV, and WebM with no watermark.
- Powerful Tool Packs: During the recording, you can easily add real-time annotations on screen, such as texts, step icons, images, mouse effects. You can also edit, crop, compress, convert, or merge the recording, when the recording is done.
- Intuitive Interface: Fonepaw provides rich and helpful features in one simple tool. With straightforward instructions, you can effortlessly record interactive and entertaining videos with sound within a few clicks.
FonePaw Screen Recorder comes with an easy-to-go interface. It takes only 3 steps to record a video from your Windows and Mac. Let's look up the tutorial as follows.
Step 1. Download and install the FonePaw Screen Recorder
Free Download Buy with 20% off Free Download Buy with 20% off
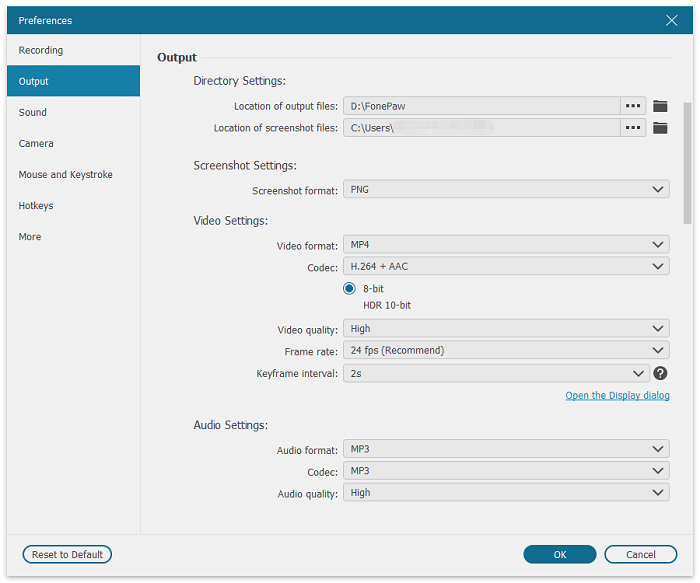
Step 2. Set up Video Output
Go to the gear icon > Preferences. Click on the tabs on the left to customize settings, like Video format, Codec, Video quality, Frame rate, and more.
Step 3. Record a Video
Select Video Recorder from the homepage. Then choose the recording area, and toggle on Webcam/System Sound/Microphone according to your needs. Once ready, click REC to start recording.
 Note
Note
Step 4. Finish Recording
To stop recording, click the red square icon. Then, you can preview, trim, and save your recording to your computer.
How to Record Streaming Video with VLC Media Player
Apart from screen recording, VLC also supports recording network streaming. If you are a YouTuber or Twitch Streamer, you can gain great benefits from this feature. Recording live streams with VLC can make it easy for you to accomplish offline viewing or further editing. Let's scroll down to see how to make it happen.
- Launch VLC. Open View menu, then click Advanced Controls
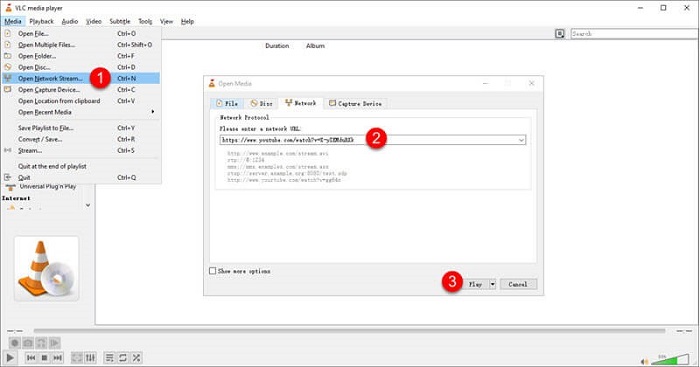
- Navigate to Media/File > Open Network Stream.
- Copy the link to YouTube Live Stream and paste it into the bar.
- Click Play and the Live video will be playing on the VLC media player.
- Go to the recording toolbar and hit the Record button. When the video ends, click the Square button to stop recording YouTube Live Stream with VLC.
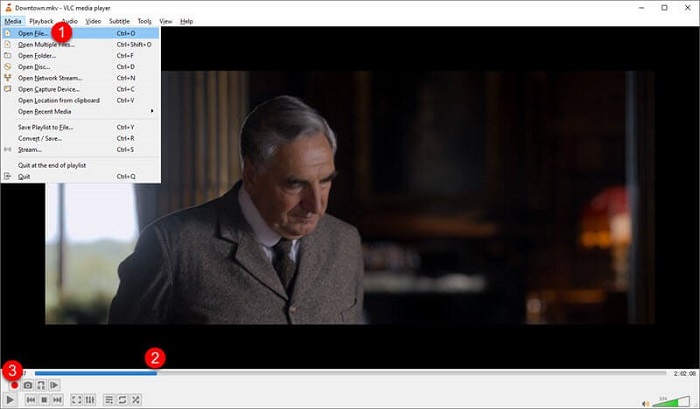
How to Record Part of Video with VLC Media Player
As we all know, a long video takes up large storage on your computer and it's hard to locate your favorite parts of the video. In this case, you can consider cutting out clips of the local video using the VLC media player. The screen recording feature also enables users to play videos stored on the computer and capture video clips with ease. Let's see how to do it with the VLC media player.
- Go to the View tab and choose Advanced Controls.
- Navigate to Media/File > Open File. Play the video you want to clip.
- Drag the process bar to where you want to start cutting the video and click the Record button to start recording the playback.
- Let the video go on to where you want to stop or use the Frame by Frame button to get a precise location.
- When the video clip is done, click the Square button to stop the process.
FAQs about Recording Video Using VLC
Where Can You Find the VLC Record Location?
If you have changed the output path, recordings created by the VLC media player will be saved to that location. To find out the location, go to Tools > Preferences > Input/Codes. You will see the location in Record directory or filename.
If you didn't set a destination folder, your recordings will be saved:
- Windows: C:\Users\[your username]\Videos
- Mac: Press the cmd key and the space bar together, and enter Movies into the search bar. Then you can see the recordings in the Movies folder.
How Long Can VLC Record For?
There is no time limit for recording on the VLC media player. Users can literally use VLC to record a video for as long as they want only if there is enough space on the desktop/laptop. However, long videos always take up large storage on the device, and it's not recommended to record a video with VLC for long.
Conclusion
The VLC media player stands out as a popular multimedia player, though it comes with a limited recording feature. If you just want to record a video with no sound, it's totally okay to try out VLC. However, if you need to record a video with extra annotations,FonePaw Screen Recorder can easily help you out with a range of professional built-in tools.
