


When it comes to recording a webcam, few people think about the VLC player because it's a cross-platform media player that primarily plays video and music. VLC has multiple recording capabilities that allow you to record your desktop, audio and webcam. If you want to record webcam for free, you can use VLC to record webcam easily. As long as the record button is enabled in VLC, you can effortlessly record your webcam on Windows or Mac. In this article, we bring you an easy tutorial on using VLC to record webcam.
Record Webcam with VLC Media Player on Windows 10
Before you start, visit the official site, VideoLAN to download VLC Media Player and install it on your computer. If you don't understand how to launch the webcam recording, please keep reading the user guide below. With just a few steps, you can capture whatever you want and play it on a VLC player.
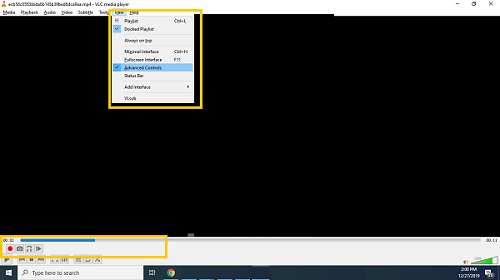
Step 1. Enable Recording Option
Before recording your webcam with VLC, please go to the toolbar at the top and select "View" and click "Advanced Controls". After that, you will see an additional toolbar with recording options in the bottom left corner of the tool.
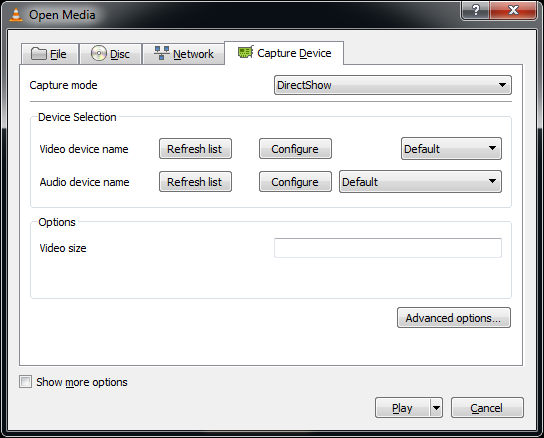
Step 2. Set Capture Mode
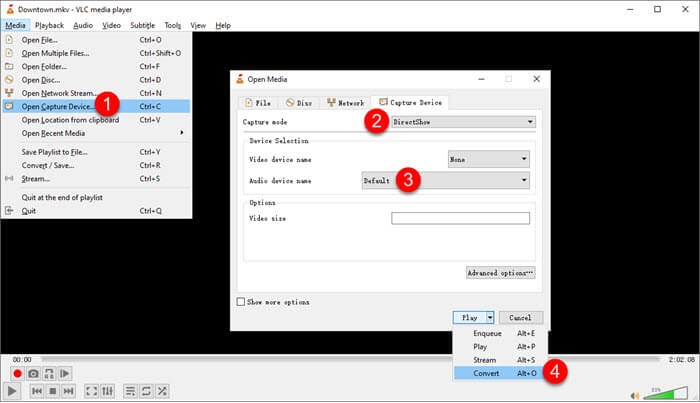
Next, go to the Media menu at the top and click "Open Capture Device" (CTRL+C). Set "DirectShow" in the capture mode, then choose HD WebCam in video device name. For audio, set it to default works as well.
 Tips:
Tips:
- Customizing the video size is optional. And if you want to set the specific frame rate, try to click "Advanced options" and make it 30 fp.
Step 3. Set up Stream Output
When you have set your capture device, click the ▼ icon beside the Play and switch it to "Stream”, then hit “next” to reach “Stream Output”.
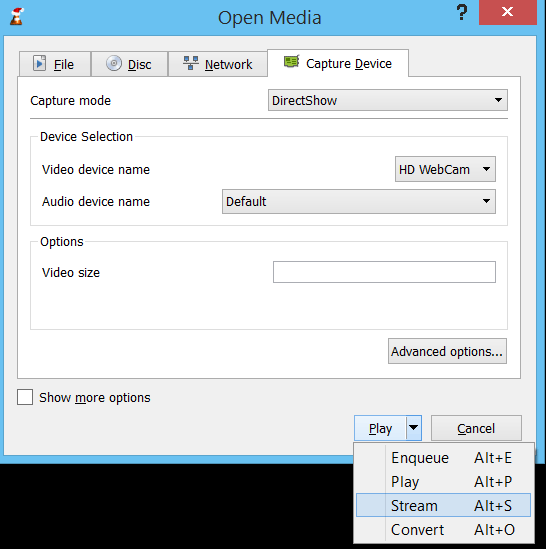
If you are at a different destination, hit Add and give the container a file name and extension. Click Save to make sure “File” is available.

Step 4. Start to Record
If you have completed the steps above, choose a video profile and click the "Stream" button to start recording the webcam. When you see yourself in the main VLC window, hit the red record button on the toolbar to make sure it's working.

Tips:
- VLC only records the sound from the microphone. For better audio quality, wear headphones or install your own audio equipment if you need to record your voice.
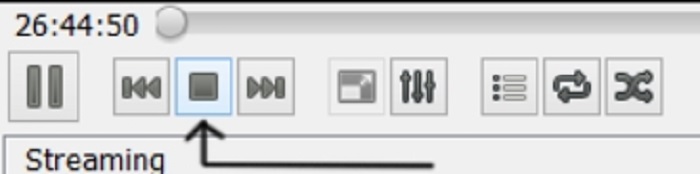
Step 5. Finish the Record
Once you finish the recording, you need to click the "Stop" button in the bottom toolbar. Then save your webcam recording to the computer file where you set it up.
Record Webcam with VLC Media Player on Mac
As we mentioned above, VLC is a cross-platform application for webcam recording tools with additional settings. You can install it if you need to use it on your iMac. The steps to record webcam on Mac with VLC are listed below:
Step 1. Download the VLC media player from the website and open it on your Mac.
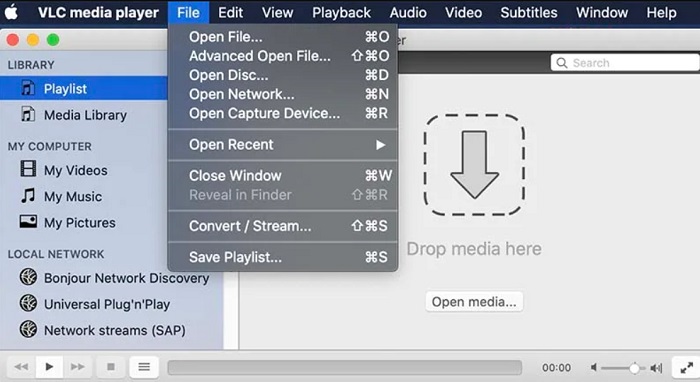
Step 2. Move the File in the top menu bar. Click on “Open Capture Device” from the file menu options.
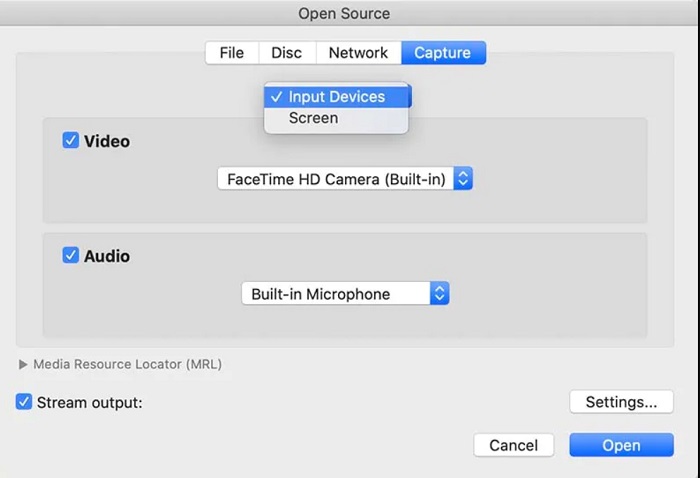
Step 3. Put ticks on the input devices. And opt for the selection of video and audio or leave it as the default.
Tips:
- For more advanced audio and video settings, you can click the "Settings" button on the lower-left side.
Step 4. Choose the destination folder in which you want to save the recorded file. You can also modify the output webcam recording format and location in Settings.
Step 5. After setting up the video and audio options, you will be referred to the Open-source window. Then click on the Open button to launch a webcam recording on your Mac.
Record Webcam Multifunctionally via a Third-party Tool
Although VLC media player records webcams effectively, its recording function is sometimes too simple to meet all of your needs. For example, if you want to edit the recording to remove the unnecessary screen or record desktop and webcam simultaneously, the VLC player will let you down. In this case, look no further than the versatile all-in-one webcam recording application, FonePaw Screen Recorder.
You can record the system sound and microphone at the same time. It also has the function to test whether the sound is recorded clearly and do a scheduled recording to start the recording automatically. In addition, FonePaw Screen Recorder also records webcams without watermarks by default. You can record the screen while recording the webcam.
The Highlights of FonePaw Screen Recorder
😊 Offer video editing capability after recording webcam
😊 Easier process in video modification (trim, compress, merge, etc.)
😊 Record any audio and webcam on-screen
😊 Screen activity for any scenario available
😊 Real-time annotation & auto-stop recording
Free Download Buy with 20% off Free Download Buy with 20% off
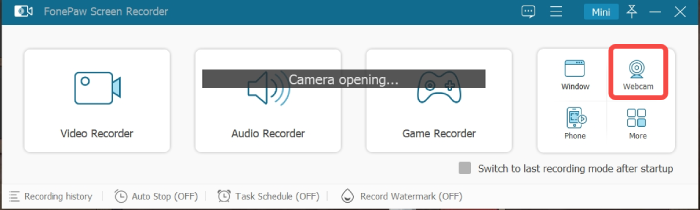
Step 1. Set up Recording Mode
When you finish downloading and launch the software, you will see different recording modes: video, audio, and game recorder, etc. Click the “Webcam Recorder” and enable the webcam camera.
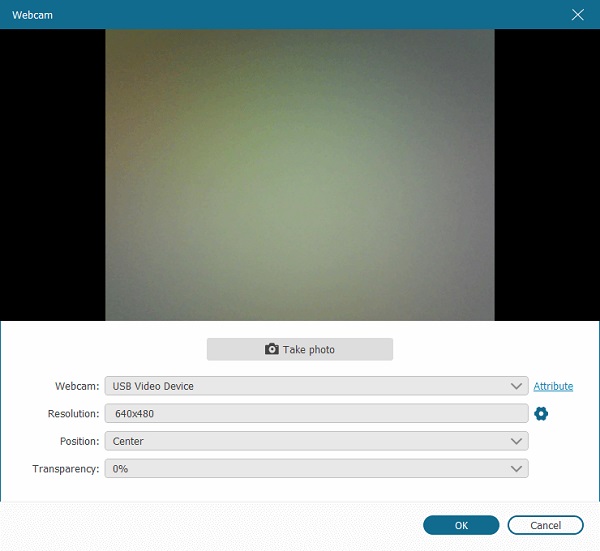
Step 2. Set up the Webcam parameters
You can select any camera with which you want to capture and set the resolution, volume and rotation on the panel.

For more detailed webcam parameter settings such as brightness, contrast, hue, saturation, sharpness, etc, you can click the “Property” button.
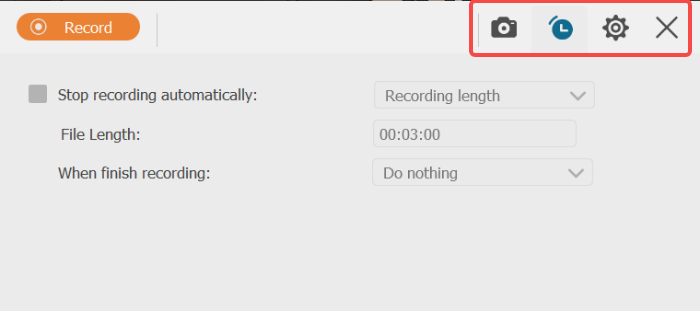
Step 3. Record the Screen
When you have gone through the steps above, you can click the REC button to start recording. If you prefer to take screenshots or set a countdown timer for your video while recording, you can use the screen shorter and timer (both are in the upper right-hand corner).
Step 4. Finish Webcam Recording
When you are done, just simply click the Stop button. And after that, you can preview, edit (if needed), and save the webcam recording to your computer .
FonePaw Screen Recorder not only records webcam without watermark by default, but it also allows you to change the recording screen parameters such as brightness, contrast, saturation, sharpness, and so on. You can record HP HD camera and control the resolution of recording.
FAQs about Recording Webcam with VLC
How to Enable and Use Webcam Recording Feature on VLC Media Player?
When you launch VLC media, you just need to View menu and click Advanced Controls. Then, the Record button will appear in the bottom left corner of VLC. You can set the DirectShow mode and audio and webcam settings to use the reocrding features.
How to Record Webcam with Audio on VLC Media Player?
For the audio device name, first you need to click Open Capture Device from the Media menu. Then select your microphone in the audio device name by default. Incidentally, alternative mic devices such as stereos, headsets or free-standing microphones are also supportive.
Conclusion
All in all, VLC Media Player has a long way to go despite having a webcam recording function. That’s why we recommend FonePaw Screen Recorder to you. For each user, it is a versatile and convenient tool to effectively record webcam with VLC. With its help, recording with a multifunctional webcam is a cinch. Let’s give it a try!
