


VLC player can record audio from microphone. However, it can't record system sound. Therefore, if you need to record audio from YouTube or other streaming videos, you can use FonePaw Screen Recorder , which can record sound from both microphone and system as well as screen activities. It is free to download now.
Free Download Buy with 20% off Free Download Buy with 20% off
The VLC media player is a versatile tool for playing local video/audio files or converting video/audio files to other formats. However, do you know it also works as an audio recorder? Users are able to record audio with VLC from the microphone, though the procedure may seem a bit cumbersome. This post will guide you on how to record external audio with VLC on Windows or Mac and even the system audio at the same time via a third-party tool.
How to Record Audio with VLC on Windows/Mac (Microphone Only)
If you've got the VLC media player installed on your Windows or Mac computer, you can use it to record audio from the microphone on a desktop or laptop. It may be a bit complicated if it's your first time recording audio with the VLC media player. What's more, the steps are different between Windows and Mac. No worries, you can follow the tutorials below on your Mac or Windows.
Record Audio with VLC on Windows
Step 1. Install and launch the VLC media player from your Windows.
Step 2. Click the View tab followed by Advanced Controls to show the hidden recording toolbar.

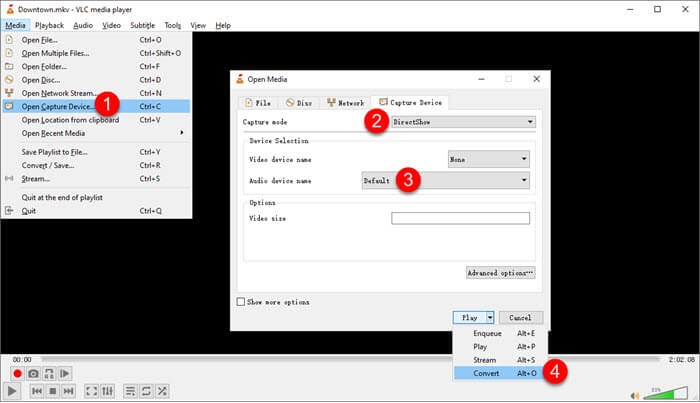
Step 3. Navigate to the Media tab and select Open Capture Device.
Step 4. Change the Capture mode to DirectShow. Then, set the Video device name to None and Audio device name to Internal Microphone. If you have an external microphone, change to External Microphone instead.
Step 5. Click the Dropdown menu next to the Play button and select Convert.
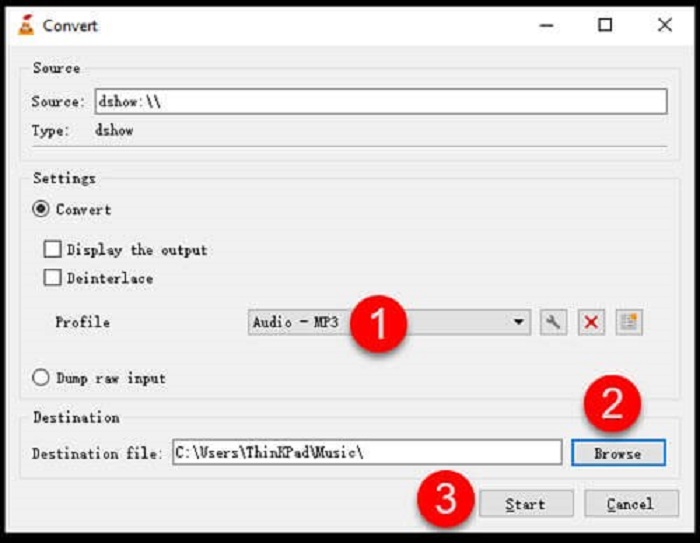
Step 6. In the Profile section, choose Audio - MP3 as your output audio format. (Or OGG, FLAC, CD options on your demand.) Then, choose a destination folder to save your recording.
Step 7. Click the Start button below and VLC will take seconds to prepare for recording audio.
Step 8. Click the Red Record button to start recording the audio. When completed, click the Square button and it'll stop the process.
Record Audio with VLC on Mac
Step 1. Install and open the VLC media player from your Finder on Mac.
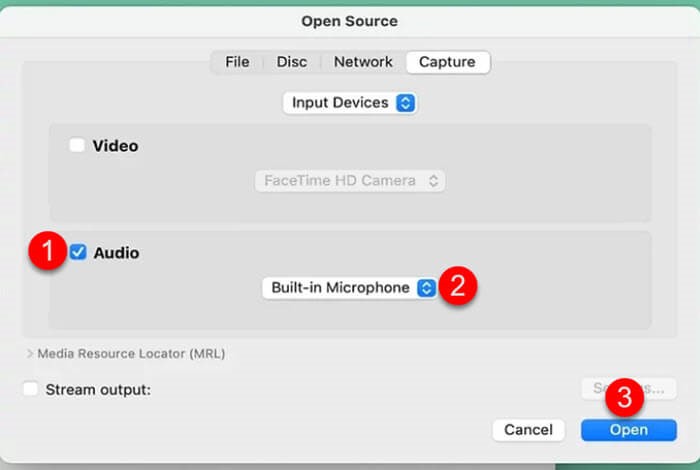
Step 2. Navigate to the File tab and select Open Capture Device.
Step 3. Tick up the Audio checkbox, and select Built-in Microphone or Built-in input to set your internal/external microphone as the audio device. Now, click the Open button.
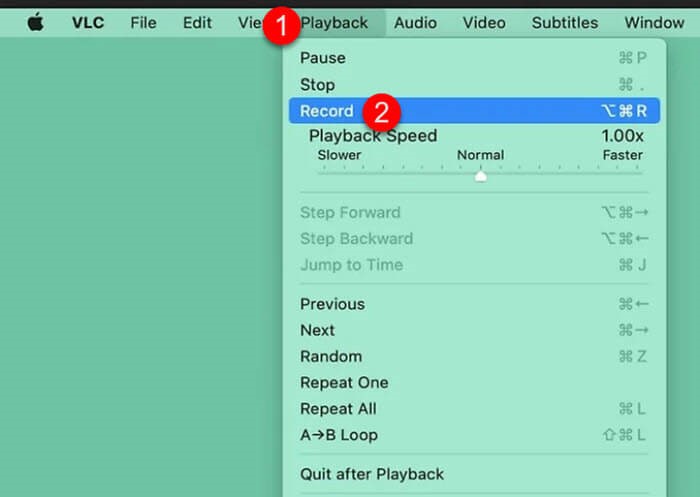
Step 4. Go to the Playback tab and choose Record. Then, it'll start recording the audio of your microphone.
Step 5. When it's all done, click the Square button to stop recording audio with VLC media player.
How to Record Audio and System Sound via FonePaw Screen Recorder
You would fail if you wanted to use the VLC media player to record the sound of your microphone and the system sound from your Mac/Windows. The VLC media player currently doesn't support recording both sounds at the same time. In this case, you may seek help from a professional audio recorder.
FonePaw Screen Recorder is able to record both the microphone sound and the system sound, for example, playing music videos on YouTube. Meanwhile, it can remove the noise of your microphone and enhance the microphone sound. There are more sparking features for you to explore.
😊 All-in-One Recorder - FonePaw Screen Recorder is a multifunctional recorder that offers Audio Recorder, Video Recorder, Gameplay Recorder, Webcam Recorder, Window Recorder, and Phone Recorder for Mobile. This software caters to all your recording needs.
😊 High-Quality Audio Sound - This excellent screen recorder works to record up to lossless quality audio files in popular audio formats like MP3, M4A, WMA, AAC, FLAC, and WAV.
😊 Easy-to-Use Interface - FonePaw Screen Recorder has an intuitive UI design for users to easily record videos, audio, and online streams from YouTube, SoundCloud, Spotify, and so on.
😊 Audio Trimmer - Users are able to clip the audio recordings when it's done recording the sound of the microphone and the system sound. Also, there is an advanced trimmer to cut, split, add, or duplicate the audio file.
😊 Advanced Features - In addition to a versatile recorder, FonePaw Screen Recorder provides users with advanced features for catering to different situations. For example, you can enable scheduled recording and lock windows for recording online classes and streaming live in case of missed time and other window pop-ups from interfering with recording.
It's as easy as falling off a log to get down to FonePaw Screen Recorder, unlike the cumbersome VLC media player. You can record both your system sound and internal/external microphone in 4 steps.
Free Download Buy with 20% off Free Download Buy with 20% off
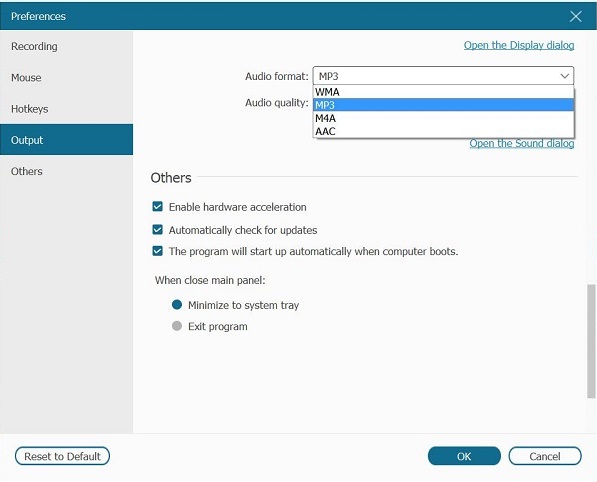
Step 1. Set up Audio Quality
Launch the FonePaw Screen Recorder after you download and install the software. The first idea is to ensure high-quality audio output. Go to the Dropdown menu - Preferences - Output and scroll down to the Audio Settings. Users are able to modify the audio format, audio quality, and codes in this section.
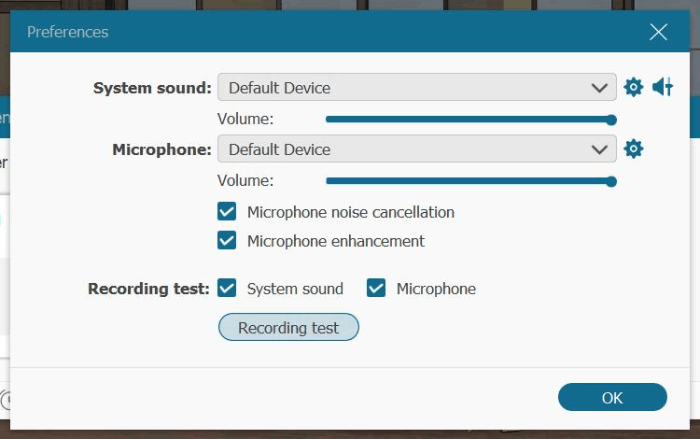
Step 2. Change the Sound Settings
Now, go to the Sound - Sound Settings. Then, you are able to select the input device of System sound, and choose to record your internal or external microphone. You can also select the checkboxes before Microphone noise cancellation and Microphone Enhancement. Don't forget to do a recording test in advance.
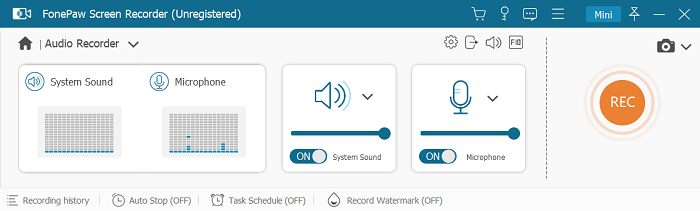
Step 3. Start Recording Audio
Back to the homepage and launch the Audio Recorder in the middle. Toggle on the System Sound and Microphone to your liking. Then, change the volume of both sounds. When the Rec button refreshes, hit the button and start recording the audio file.
Step 4. Stop and save recording
Click the red rectangle icon to stop and save recording. You also can trim and preview the recording.
FAQs about Recording Audio with VLC
Can I Record Streaming Audio with VLC?
Yes. Some users may be wondering whether the VLC media player is able to capture audio online streams. The answer is YES. It's possible to utilize VLC to capture audio from video streaming sites like YouTube, Vimeo, TikTok, and so on. However, it may take a long time for VLC to record the audio from a streaming video/audio. Due to the DRM restrictions, the success rate is also unstable for encrypted streaming videos/audios. If you still want to proceed, let's grasp the idea of capturing online streams to audio files with the VLC media player.
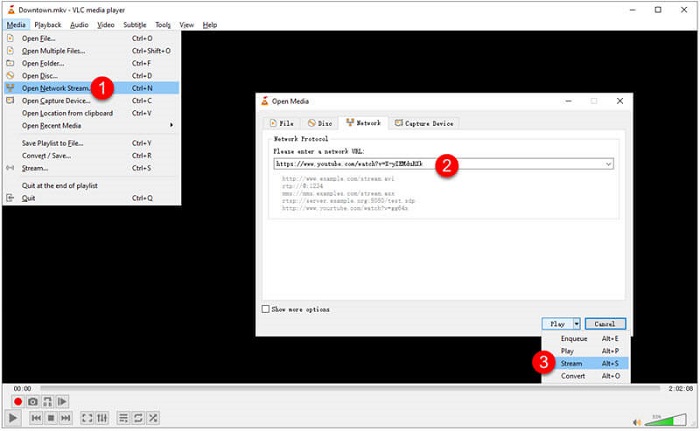
Step 1. Go to Media - Open Network Stream on Windows or File - Open Network Stream on Mac.
Step 2. Copy the video/audio link you want to capture and paste it into the bar under Please enter a network URL
Step 3. Navigate to the Dropdown menu next to the Play button. Now, confirm the link in the Source dialogue box and go to Next.
Step 4. Click the Add option and browse for a destination folder. You can change the file name in the popup and click Save to proceed.
Step 5. Leave the Activate Transcoding unchecked and select your preferred output format in Profile.
Step 6. When done, hit the Stream button and start recording the audio from online streams. Click the Square button if you want to stop the process.
Where Does VLC Save Recorded Audio?
When the recording process ends, the VLC media player actually wouldn't pop up the destination folder. Therefore, some users may get lost where recording audio files are saved. If you don't change the destination path in the recording setup with the VLC media player, the recording audio files will be in the following path based on your operating system.
- Windows: C:\Users\Your_Username\ ...\Music.
- Mac: Macintosh HD > Users > Your Username > Music.
Conclusion
You can use the VLC media player to record the microphone sound on your desktop. However, the VLC media player seems helpless due to DRM restrictions if you want to record the audio file of streaming videos from YouTube, TED, SoundCloud, and others.
FonePaw Screen Recorder outperforms VLC media player from a range of perspectives, like the multifunctionality of the software, the ability to record both the sound of your microphone and the system sounds from online streaming sites and the output audio file of up to lossless quality in preferred formats. Why not give it a shot?
