


OBS Studio plays a professional role in video recording, especially as a game recorder. However, due to OBS high CPU encoding sometimes, you may receive a warning like "Encoding Overloaded" on OBS, which will badly hamstring your gameplay experience. If you are facing the same problem, don't worry. Just jump into this post, where you can learn 10 workable methods to help you fix OBS encoding overloaded. Now, let's scroll down and read more!
What Does Encoding Overload Mean in OBS
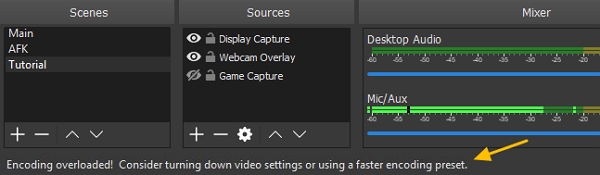
Encoding overload OBS is common. If your computer's hardware or CPU is no longer able to carry the running load from OBS, you will probably see a warning in the status bar: "Encoding overloaded! Consider turning down video settings or using a faster encoding preset". This OBS high CPU encoding will always cause the video to freeze or periodic stuttering after a few seconds. And this situation is often related to computer hardware and software and OBS settings as follows:
- High CPU Utilization: The performance of the OBS software may be compromised due to insufficient CPU capacity on your computer.
- Scare Disk Storage: The amount of available disk space is not enough to accommodate the recording.
- High Screen Resolution: Your computer may not support or be capable of handling the high screen resolution that is currently set by OBS.
- Conflicts with Other Streaming Apps: The presence of another streaming application from a third party could cause conflicts with OBS, resulting in multiple errors.
Without further ado, let's see how to cope with encoding overload on OBS.
How to Fix Encoding Overloaded on OBS
In the first place, you can try to fix encoding overloaded on OBS directly through operations in this application. Here comes the detailed tutorials of multiple possible solutions to this issue:
Reconfigure Output Resolution
The encoding resolution is closely related to CPU usage — the higher resolution you set for encoding videos with OBS, the more pressure the CPU will get. Given OBS's high CPU encoding, your computer may become overheated, giving rise to encoder errors on OBS: your screen may freeze and the videos may stutter. So the first workaround is to fix the OBS encoding overloaded by downscaling the OBS output resolution to reduce CPU usage. Here is the detailed tutorial:
Step 1. Launch OBS Studio and click on Settings at the bottom-right of the screen.
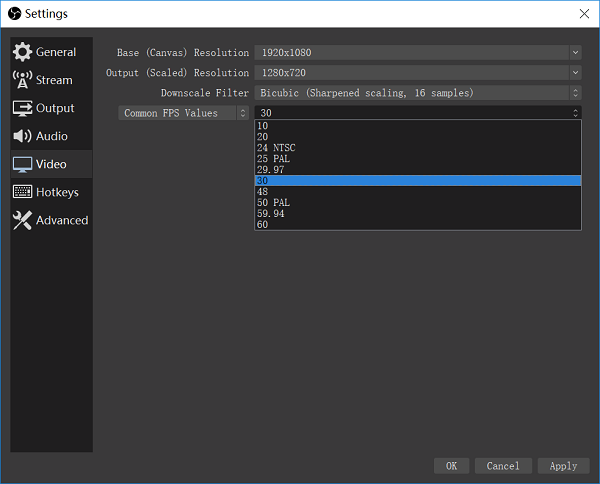
Step 2. In the new pop-up window, select Video on the left side, and then click Output (Scaled) Resolution to lower the resolution by a notch or two.
Step 3. Save changes, exit the program, and reboot your computer. Launch the app to record video or stream again to check if the encoding overloaded error still occurs.

Lower Frame Rate
If you capture video in a higher frame rate than that your computer can process, chances are that your computer will run slowly and other unexpected problems may also occur, like this OBS Studio encoding overloaded error. So you may need to reduce the frame rate in your OBS settings to avoid this problem by following these steps:
Step 1. Go to OBS Settings.
Step 2. Click Video on the left side of the pop-up window.
Step 3. Select Common FPS Values and set it to a lower value, such as 30 FPS, 25 FPS.
Step 4. Save changes, reboot your computer, and restart the program to see if the error is solved.
Change x264 Preset Settings
X264 is the OBS video encoder embedded with many "presets", which you can adjust to change your video quality and CPU usage. Within the preset settings, "veryfast" is used by default, helping to keep the best balance between CPU usage and video quality in most cases. Remember, different presets can have different impacts on CPU usage and video quality: the faster you set up, the less CUP will be used. And vice versa. If you are still not sure about what to do? Don't worry, you can always set it back to "veryfast" as default. Here comes the tutorial to set this so:
Step 1. Launch OBS Studio and go to Settings.
Step 2. Click Output on the left side of the pop-up window.
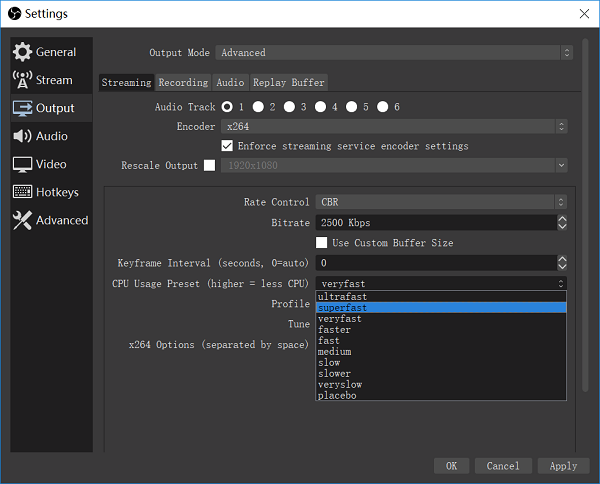
Step 3. Change the Output Mode to Advanced.
Step 4. Now you can change the preset CPU Usage mode to a faster speed, such as "superfast", "ultrafast", or simply leave it as "veryfast" by default.
 Note:
Note:
- The higher you select the X264 preset, the worse your video picture quality will be.
Use Hardware Encoder
You can also consider using a hardware encoder as an alternative to x264, the OBS embedded video encoder. Hardware encoders namely Quicksync, AMF, and NVENC are encoders that come on recent Intel Integrated GPUs, newer AMD GPUs, and recent NVIDIA GPUs. The benefit of using a hardware encoder is that it doesn't require too much CPU resources and thus reduces encoding load while on the other hand, this benefit comes at the cost of video quality. Here is how to use a hardware encoder in OBS:
Step 1. Launch OBS Studio and go to Settings as mentioned above.
Step 2. Click Output on the left side of the pop-up window.
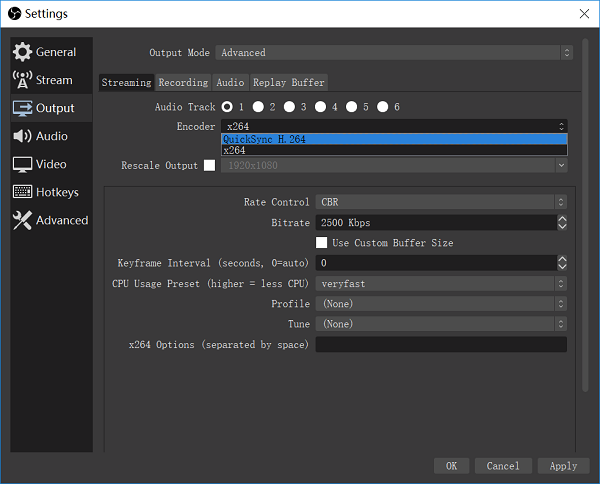
Step 3. In the right panel, select Advanced output mode.
Step 4. In the Encoder option, choose Quicksync, AMF, etc.
Check the Capturing Camera
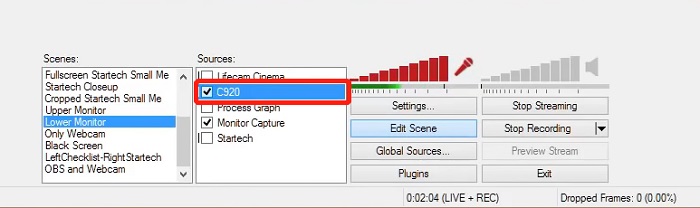
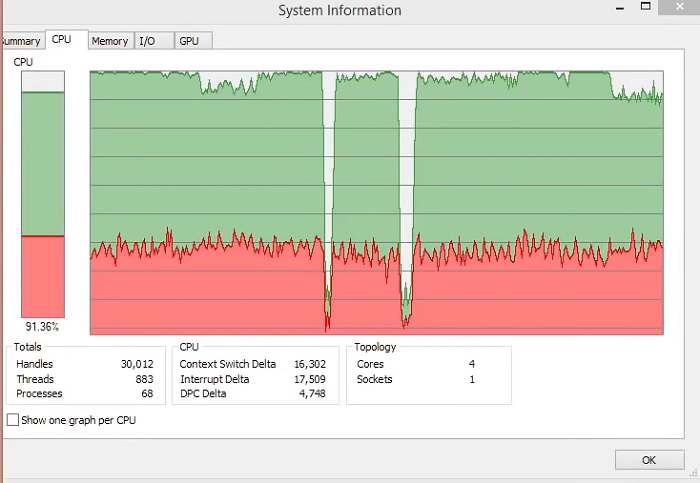
When recording or streaming videos on OBS, the CPU may be consumed to the max due to the use of capturing cameras. As a result, there will exists an "encoding overload" warning on OBS. To solve this problem, you can check the capturing camera. However, be aware that this method works at the expense of degrading output resolution. If you don't mind that, please continue to read how to deal with OBS high CPU encoding through Sysinternal's Process Explorer for Windows, a software used to monitor the CPU:
Step 1. Download Process Explorer on your Windows, then launch it.
Step 2. Double-Click on your capturing camera in the Sources mode below.
Step 3. When the Device Selection window pops up, turn to in the Video mode. In the Resolution option select "1024x576", "160x90", etc.
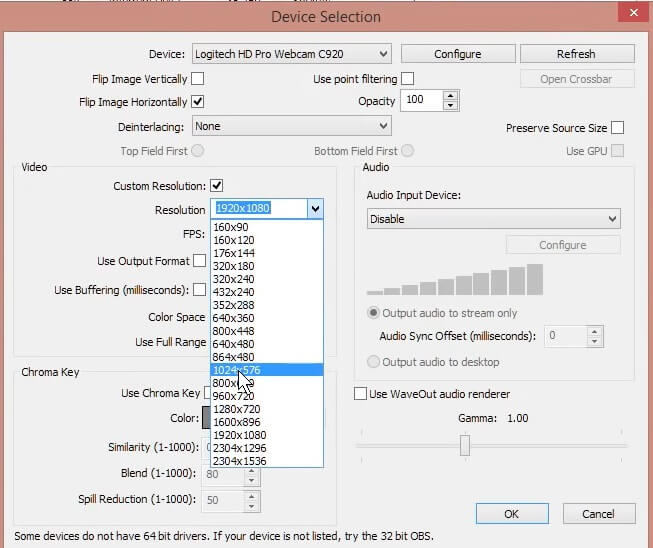
Step 4. You can see the CPU consumed directly through the window on the right. Choose the suitable resolution based on the changes in the CPU in this window.
Note:
- For a more detailed tutorial, please click to watch this video.
How to Fix Encoding Overload OBS via PC Settings
In addition to adjusting the OBS application, you can fix encoding overload OBS via PC settings. Here comes the detailed tutorials of multiple possible solutions to this issue:
Free Up Disk Space
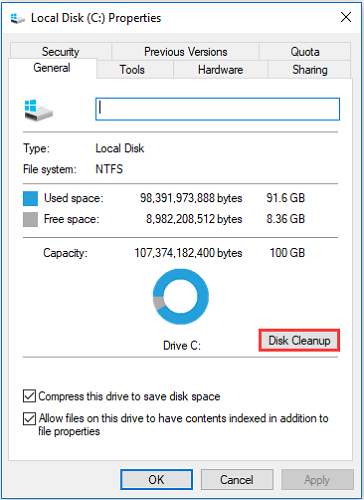
Aside from the reasons mentioned above, there is another possibility that may cause encoding overload on OBS: insufficient disk space - OBS requires space on the hard drive for operations including writing temporary configurations and output files. Therefore, you can check whether there is enough storage space on your drive to run OBS. If not, you can stop encoding overloaded on OBS by deleting some specific data or unnecessary applications, or performing disk cleanup by freeing up the disk space on your device as follows:
Step 1. Open File Explorer on your computer.
Step 2. Right-click the drive you want to clean. Then choose Properties.
Step 3. When a window pops up, go to the General tab and click Disk Cleanup.
Step 4. Click on OK below and wait until the process is finished.
Tip:
- Please make sure that there should be at least 5-10 GB of free space available on your drive.
Close Additional Programs
If you launch too many programs, for example, certain third-party recording programs or steaming media, simultaneously on your computer, they will all take some CPU resources. Thus, little resource will be left for OBS to process encoding videos, which is very likely to cause encoding overloaded errors. In this case, simply free up your CPU usage by ending those unnecessary processes in the background.
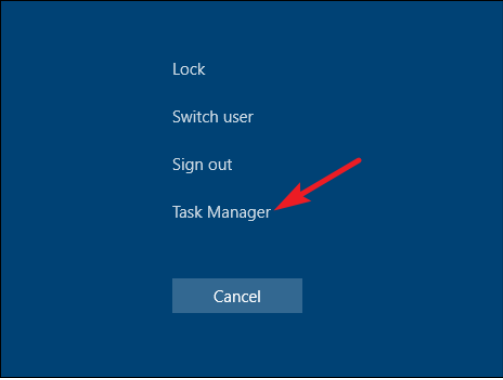
Step 1. Press Ctrl + Shift + Esc to open Task Manager.
Step 2. In the Processes tab, right-click those programs that you don't need, select End task.
Change Process Priorities
If the solutions mentioned above did not resolve the OBS encoding overload issue, you can take additional steps to optimize your computer, of which changing process priority is a practical way. For your information, processes with high priorities will consume more CPU resources and be processed first. In this case, if you give OBS higher priority, OBS will then take precedence over other programs running on your computer. Thus, OBS encoding overloaded will be solved. Check the steps of changing process priority below and have a try.
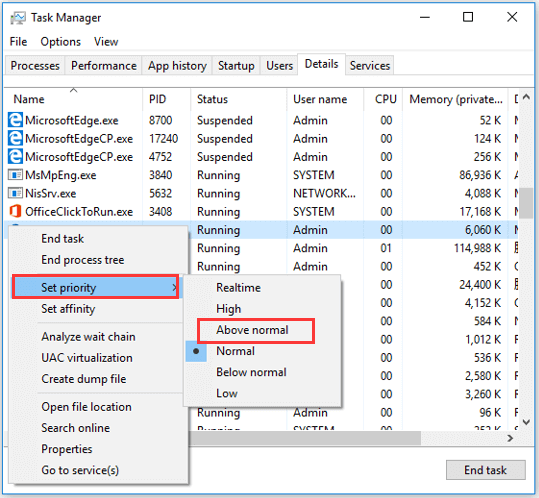
Step 1. Simultaneously press Ctrl + Alt + Del and select Task Manager to open it.
Step 2. In the Processes tab, right-click on your OBS. After that, tab Go to details from the menu to locate OBS in the Details tab.
Step 3. Right-click OBS and select Set priority-Above normal to empower OBS with higher priority.
Step 4. Go back to your gameplay or video streaming.
Tip:
- It is advisable to avoid setting the OBS priority to High or Realtime, which is to ensure that there are enough CPU resources available for other tasks. Additionally, if the game does not require extensive resources, you can consider setting its priority to Below normal.
Upgrade Your Hardware
After trying so many methods to stop encoding overload on OBS but still not working? Maybe it is just because your hardware is too old to handle simultaneous streaming and gaming: successful game/video recording and streaming necessitate a capable processor with 6 or 8 cores, such as an Intel i5 or i7 from the 7th to 9th generation or a mid-range AMD processor like the 3700X. Therefore, you may need to upgrade your hardware to fix encoding overload errors on OBS.
Bonus: Use an Alternative Tool to Stop High Encoding on OBS
As we can see, the above solutions may either lower the recording quality or introduce complex operations that could potentially lead to other issues or fail to resolve the problem entirely. In such cases, having a reliable OBS alternative would be a good choice.
FonePaw Screen Recorder stands out as a powerful screen recorder to provide Windows/Mac users with the best recording and viewing experience. With this top-rated recorder, you can record games, desktops, and any other screen activity s in high quality without being bothered by "encoding overloaded" errors anymore. What's more, this recorder enables you to add annotations, highlight the mouse cursor, and enable webcam in screen recordings. You can also set a timer for the recorder to schedule a recording or end a recording automatically.
Not only that, there are more sparkling features you can explore:
- Support various gameplay without watermarks, including PS4 games;
- Provide recording gameplay and webcams at the same time with no lag;
- Record gaming videos in HD quality up to 1080P with 60fps;
- Offer you diverse output formats and you can share gameplay recordings with one click;
- Customized settings are also provided, like video & audio codec, recording area, and noise cancellation, etc.;
- The intuitive interface makes you get started with no sweat.
Without further ado, let's see how to stop encoding overloaded on OBS with FonePaw Screen Recorder on Windows.
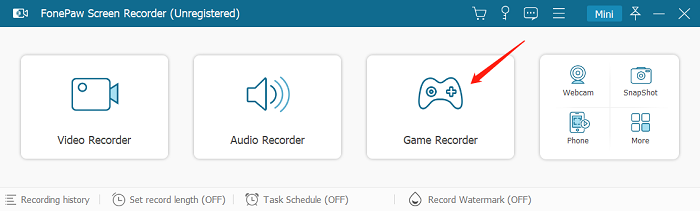
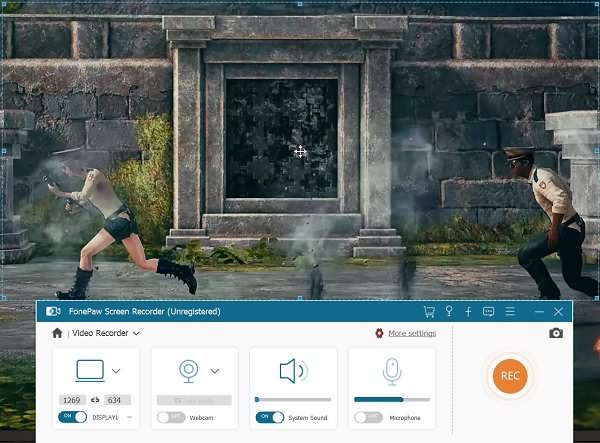
Step 1. On Windows, download the FonePaw Screen Recorder and launch the program. On its main interface, click to enter the Game Recorder module.
Free Download Buy with 20% off Free Download Buy with 20% off
Step 2. Based on your needs, turn on/off your Webcam, microphone, and System Sound. It is advised that you can check the soundtrack before recording and you can turn on microphone enhancement and noise cancellation from the Microphone tap.
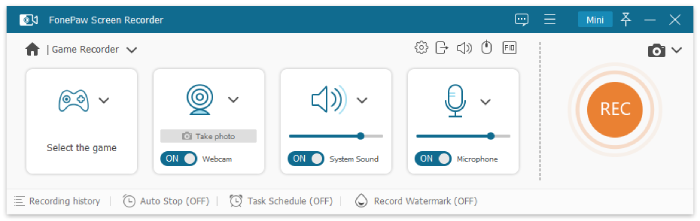
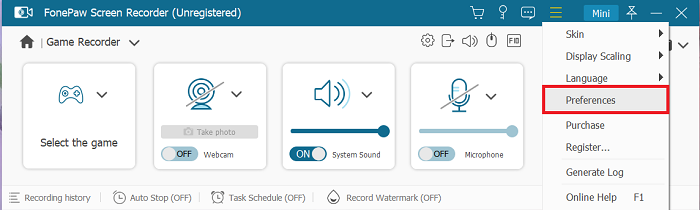
Step 3. Click on the Menu on the upper right and choose Preferences to complete the customized settings in output format, video codec, video quality, etc.
Step 4. Launch the game and select the desired window for the gameplay session. Then press REC to start recording. When the 3-second countdown ends, start to play your game and commentate as you want to. When you want to end recording, tap on the Stop icon to stop recording. Then you can preview and edit the recorded video clips before clicking on the Save button to keep or share them.
Conclusion
To sum up, this article shows you what "encoding overload on OBS" is, and informs you of its common causes and corresponding solutions. Among those solutions, the use of alternative tools like FonePaw Screen Recorder is highly recommended for it enables you to fix OBS encoding overloaded with the simplest steps and without quality loss. It is hoped that this post will inspire you when you are wondering how to stop high encoding on OBS!
Free Download Buy with 20% off Free Download Buy with 20% off