


Recording screen on Windows 10 can be an effortless job when there are different helpful methods provided. In this post, 5 rational solutions to help record video Windows 10 with a full manipulation guide will be introduced to you with details. Please read and sort out the most practical and convenient method on how to record a video on Windows 10 effortlessly now.
How to Record a Video on Windows 10 Using Game Bar
The first simplest and most direct method to record a video on Windows 10 should be utilizing the built-in feature, the Xbox Game Bar. This default recording feature provided for Windows 10/11 is possible to help you capture gameplay and take screenshots while gaming in an effortless way. You don’t need to install any other third-party program to process with Windows 10 record video. Next, check the manipulation guide and learn how to record video on PC Windows 10 with the help of the Xbox Game Bar in no time:
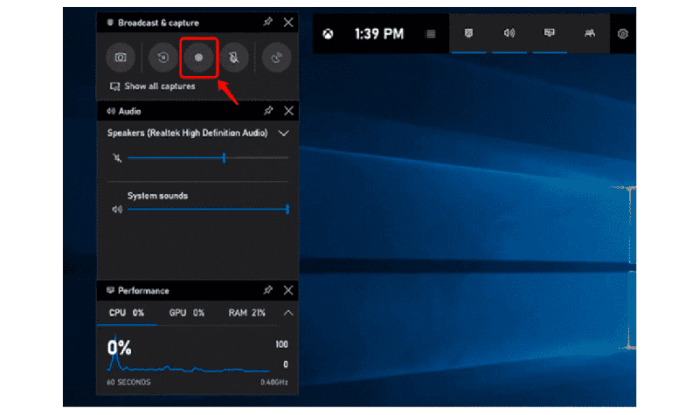
- First, you ought to turn this recording feature on by turning to Windows Settings >> Gaming >> Game Bar.
- When there is a moment you wish to capture from your screen, please directly press Windows + G keys to awake the Xbox Game Bar.
- Tap the Start Recording button or press Windows + Alt + R to initiate the recording process. You can turn on the Microphone option here to capture your voice as well.
- After completing the recording, the captured video will be stored locally on your computer in no time.
Although the Xbox Game Bar offers a direct recording feature for Windows 10 users to proceed with the desktop recording at any time without charge, this tool only provides the basic recording features for you. If you consider editing the recordings or creating video tutorials, it can’t deliver corresponding help. Instead, you will need help from another more professional but the same easy-using screen recorder for Windows 10. Next, FonePaw Screen Recorder will be introduced to help record video Windows 10 in a professional but effortless way for you.
The Best Way to Record Video on Windows 10🔥
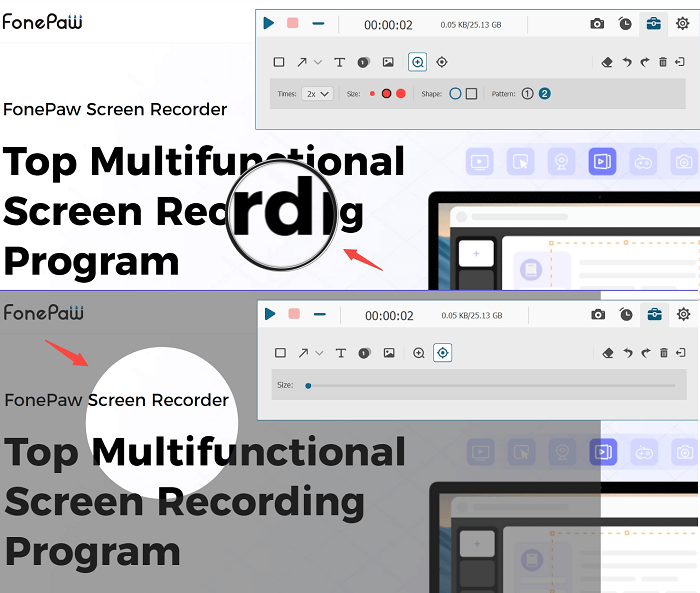
For any of you who wish for a lightweight but professional screen recorder to record video on Windows 10, FonePaw Screen Recorder is no doubt the best product you shall not miss. The program supports multiple recording modes, with which you can capture the screens in any pattern you wish.
Moreover, FonePaw Screen Recorder provides flexible recording settings to adjust the outputs in preferences with different qualities and formats. There are more advanced features such as the locked windows recording, scheduled mode, and even the easy-using editing toolkit provided for creating video tutorials easily.
Free Download Buy with 20% off Free Download Buy with 20% off
Overall Features:
- Offer multiple recording modes to record any activity on Windows/Mac conveniently
- It provides advanced recording features for enjoying smoother manipulation but great quality outputs.
- Built-in video editor is provided to adjust the recordings before exporting.
- Allow personalizing the recorded outputs by freely changing the parameter settings in the way you like.
FonePaw Screen Recorder is well compatible with Windows 7/8/10/11, and also macOS systems. In the following, please walk further to master the way to record screen video Windows 10 utilizing the program:
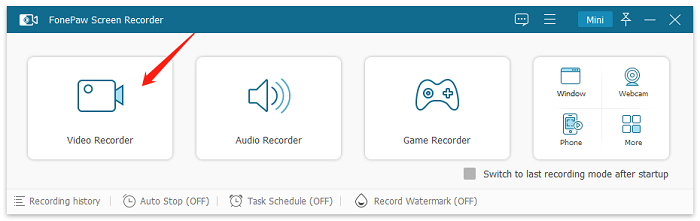
Step 1. First, install FonePaw Screen Recorder and well set up the program. Then you can run it and select Video Recorder from the main feed.
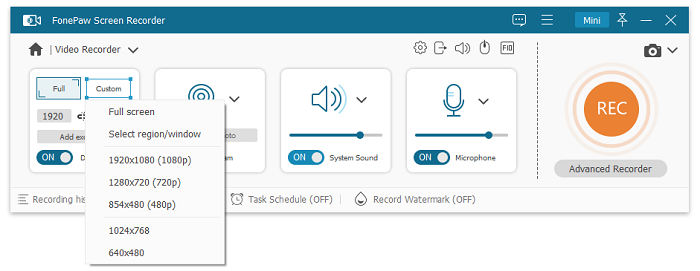
Step 2. On the screen on Video Recorder, please set up the recording preferences in preferences, like adjusting the recording area, setting up webcam, or testing the volume for both system and microphone sound as you wish.
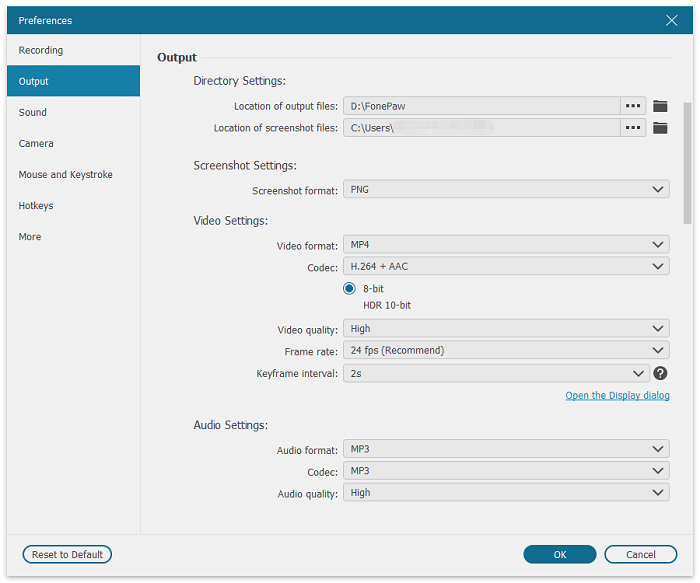
Step 3. Next, please open Preferences by clicking on the Settings icon above the Microphone setting box. In the Output module, you can adjust the Video Format, Quality, and more parameters in preferences.
Step 4. After walking through these settings, subsequently, directly tap the REC button to proceed with the screen record on Windows 10. During the recording, you can add annotations or draw on the video utilizing the panel at any time you want.
Step 5. When the recording is ended, please tap the Stop button and turn to the previewing window for checking the recording status. You can trim the unnecessary parts of the recording accordingly. Eventually, click on Save to store the video recording locally.
How to Record a Video on Windows 10 Using Movavi
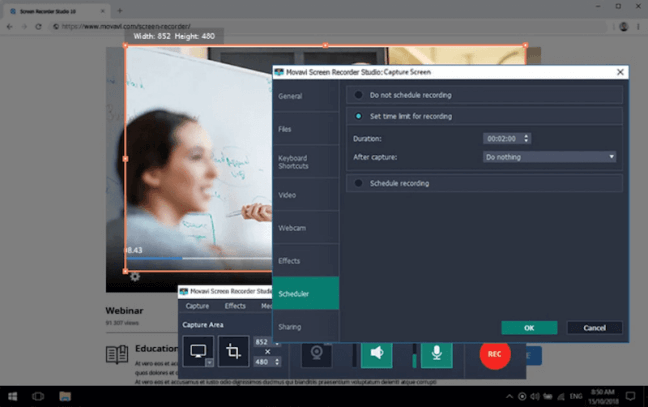
Movavi Screen Recorder is another professional access to record screen on Windows 10, with the excellent ability in capturing all types of webinars, video calls, instructions, tutorials, and online events for you. It allows you to preset parameters and retain high definitions even when you record video from webcam Windows 10. The following guidance will lead you to the way in utilizing the program in no time, please check:
Step 1. Run Movavi Screen Recorder on Windows 10.
Step 2. Subsequently, set the area to record and adjust other recording settings in preferences. Besides, you can also freely adjust the height, width, and more real-time settings in needs.
Step 3. Please tap the Start recording button to initiate the screen recording. To end it or pause, simply click on Stop to stop it.
Step 4. Before saving the output, you can simply edit the recording in the way you like freely.
Step 5. Eventually, tap Save and complete the recording output in no time!
How to Record Video on PC Windows 10 Using Bandicam
For many Windows users, you must have heard about Bandicam. Yes, Bandicam is definitely one of the best programs to record videos on Windows 10 with only very easy manipulation but quality-ensured outputs. With multiple recording modes for flexible selection, you will find Bandicam can be utilized under different life scenarios when you need to capture your desktop screen. Its intuitive interface for facilitates its popularity, especially for beginners to get stared.
Now, please walk through the way to record video on Windows 10 utilizing Bandicam, too:
Step 1. Open Bandicam and select Video from the left panel.
Step 2. Subsequently, please click on Settings to adjust the parameters before initiating a video recording on your desktop. Tap OK to save the changes.
Step 3. Proceed with the screen capturing on Windows 10. You can control the recording process and stop it whenever the recording is over.
Step 4. Save the recording locally and play at anytime you wish.
How to Record Video on Windows 10 Using Icecream Screen Recorder
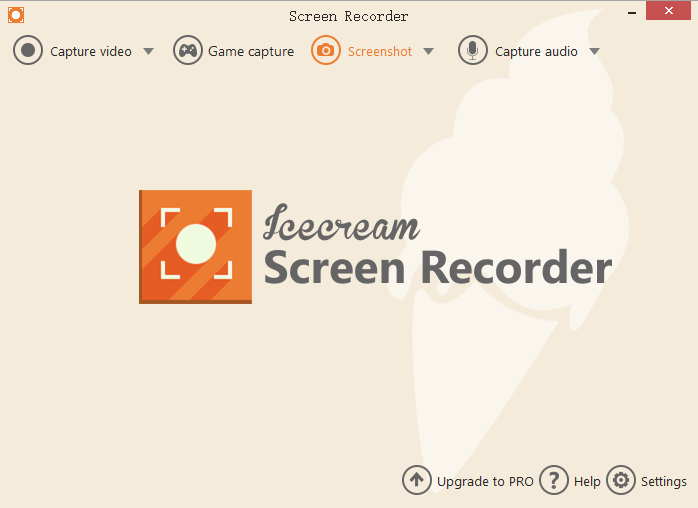
The final recommended way to record video on PC Windows 10 is by utilizing Icecream Screen Recorder, which provides rich recording functions to help capture videos and audio under different life scenarios whenever you need. By being equipped with customizing tools and annotations adding features, the program makes it simple to take notes especially when you need to record an online meeting or lesson without missing any important points!
Icecream Screen Recorder will take no registration procedure to start the services. In the following, please walk through its manipulation guide in no time:
Step 1. After running Icecream Screen Recorder, select Capture video and choose to adjust the area you wish to record.
Step 2. When the recording toolbar is provided, you can initiate the screen recording at any time by clicking the Rec button. On the toolbar, you can turn on webcam, microphone, or system sound whenever you need flexibly.
Step 3. Once the recording is over, end it by clicking on the Stop button, then you can store the recorded video locally in no time.
FAQs of Recording Video on PC Windows 10
Before ending the post, you can learn more details to record a video on Windows 10 with the following FAQs.
How to Record Video from Webcam on Windows 10?
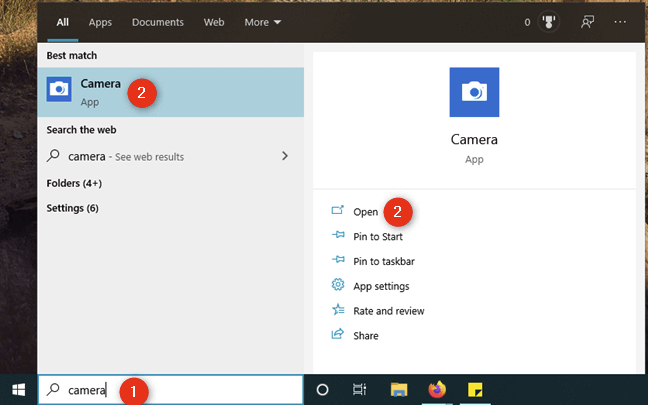
There are circumstances when you wish to record video from webcam on Windows 10, and this is completely possible with different methods to do it. For example, the built-in Windows 10 application, Camera app, can definitely help you record video from Windows 10 camera following the procedures below:
- Open the Camera app on Windows 10 by turning to Start >> Windows >> Camera on your computer.
- Subsequently, please configure the recording settings such as turning on your webcam and microphone. It is also possible for you to adjust the brightness if needed.
- Now, tap Record to initiate the desktop recording.
- Once the recording is completed, end the process and check the recorded video offline in no time!
If you discover Windows 10 camera not working while recording in the Camera app, FonePaw Screen Recorder also offers the webcam recording mode to capture camera video with high definition. You can try the program record video from webcam on Windows 10 by installing it for free now!
Free Download Buy with 20% off Free Download Buy with 20% off
How to Record Screen Video on Windows 10?
To record screen video on Windows 10, you can try different methods in preferences. For instance, the built-in recording feature the Xbox Game Bar is possible to help. Meanwhile, many professional third-party screen recording programs are all available to deliver capture your screens with great output quality. Simply select one based on your personal needs.
Conclusion
If you are still considering how to record a video on Windows 10, this post has offered the 5 best methods you can try. Among all of them, FonePaw Screen Recorder is better recommended for its great output quality, equipped editing features, and more advanced recording functions available. Because the program provides the free trial, so you are recommended to install and try it without charge first. Enjoy!
