


Do you want to record your impressive Minecraft gameplay performance and upload it to your social media channel for more attention and acclaim? If you do, you've come to the right place. Even though Minecraft does not officially provide a separate recording function, there are actually a number of methods and tools to achieve it.
This post is going to show you a complete guide on how to record Minecraft on PC with no lag using different tools, and show you the differences between them in detail. You can choose the one that suits you the best based on your actual needs, such as recording your appearance and voice at the same time, or simply clipping the videos, etc.
Read on and pick your way to capture your gameplay on PC!
Part 1: How to Record Minecraft on PC without Lag
When you think of recording gameplay with no lag, you might consider the built-in screen recording tool or the external capture card. They are all good solutions, but they require you to switch devices frequently, and the video output quality is not guaranteed. So with all of this in mind, we would recommend that you use a powerful and easy-handling third-party program to record Minecraft on PC.
FonePaw Game Recorder is the one you need. With the help of its hardware acceleration function, you can record 4K 60FPS long-time videos without lag, and output them to a variety of commonly used formats at a high speed. Also, you can add a webcam overlay to screen recordings, and take screenshots with customized hotkeys whenever you want during the process. Moreover, there is no watermark added to your output videos even for the free-trail version, while you can customize your personal watermark.
Free Download Buy with 20% off Free Download Buy with 20% off
- Adjustable Output Formats: It can export your recordings to multiple widely-supported media formats such as MP4, MOV, etc., without quality loss. You can even save them as GIFs to share the highlight moments
- Powerful Mouse Effects: You can record gameplay videos with your mouse cursor tracks and clicks, and it will clearly show your operations. Also, you can show your keystroke while recording, which is really suitable for making tutorials.
- Real-time Annotations: With the built-in toolbar, you can flexibly add arrows, callouts, narrations, and even a magnifying glass to highlight your gameplay actions during recording.
- Extra Video Editing Tools: It provides a range of video editing tools with clear guidance to help you simply trim, compress, merge, and convert your recorded videos.
FonePaw Game Recorder can be used on both Windows and Mac computers. Check out the video tutorial and detailed steps below for more information.
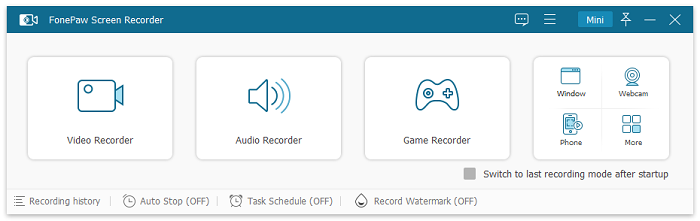
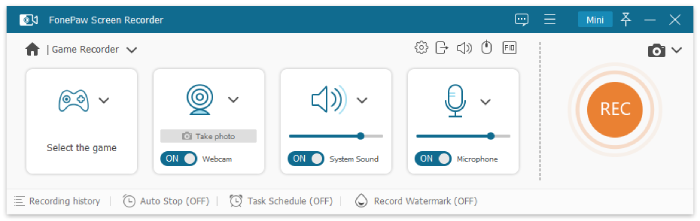
Step 1. Install and Launch FonePaw Screen Recorder
After downloading and installing, launch the software and double-click it to enter its interface.
Free Download Buy with 20% off Free Download Buy with 20% off
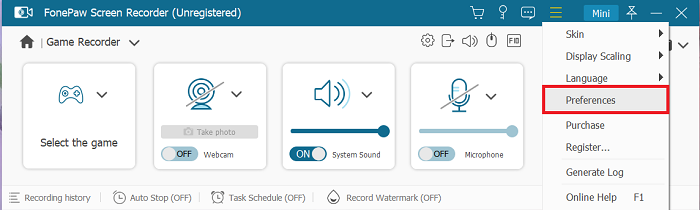
Step 2. Choose Personal Settings
Before recording, you can always set up the software to make it customized for you. Most settings can be found and set on the interface. Besides, you can also click the "≡" icon on the menu bar to enter Preference Settings.
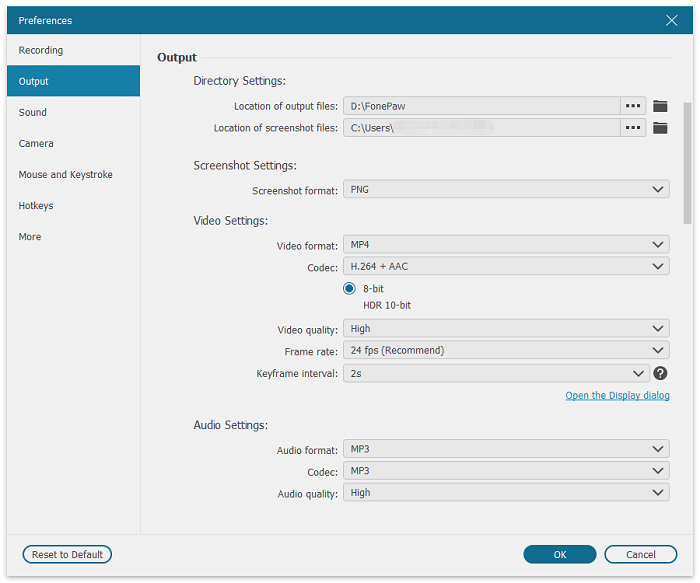
On this tag, you can select the parameters such as output format, frame rate, etc. For perfectly recording gameplay, we suggest you tweak H.265 codec and 60 FPS frame rate to make your videos present 4K quality without taking up much storage.
Step 3. Start Recording Minecraft on PC
After setting things up, it's time for you to record Minecraft gameplay. Run the game and go back to FonePaw Game Recorder interface, and it will automatically locate the region of the game program to record. Adjust the sound settings according to your needs, then click REC to start recording gameplay without lag.
Step 4. Edit Videos (optional) and Finish
While recording, you can mark some real-time annotations to make your videos vividly appear.
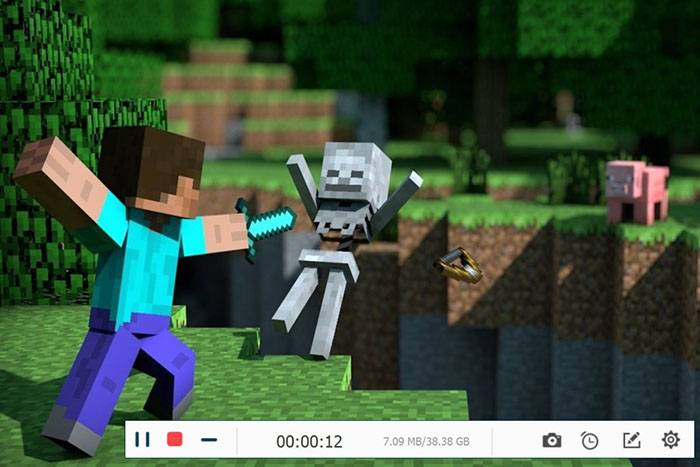
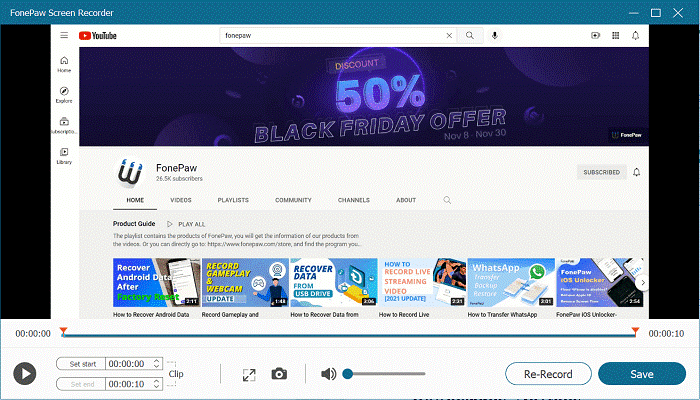
When everything is done, remember to click Save and choose the output location for the video. Then, you can edit your videos again with the built-in tools.
Part 2: How to Record Minecraft for Free
If you don't want to download extra third-party software, there is also an alternative way to record Minecraft for free. Xbox Game Bar is a built-in authority screen catch apparatus of Xbox control center and Windows gadgets for Windows. Just press Win + G on your keyboard, and you can initiate the Xbox Game Bar, to record Minecraft gameplay on PC.
It should be noted that Xbox Game Bar only works on recording screens for Windows 10 and later. Besides, it has limitations on recording time and does not support customizing the recorded area and sound volume. So before you use it, make sure whether this software is sufficient for your needs.
 Tips:
Tips:
If you're actually looking for a screen recorder for Mac devices, or a more full-featured software that works in most circumstances, you might consider FonePaw Game Recorder introduced in Part 1 as a better option.
Here are the steps for you to record Minecraft using Xbox Game Bar.
Step 1. Press Win + G as mentioned above to open the Game Bar while playing Minecraft. It will spring up over the game you're playing.
Step 2. Click on the Capture Button on the Xbox Game Bar's Widget Menu and select the Pin Button.
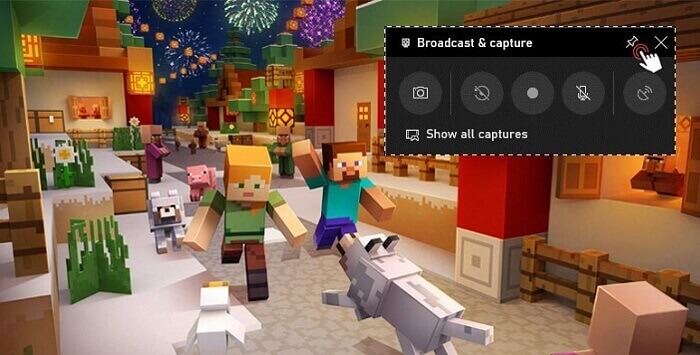
Step 3. Head back to the Minecraft screen and Hit the red Record Button to start. When finished, the recorded video will be saved into the video subfolder of Captures.
Bonus: What are the shortcuts to record Minecraft?
Win + G: open the program
Win + Alt + R: start or stop recording
Win + Alt + PrtScn: take a screenshot
Also, you can change the amount of time recorded in Xbox Game Bar > Settings.
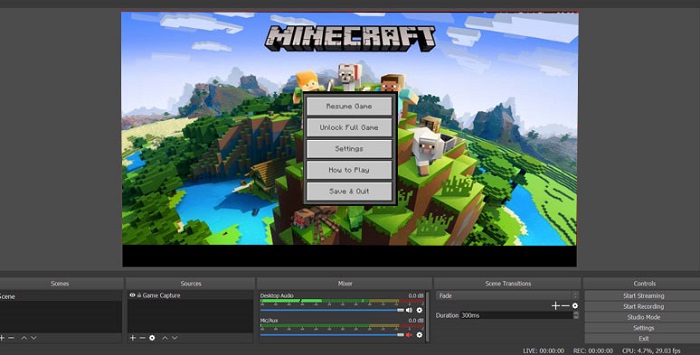
Part 3: How to Record Minecraft for YouTube with OBS
For YouTubers or game streamers, OBS may be a good choice to Record Minecraft gameplay, since it can directly stream your records to Twitch, YouTube, and more platforms. It is multi-functional with lots of settings, which means that games, audio, etc. can all be recorded. But, it will also have some small problems, such as it is not very stable and sometimes shows a black screen. Also, it cannot import audio files as sources.
Follow the steps to learn how to record Minecraft on PC with OBS.
Step 1. Download and install OBS on PC. The installation may change your computer's settings of recording, resolution, bitrate, encoder, and more, because of OBS' configuration requirements.
Step 2. Before recording, please make sure that you have selected the right audio devices. You can adjust volume levels and tweak more settings on the main tag.
Step 3. On OBS main interface, create a scene by pressing the + button, then Enter Minecraft to name it. Click Sources > Game Capture > Capture Specific Window, then select the currently running Minecraft version in the Option tag, and click OK to finish setting.
Step 4. Open Minecraft's Launcher, and match the resolution of Minecraft with the output resolution of OBS. Then, you can click Start Recording and turn to the Minecraft tab in Source.
Step 5. Finally, press ESC to exit Minecraft, then click Stop Recording > Go to File > Show Recording to check your work.

FAQs about Screen Recording Minecraft on PC
Q1: How can I Record Minecraft Gameplay?
As mentioned above, there are multiple screen recorders to satisfy your needs, and we recommend you to use FonePaw Game Recorder. Its amazing features can help you record high-quality videos of your Minecraft Gameplay without lag, and output them into various mainstream formats to share with others. The steps are also very simple. All you need to do is download and install the program, set it up, and then press to record. For more detailed processes, you can read back and check Part 1.
Q2: How to Record Minecraft for YouTube?
Depending on the situation, different tools can be used to make things happen. If the recorded videos are going to be uploaded to YouTube Channel, then Xbox Game Bar will be better, because it supports high-quality recording screens and cameras. With its built-in editing tools, it allows users to directly export clips after recording the screen. If you are going to do YouTube live streaming, then OBS will be suggested, since it has the function to steam your records directly to YouTube, which is very convenient.
Q3: How to record Minecraft without OBS?
As we've mentioned previously, OBS is very suitable and convenient for YouTube steamers, because of its corresponding features. But for non-techies, the user interface is somehow confusing and even gets you frustrated interacting with them. Even if you can find enough guides and instructions to learn to handle it, it may take you quite a bit of time and effort, instead of getting started quickly to achieve your purpose.
So if you're considering using third-party tools other than OBS to record your Minecraft gameplay, FonePaw Game Recorder is a good choice. Not only is it easy to use, but it also comes with an editing toolbar that allows you to overlay the webcam onto the video after recording the camera.
Conclusion
After reading the post, we believe that you have a further understanding of different screen recording tools to record Minecraft Gameplay. Among all the third-party programs, FonePaw Game Recorder will definitely be the most outstanding one to solve your problems, because of its powerful features and stability of recording high-quality videos without lag. Hit the button below and give it a shot, and you will be surprised!
