


For iOS users, FaceTime makes communication very easy with friends and families. It’s good to make video calls and talk with each other when being apart physically. You may want to record FaceTime calls sometimes for saving some important information or interesting talks. However, even if you use FaceTime frequently, you may not know about how to record FaceTime with audio.
Actually, there are simple ways for you to record a FaceTime call with audio on your iPhone and Mac, and even PC, and this post will clearly instruct you with step-by-step guide.
Can You Record a FaceTime Call?
While it’s possible to record FaceTime calls on different devices, it’s also important to make it clear that you need to follow the rules when you screen record FaceTime calls. Apple does not notify the other side when you capture the screen during a FaceTime call. On the contrary, when the other person records the call with you, you will not get any notification.
Although it’s not restricted to screen capturing during calls, from the legality aspect, it’s better to check if you need to get permission before recording. In United States, it varies from state to state. Some follow one-party consent policy that only one side’s approval is needed, while others abide by the two-party consent policy that mutual agreement is needed. Therefore, it’s always recommended asking for approval before you record a FaceTime call.
How to Record FaceTime Calls with Audio on iPhone
Actually, recording FaceTime Calls on iPhone is very easy with the built-in screen recording feature.
The first thing you need to do is to add the screen recording feature to your control center. By default, this function is disabled. In order to launch it, navigate to Settings > Control Center, in MORE CONTROLS section, you will find Screen Recording. Click the “+” icon at the left of the bar, you will add it to the Control Center.
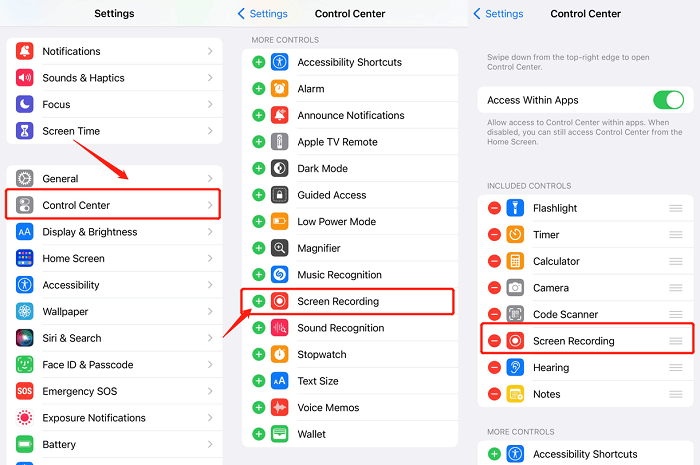
You can open the Control Center to have a check. If you are using iPhone X and later, swipe down from the top right corner of the screen, and you will see it.
Now you can use this feature to record your FaceTime call:
STEP 1. Launch the FaceTime app.
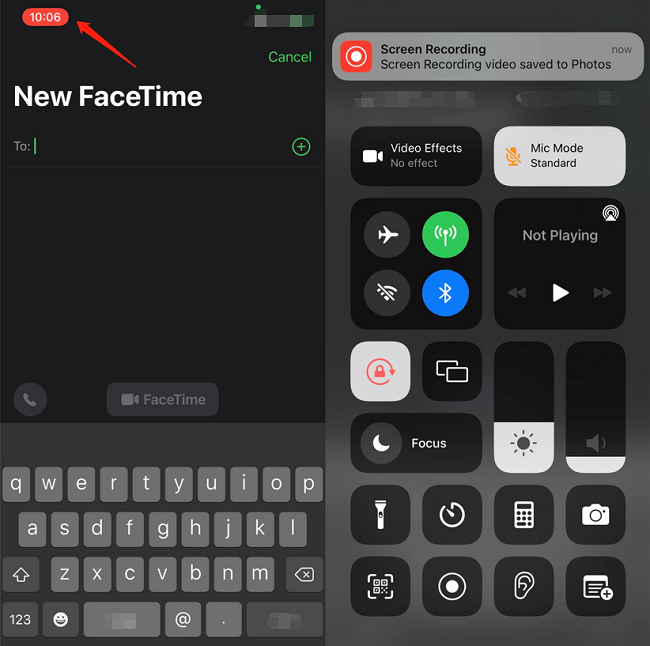
STEP 2. Open the Control Center, and click the Screen Recording icon to start a recording.
 Note:
Note:
- By default, the screen recording feature records only the internal audio of your iPhone, and your voiceover is excluded. If you want to enable Microphone recording, long press the Screen Recording icon until you see the settings, then tap to turn Microphone on, and choose to Start Recording.

STEP 3. Back to FaceTime to start a video or audio call. After the 3-second countdown, your iPhone will automatically record the screen, and you will see the status in red at the top left corner of your screen, where you normally view the time.
STEP 4. If you want to end the recording, tap the red icon at the top left and select to end the recording, or you can also open the Control Center again and click the Recording icon to do so.
STEP 5. The Screen Recording video will be saved to Photos, so you can freely view and edit the video later.
How to Screen Record FaceTime with Audio on Mac
Instead of iPhone, many people may also use Mac to make FaceTime calls, or you just want to record FaceTime calls on Mac. It’s easy to screen record FaceTime calls on Mac as well. Here are two methods that you can try.
Record FaceTime Call With Audio on Mac with iPhone
You may have your FaceTime call on iPhone, but want to record them on Mac to conveniently save the video on the Mac. It’s not difficult, and you can make it by following the steps.
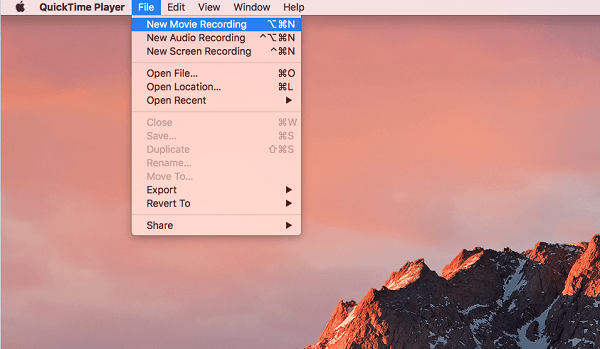
STEP 1. Connect your iPhone to your Mac with a lightning cable, and open QuickTime on your Mac.
STEP 2. Select File from the menu bar and choose New Movie Recording for preparing recording.
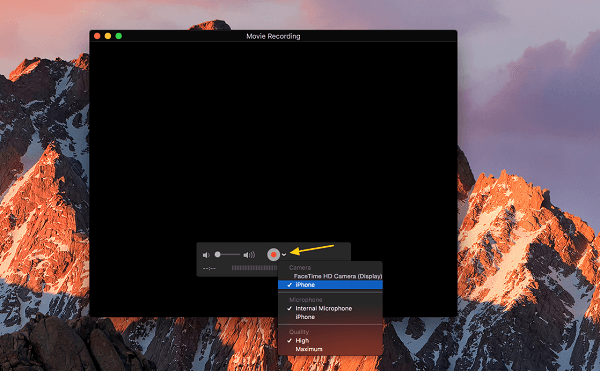
STEP 3. Click the arrow to the right of the Record button to see available cameras. Here you need to select your iPhone to do the record.
STEP 4. Unlock your iPhone and the screen will appear on your Mac screen in QuickTime. Then, open your iPhone and open FaceTime.
STEP 5. Now you can click Record in QuickTime on Mac, and make a call on FaceTime with your iPhone.
STEP 6. When you finish recording your FaceTime call, click File and then Save. Don’t forget to name the recorded call and select a folder to save it.
You have now saved your recorded FaceTime on your Mac.
Record a FaceTime Call on Mac with QuickTime
QuickTime is the built-in recording feature of Mac. If you want to record the screen activities on your Mac, it’s always the first and free choice. Here’s how to begin a screen recording of FaceTime on Mac:
STEP 1. Open the FaceTime app on your MacBook or iMac, and also launch QuickTime.
STEP 2. On QuickTime, Hit File and the New Screen Recording.
STEP 3. There will be a new window with a down arrow button along with a red recording button. Click the down arrow and choose the microphone under use.
STEP 4. Click the red button to begin recording the video call. Hit anywhere if you want to record the whole screen; for recording specific area, you need to drag the record part.
STEP 5. Start your FaceTime call. When you want to end the recording, click the button on the menu bar to stop.
STEP 6. The window to playback the FaceTime video will pop up thereafter. Review it and then save it by closing the window.
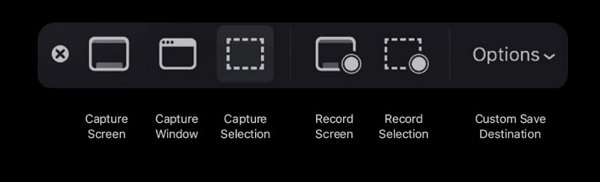
Note:- Besides QuickTime, you can also use the shortcuts Command + Shift + 5 on your keyboard to arise the built-in screen recording feature, the usage of which is similar to QuickTime.
Here’s how to record a FaceTime call on your Macbook or iMac. It’s convenient and easy to do the recording job, but according to Apple’s privacy protection policy, both of the built-in recording tools can only record the Mac screen with the microphone and exclude the system sound. If you prefer a way that can record both internal and external audio, follow the next method.
Record FaceTime Calls on Mac with FonePaw Screen Recorder
As the built-in recording features of Mac disable the feature of recording the system sound properly and lack other useful recording modes, the best alternative way is to use a third-party screen recording program to do this job. There are a diversity of screen recorders for Mac that can do this, and our best recommendation is FonePaw Screen Recorder.
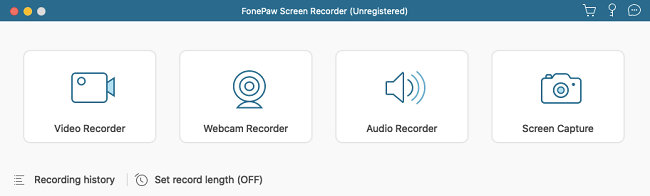
FonePaw Screen Recorder is a lightweight and easy-to-use tool for screen recording on Mac. It can help you record FaceTime calls with full voice in high quality. Besides this, it’s also applicable for different scenarios like recording tutorials, meeting, and games. It’s also particularly suitable for newbies, as the interface is very intuitive, and all the recording tasks can be finished in a few clicks. You can view its main features below:
- Record screen and webcam at the same time with quality up to 1080p HD
- Able to record system sound & microphone sound simultaneously when recording FaceTime calls
- Record locked windows so you can use the computer and make FaceTime calls at the same time
- Allow real-time annotation and taking snapshots for customized recorded FaceTime calls
- Support scheduled recording & auto stop
Free download this screen recording software and record the FaceTime calls:
Free Download Buy with 20% off Free Download Buy with 20% off
STEP 1. Launch FaceTime on your Mac and then FonePaw Screen Recorder. Select Video Recorder at the main interface.
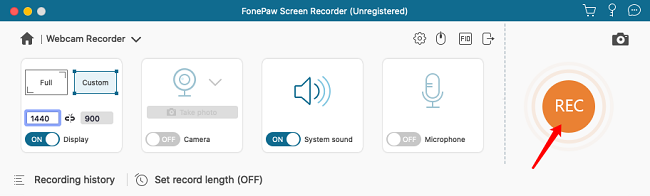
STEP 2. Adjust the recording settings as you need. You can see the settings of the recording area, system sound, microphone, and webcam are clearly divided into different parts. So, select the recording area as you need, turn on both of the audio and adjust the volume, then turn off the webcam.
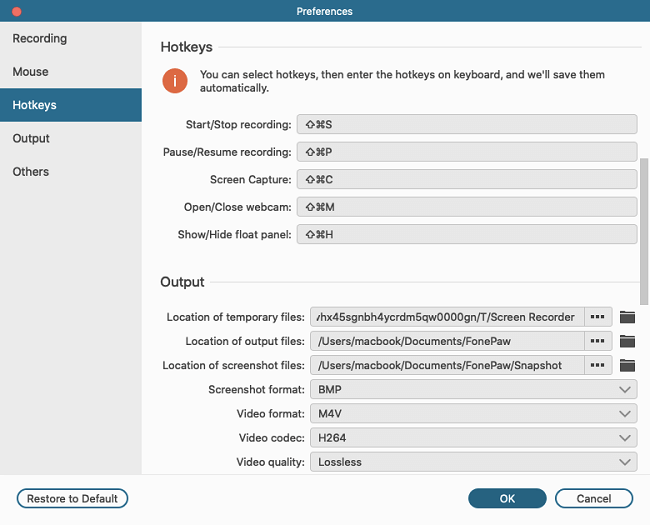
You can also customize more settings at Preferences, for example, the output format. This is optional though.
STEP 3. If you want to start a recording, click the orange “REC” button at the right side, it will automatically record after the 3-second countdown.
STEP 4. Now enjoy your FaceTime call. During the recording, you can see a slim floating bar and you are free to adjust settings anytime. When you want to stop the recording, just click the Square button to end the recording.
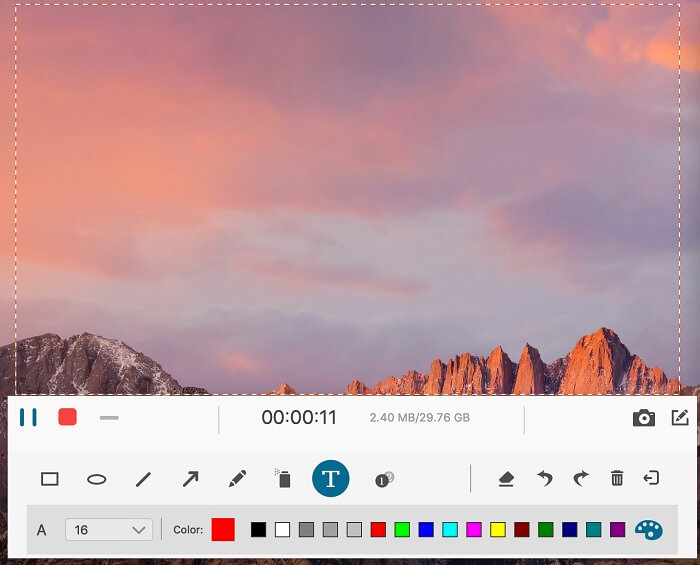
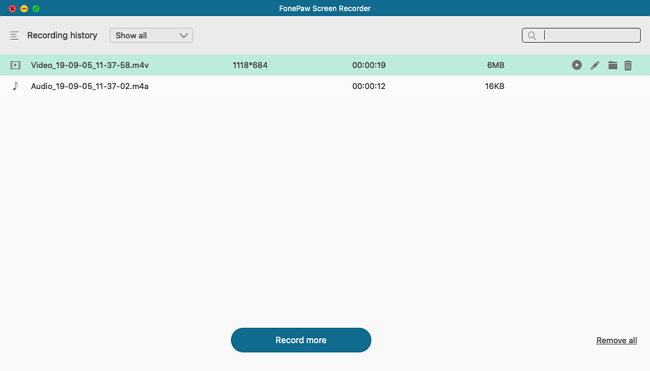
STEP 5. You can preview the recorded video and cut the unwanted part before you save.
That’s how to record FaceTime calls on Mac with FonePaw Screen Recorder. It’s easy to operate and offers much more customizations and recording modes. So it’s also worth a try if you have more recording needs.
Free Download Buy with 20% off Free Download Buy with 20% off
Note:- You may also wonder how to record FaceTime calls on PC sometimes. Though there is no FaceTime app for Windows, you don’t have to bother to screen mirror your iPhone to PC for recording it.
- With the recent update of Apple, you can just join a FaceTime call with an invitation link shared by the other side using an Apple device, and use the web browser. So, for recording FaceTime calls on PC, you can just use a desktop recorder for PC – and FonePaw Screen Recorder is also available.
FAQs
1. Can you screen record a FaceTime call legally?
Actually, it varies from state to state, which means you need to check the laws on your own before you record FaceTime calls. But anyway, before you record a FaceTime call, make sure the counterpart also agrees the FaceTime call to be recorded. It can avoid some possible conflicts that can be hard to dealt with.
2. Can you record FaceTime with audio on iPad?
Yes. Similar to iPhone, you can use the built-in screen recorder on your iPad to record a FaceTime call. You may need to check if the microphone recording is open, because sometimes it is off by default. If not, you can adjust it in the settings.
Conclusion
Above are what you need to know about how to screen record FaceTime on your iPhone, Mac, and PC. Generally, if you want to record a FaceTime call on Mac, FonePaw Screen Recorder is the best choice with multiple recording features. Hope this post can be of help, and most importantly, you can enjoy and memorize the happy times with the video calls.
