


For those who are running out of storage space on their smartphones, microSD card is lifesaver. Here is a complete guide to walk you through the whole process of installing, using, removing SD card on Android.
1. Format Used SD Card Before Use
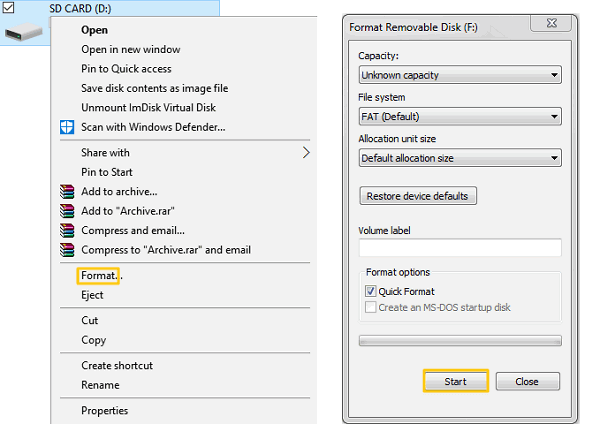
Some users wonder if they should format the microSD card before use. Well, if this is a brand-new SD card, there is no need to format the card. But if the SD card has been used previously or you have purchased a used memory card, you should format the card with a PC/Mac before inserting the card into your phone.
Remember: The formatting will erase all contents in the card; therefore, back up your SD card contents before formatting.
2. Insert a MicroSD Card into Android Phone
You can then insert your microSD card to your phone. If your Android phone comes with a removable battery, the SD card slot is often found after removing back cover:
- Power off your phone and remove the back cover;
- In some models, you just need to place the SD card on the metal slotand push it upward into the slot;
- In other models with a latch in the slot, push the latch upward and lift it open. Then place the SD card into the slot;
- You can then lock the latch again and put the back cover back.
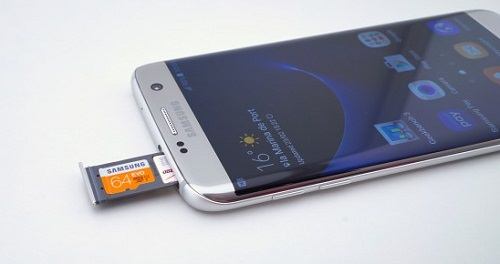
Now as metal design and thinner profile become a trend in smartphone industry, removable battery has been abandoned by hign-end new models, like Samsung S8/S7, LG G6. Now to insert SD card in new models with a SIM card tray:
- Find the SIM card tray on the bottom or on the right side of your phone;
- Plug a small pin into the small hole in the tray, the tray should open;
- Place your SD card in the tray and slide the tray back into the phone.
SD card fail to be detected after inserting in the phone? See what to do if SD card can not be recognized by Android phone. (opens new window)
3. Set up SD Card as Portable/Internal Storage
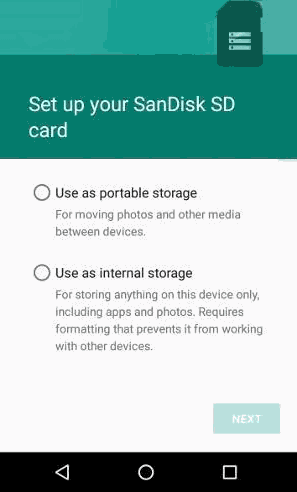
Now you should get a notification to set up the inserted SD card. Since Marshmallow, Android has provided two options to set up SD card: use the card as portable storage or adopt the card as internal storage.
We’re quite familiar with the idea of using SD as portable storage on Android phones: we store media files and documents on the card and when we don’t need it, we take the card out and use it on a card read or other devices. But when a SD card is adopted as internal storage, things are different:
- You can store not only files, but also apps/app data on the memory card;
- You can't take the card out easily. Taking out the card may stop some apps from working or cause data loss on your phone;
- The SD card can not be used on other devices, including your PC.
(Learn more about Internal Storage vs External Memory, Which is Better? (opens new window))
After you have made your mind, you can begin to set up your SD card:
- Tap Set Up. And choose Use as Portable Storage or Use as Internal Storage.
- If using the card as portable storage, a notification will pop up asking whether you want to check out the files on the SD card, tap Explore and you can now move files to the SD card.
- If using the card as internal storage, a notification will warn you that all files on the card will be erased after formatting the card as internal storage. Tap Erase & Format. Wait till the formatting is completed.
4. Move Apps, Photos and Files to SD Card
If an apps can be moved to SD card, you’ll find the "Move to SD card" option available on Settings > Apps.
(Learn more about How to Move Apps to an SD Card on Android (opens new window))
Other than locate and move the photos or files to SD card manually, you also have a quicker way:
- Go to Settings > Storage & USB;
- Tap Internal storage;
- Pick the type of file(photos, videos) to move to your SD card;
- Tap all files you want to move and tap More > Copy to…;
- Pick your SD card and tap copy.
5. Remove/Unmount SD Card
If you don’t need the SD card on your Android phone, you can remove the card from your phone. But other than just taking the card out of the device, you need to unmount the SD card.
What does unmount actually mean? By unmounting, it means to release Android OS’s control of SD card and remove it safely without causing any damage.
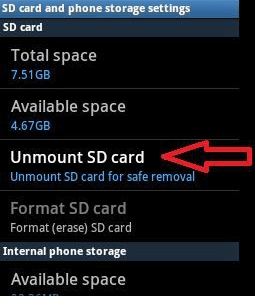
To unmount SD card used as portable storage:
- On your device, tap Settings.
- Go to Storage.
- Under SD card, tap Unmount SD card (it is Eject rather than Unmount in some models.)
To unmount SD card running as internal storage:
- Go to Settings > Storage, choose the SD card and tap Format as portable to format it to run as portable storage.
- Then you can tap Unmount SD card/Eject.
Important: Formatting SD card as portable storage will erase all contents on the card. Please move important data to your internal storage before formatting the card.
After unmounting SD card, you can now remove the card from the card slot or card tray anytime you want.
Any other question about using SD card on Android? Leave your comment below.