


Does iCloud save text message and iMessages history?
Yes. iCloud can back up your text messages and iMessages. Here's what an iCloud backup includes:
- iMessage, text (SMS), and MMS messages;
- Photos, videos, and ringtones;
- Purchase history from Apple services, like your music, movies, TV shows, apps, and books;
- Call history, device settings, home screen, visual voicemail password and other app data.
By backing up iMessages, text messages to iCloud, you can easily transfer messages from iPhone to a new iPhone, iPad, iPod Touch. And you can view your iMessages on iCloud through any device. Or if you lose some messages on iPhone one day, you can get back messages by restoring iCloud backup.
With iOS 11.4 and later, you can now sync messages across iPhone, iPad, Mac over iCloud. So now you have two ways to back up messages to iCloud. And if you want to back up messages without iCloud or transfer messages from iPhone to iPhone without iCloud, you can refer to Part 3 of this passage. (opens new window).
Part 1. How to Back up iMessages to iCloud
Here is how to back up iMessages, text messages to iCloud on iPhone, iPad, iPod Touch.
STEP 1 Connect your device to a Wi-Fi network.
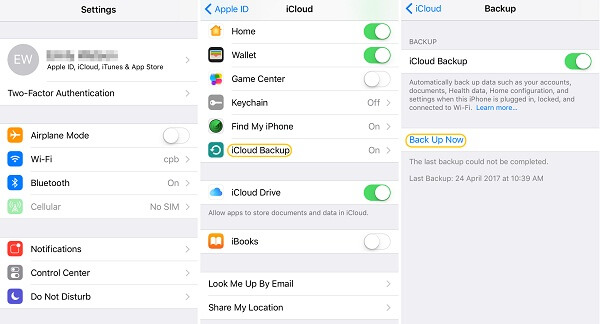
STEP 2 Go to Settings > [your name], and tap iCloud. (If you’re using iOS 10.2 or earlier, go to Settings, then scroll down and tap iCloud).
STEP 3 Tap iCloud Backup. If you're using iOS 10.2 or earlier, tap Backup. Make sure that iCloud Backup is turned on.
STEP 4 Tap Back Up Now. Stay connected to your Wi-Fi network until the process completes. Your iMessages will be automatically included in the backup.
Note: Check that you have enough available space in iCloud for the backup. When you sign in to iCloud, you get 5GB of iCloud storage for free. If you need more iCloud storage, you can buy more from your iPhone. Plans start at 50GB for $0.99 (USD) a month.
Part 2. How to Sync iMessages/Text Messages to iCloud on iOS 11.4
In the latest iOS 11.4, users can store all iPhone messages in iCloud instead of the phone memory. Apple fixed the problem that there was no way to keep messages in sync between an iPad, iPhone, iPod touch, and Mac in previous iOS versions.
Therefore, iPhone, iPad, iPod Touch, after upgrading to iOS 11.4, can enable Messages in iCloud to save SMS/iMessages to iCloud, and then the messages can be viewed in all devices that are using the same Apple ID.
Here is how to save iMessages, text messages to iCloud on iOS 11.4.
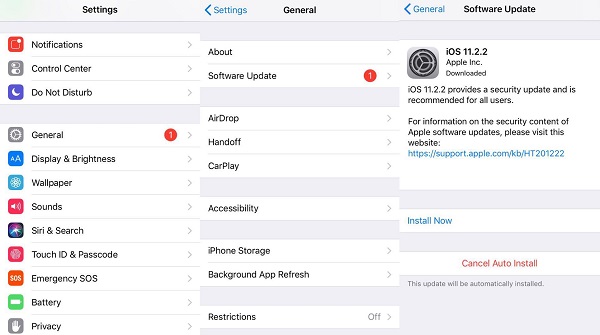
STEP 1 Update iPhone/iPad/iPod Touch to iOS 11.4
You can access the update from Settings –> General –> Software Update, then follow the installation instructions.
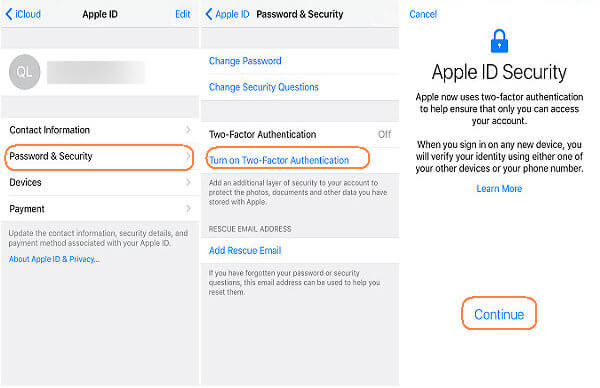
STEP 2 Enable Two-Factor Authentication
To enable it, simply tap on your username at the top of the main Settings page, then select "Password & Security." From there, tap "Turn On Two-Factor Authentication."
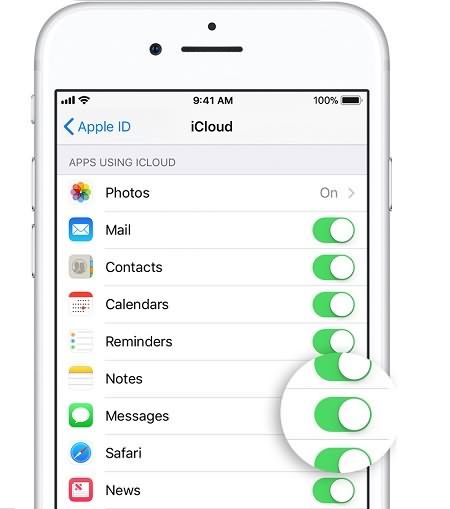
STEP 3 Enable Messages in iCloud
Open Settings, then tap the Apple ID settings. On the Apple ID page, Tap "iCloud," then toggle on "Messages."
From then on, your messages on your iPhone, iPad, iPod Touch are not saved on device memory storage anymore but in iCloud storage.
Tip: If you also want to view iPhone messages on Mac, activate iCloud in Messages on Mac: Open the Messages application on Mac, then click on "Messages", followed by "Preferences > "Accounts" and check the box that says "Enable this account."
Part 3. How to Back up iMessages/Messages without iCloud
Despite iCloud, there are many other ways to back up iMessages, SMS messages, MMS messages on iPhone, iPad, iPod Touch. For instance, you can choose to back up iMessages, messages to computer.
FonePaw iOS Data Backup & Restore can help you back up iMessages, SMS messages and MMS messages on iPhone to PC or Mac.
- Back up messages on computer in small size;
- Encrypt backups to protect privacy.
The method is simple.
Video Guide: How to Backup & Restore iOS Device (Mac)
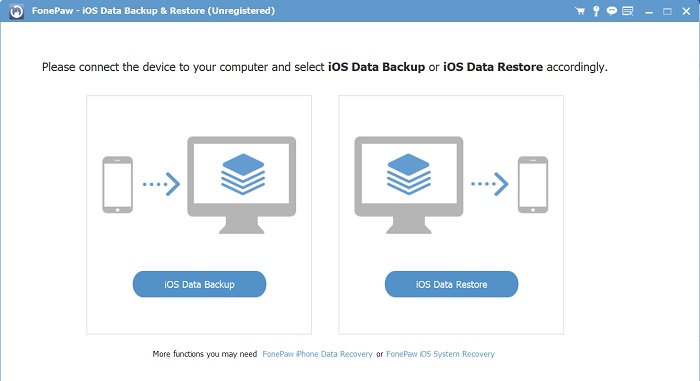
STEP 1 Download and install FonePaw iOS Data Backup & Restore.
STEP 2 Click iOS Data Backup & Restore > iOS Data Backup.
STEP 3 Click Standard Backup or Encrypted Backup.
STEP 4 Check the box of Messages & Attachment. Click Next.

STEP 5 In a minute, a backup of all messages on your iPhone will be created on your computer.

Related Reading: How to Transfer Messages to Computer or Mac without iCloud. (opens new window)