


Finally updated the computer to Windows 11, but not sure how to screen record on this new version? Is Xbox Game Bar still available to capture screen activities on Windows 11?
Don't panic! This article will not only present the instructions of using Xbox Game Bar to screen record on Windows 11, but also reveal the newly launched built-in tool - Snipping Tool. You can also find other effective methods to support you in successfully recording screen. Let's scroll down to check them out!

1. Screen Record on Windows 11 with Snipping Tool
Snipping Tool, launched in 2022, is one of the embedded tools on Windows 11. Compared with Snip & Sketch on Windows 10, it focuses more on capturing screenshots in different modes and offers screen recording with audio as a new feature. To discover its capability, let's see how to screen record with Snipping Tool.
Step 1. Install Snipping Tool on your computer. Search Snipping Tool on the menu, or press down Windows + Shift + S or prt sc to launch the program.
The hotkey is designed for screenshots, so you need to make a screenshot in a random shape to get into the program.
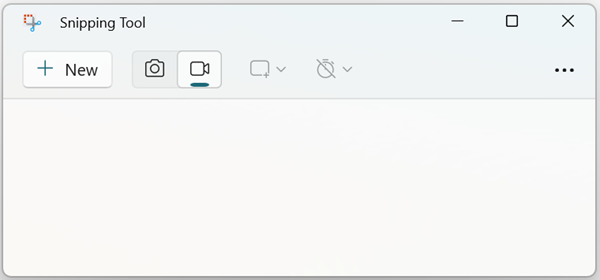
Step 2. Click on the recording icon, and then click on + New to create a new recording.
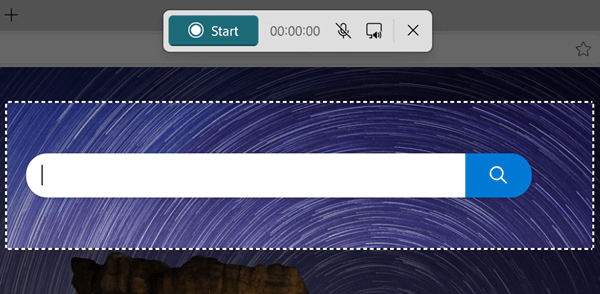
Step 3. Customize the recording area. Press Start to start the recording. Press the red button to stop recording. Then you can preview and save it.
Basically, Snipping Tool is easy to use and effective. But the hotkey is a bit inconvenient since it is designed for screenshots. Also, some users reported that the recording was sometimes delayed to start, and it is still not workable on some Windows 11 computers. Therefore, to achieve successful recording, it'd be better to choose other methods or professional screen recording software.
2. Screen Record on Windows 11 with Xbox Game Bar
As another built-in recorder for Windows computers, Xbox Game Bar has many users for its convenience. By pressing the Win + G button, you can initiate the Xbox Game Bar on your computer. Although Xbox is a pre-installed game recording tool, it can capture your screen with audio as well. You can refer to the steps below to record screen and audio on Windows 11 with Xbox.
Step 1. Head to the Start menu and find Xbox Game Bar. Or tap Win + G to launch it.
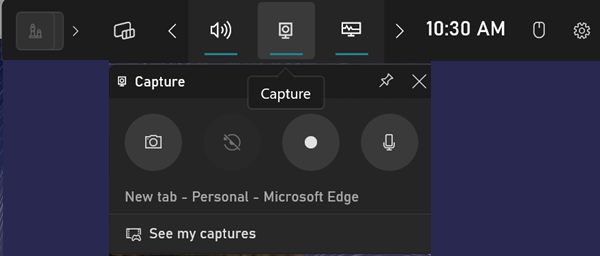
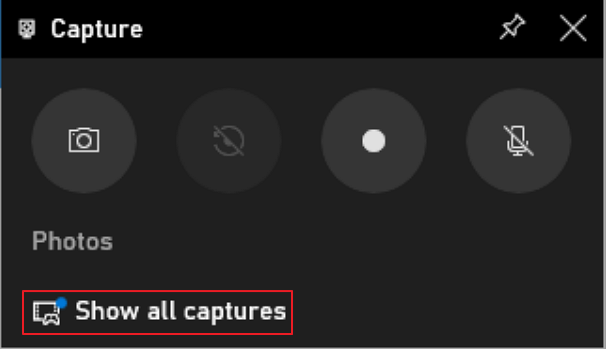
Step 2. Click the Camera icon to open the Capture window. Click the Microphone icon to enable or disable sound. Once you are ready, hit the round Record button to start the recording.
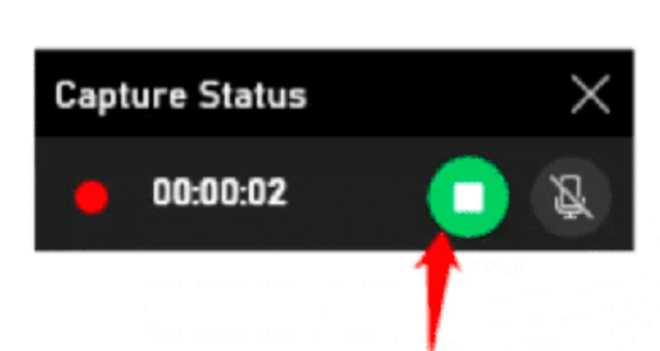
Step 3. When you want to end the recording, tap the Stop button.
Step 4. You can check the recording by clicking Show All Captures at the bottom of the Capture window.
Although Xbox Game Bar is handy to use, it is still far from full-fledged, and therefore you may encounter some bugs from time to time. Sometimes you can not capture the sound, even though you already enabled the microphone. Also, the desktop can not be captured with this tool. The session will automatically end when you switch windows.
To have a smooth recording journey, it is advisable to use professional screen recording tools to capture screen activities with audio on Windows 11. Compared with Xbox game bar, third-party software provides all-around features to allow you to customize recording area, schedule recording tasks, capture screen, audio (system sound and microphone), and webcam at the same time, etc.
3. Screen Record on Windows 11 with FonePaw Screen Recorder
FonePaw Screen Recorder is an all-in-one desktop application on Windows 11/10/8.1/8/7. With FonePaw, you can record screen with audio and webcam, whether you want to mark down highlights of an online meeting or webinar, record gameplay, or capture a music clip. Most importantly, FonePaw Screen Recorder is featured with a user-friendly interface to allow you to complete customized recordings within a few clicks.
Free Download Buy with 20% off Free Download Buy with 20% off
Main features of the FonePaw Screen Recorder
- Flexible Recording Settings: This program supports selecting specific recording areas or windows and its built-in feature can cancel noise and enhance microphone and system sound.
- High-quality Output and Various Output Formats: Fonepaw outputs video and audio files in original quality and with frame rates up to 60 fps. Also supports output videos in MP4, MOV, AVI, F4V, MP3, WMA, AAC, and M4A.
- Add Annotations & Personalized Watermark: You can personalize watermark on your video. Real-time annotations (text, image, step icons, mouse effect) are also available during recording to make your video more interactive.
- Set up Schedule Recording: This tool enables you to organize your recordings in advance in terms of duration, start time, stop time, etc.
If you are curious about how FonePaw works, let's have a closer look at the tutorial video and instructions below:
Step 1. Download and launch the software on your computer
You need to download FonePaw by clicking the button below first, and then open it on your computer.
Free Download Buy with 20% off Free Download Buy with 20% off
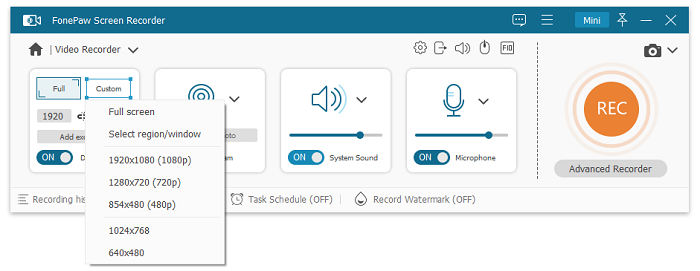
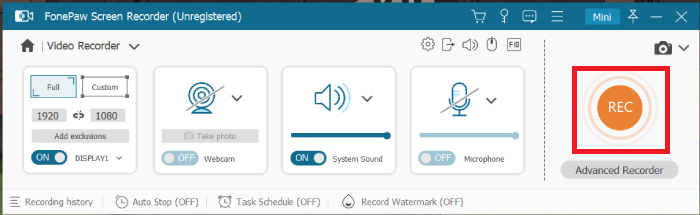
Step 2. Customize the recording area
After you enter the main interface of FonePaw, you can directly head to the Video Recorder section and choose the specific area or window you want to record.
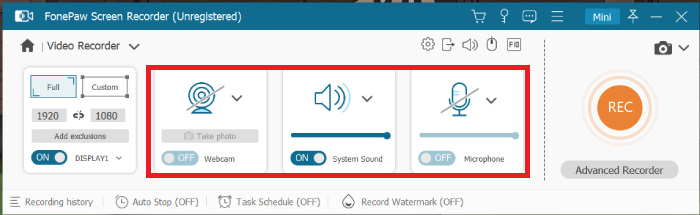
Step 3. Change settings before recording your screen
According to your needs, you can turn on/off the webcam, the system and microphone sound.
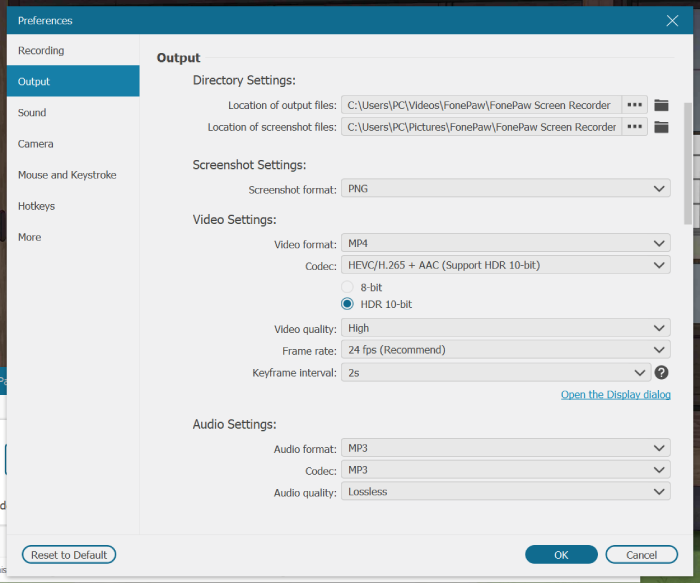
Also, for better output, you can go to the Preference menu, where you can change settings such as hotkeys, video quality, frame rate, video format, etc.
Step 4. Start to record your screen
After you finish all preparations, you can click the REC button to start your screen recording.
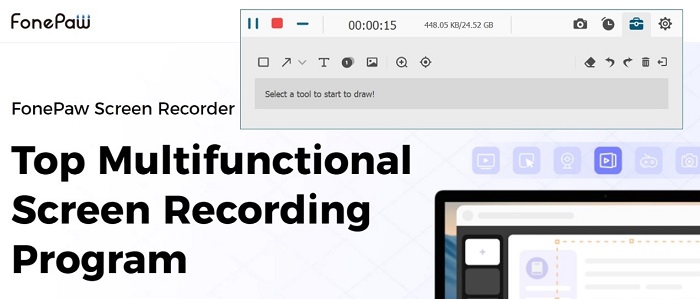
During recording, you can see a floating panel. You can add some annotations or make snapshots from the panel.
Step 5. End screen recording
If you want to end your recording, you can press the Ctrl + Alt + S keyboard shortcut or click the red rectangle button to end it. You can also click the Clock icon to preset a recording length and let the recorder automatically stop video recording when time is up.
Overall, FonePaw is a powerful tool for recording screen on multiple occasions. The rich features can be easily accessible with its simple and clear interface. Though the floating panel sometimes covered some parts of the screen and I had to move it around, FonePaw is still a valuable choice if you are looking for a one-fit-all screen recording tool.
4. Screen Record on Windows 11 with PowerPoint
If embedded tools on Windows 11 can not meet your needs, and you don't want to tackle third-party software, this solution might be a nice fit. Generally, Microsoft Office will be pre-installed on Windows computers. PowerPoint, featured with animation tools and templates, is often used for presentations or tutorials. Actually, it is also equipped with a screen recording feature.
This feature aims to provide vivid pictures to complement the slides. You can also record the slides, mouse cursor, and audio at the same time. Here are the steps of recording screen on Windows 11 with PowerPoint.
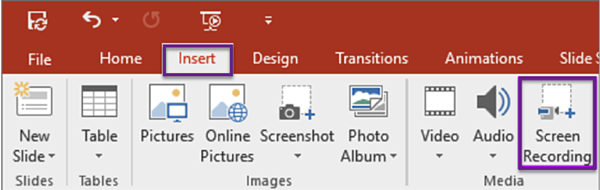
Step 1. Open the presentation or window you want to record. Start PowerPoint on your computer and create a slide. head to the Insert > Screen Recording.
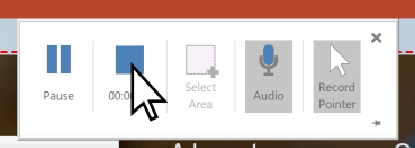
Step 2. Select the recording area. Click on the Record button to start the recording.
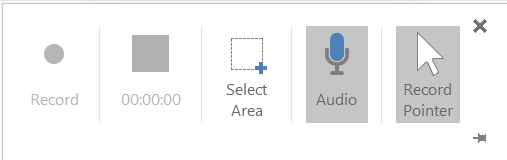
Audio and record pointer are enabled by default. If you don't need them, click on them. They will not be captured if you see the underlay greys out.
Step 3. When you are finished, you can directly click the Stop button and your recording will be added to the slide.
Step 4. To save the recording, right-click on the Video Frame and select Save Media As.
With the help of PowerPoint, you are able to make screen record with audio on Windows 11. But the process is a bit complicated, and you can not record webcam. If you want to capture webcam in high-quality video, it is recommended to use professional screen recording software.
FAQs of Recording Screen on PC Windows 11
How long can I screen record on Windows 11?
The time limit depends on the tools you use and the storage of your computer. Check out the time limits of the programs introduced in this post:
- Snipping Tool: Unlimited
- Xbox Game Bar: 30 minutes
- FonePaw Screen Recorder: Unlimited
- Microsoft PowerPoint: Unlimited
What is the shortcut to record screen on Windows 11?
The shortcut varies according to the tool you use.
- Snipping Tool: Press Windows + Shift + S or prt scr > make a screenshot > start a new recording
- Xbox Game Bar: Press down Windows + Alt + G to enable the screen recording feature. To start recording, press Windows + Alt + R.
Conclusion
Overall, screen recording is easy to accomplish on Windows 11 via various methods. If you don't want to download extra software on your computer, you can use Snipping Tool, Xbox Game Bar, or Microsoft PowerPoint to record some simple videos.
However, considering the shortcomings of built-in tools, FonePaw Screen Recorder seems to be a great choice that is practical, all-purpose, and easy to operate. As a desktop recorder, FonePaw also allows you to easily access advanced features to record videos as you expect. If you want to make screen recording easier on Windows 11 anytime, anywhere, then try FonePaw Screen Recorder!
