


Although iPhone is one of the greatest smartphone for photos in the current market, users come across different camera not working problems whether they are using new models like iPhone X/8/7/6s/6 or earlier version like iPhone 5s/5. This article collects all common problems that may happen to iPhone front/back camera and tell you what to do about the non-working camera.
People also read:
Tips to Fix iPhone Black Screen of Death (opens new window)
Webcam Recorder: How to Record Video with Webcam (opens new window)
Are you facing one of the problems described as below? Click and jump to the solutions that you need.
iPhone Front/Rear Camera Shows Black Screen
You are just going to take a photo and open the Camera on iPhone as usual. However, instead of capturing the target object, the camera shows black screen. You return to the home screen and try to re-enter the camera for several times, but the camera screen is still black. If this sounds like the situation that you are facing, go ahead with these steps.
Step 1. Inspect iPhone front and rear camera. Open a app to make video call, such as Skype, Facetime or Viber. Check if both the front and back camera are working fine during the video call, if so, you are facing a software problem that can be solved by yourself. If the camera still shows black screen, you may need to turn to Apple (opens new window) for help.

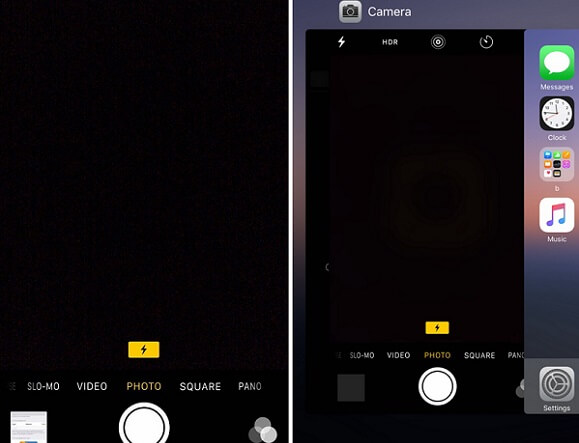
Step 2. Close Camera app on iPhone. Tapping home button and returning to home screen doesn't close an app. To close Camera, double tap home screen until you see App Swticher, where you can see all the apps that are currently running on your iPhone. Find Camera app and swipe up to close it. Then return to home screen and tap Camera app again. If the screen is still black, move on to next step.
Step 3. Press and hold the home button and power button (volume down button and power button for iPhone 7/7 Plus) until the apple logo appears. The iPhone will restart and you can now check the camera is working now or not.
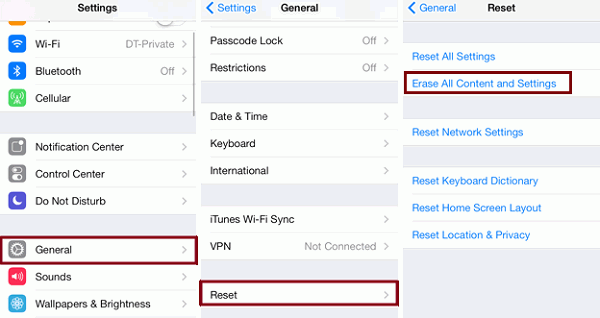
Step 4. Reset iPhone settings. Go to "Settings" > "General" > "Reset" > "Reset All Settings". This won't delete any files or apps on your iPhone but erase your preferred settings on the apps. After the resetting, open the camera app and see if it works okay now.
Step 5. Factory Reset iPhone. Go to "Settings" > "General" > "Reset" and choose "Erase All Content and Settings". This will delete all files and third-party apps on your iPhone so it should be the last resort. To not lose any data, back up your iPhone before factory reset (If important photos are lost after factory reset (opens new window), recover iPhone/iPad photos with iCloud/iTunes backup).
iPhone Camera Flash Not Working
When taking photos in dim light, you may want to turn on flashlight when shooting. However, the camera flash is either totally not working or it is on before or after the photo is taken. For users with camera flash not working problem, the following steps may be able to help you.
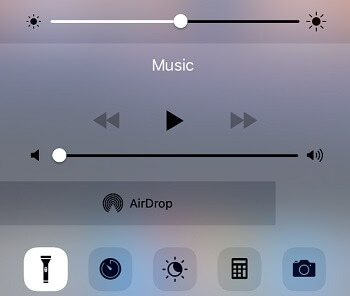
Step 1. Test LED flash. Swipe up to bring out Control Center. Tap flashlight and see if the light is on. If it is, the LED flash is fine. If the flashlight is not on, remove the iPhone case or bumper if there is any. Then clean the flash len to make sure there is no obstruction covering on the lens.
Step 2. Open iPhone camera, tap flashlight icon on the top left corner and make sure you have tapped "On".

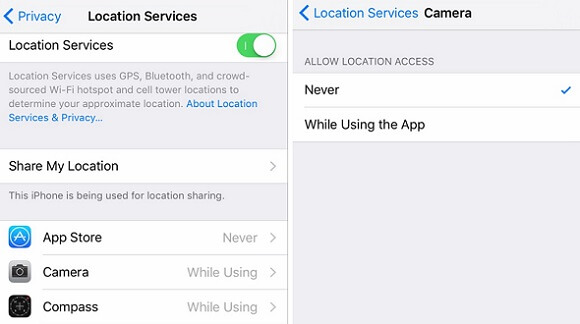
Step 3. Go to "Settings" > "Privacy" > "Location Service". If the camera is allowed location access, tap "Never" to disable it.
Step 4. If you are taking video with the flash on, or the iPhone gets too hot, you might get the message that flash is disabled. You are unable to use the camera flash until iPhone cools down.
Step 5. Restart iPhone by holding power and home button (power and volume down button for iPhone 7/7 Plus).
iPhone Freezes When Switching Between The Front And Rear Camera
"Anyone else having issues when switching between the front and rear camera on iPhone X? Whenever I switch from rear to front, it freezes for about 10 seconds before I can use."
Some people may meet the iPhone X/8/7/6s/6 camera freezing problem when switching between the front and rear camera like the user describes above. Now, let's see some tips to fix the iPhone camera won't reverse problem below:
Go to "Settings > General > Restrictions" on your iPhone. Enable the Restrictions and then make sure you have turned on "Camera" so that it can be accessed.
Force close the Camera app. Then launch it to try again.
Restart iPhone.
Actually, some people would take it as a system issue and Apple may fix it with a new iOS update.
iPhone Keeps Displaying "Cannot Take Photo" Error
After you have used the iPhone for a period of time, you may get the error "Cannot Take Photo - There is not enough available storage to take a photo. You can manage your storage in Settings" when trying to take photos with iPhone camera. That leaves you two options: using a third-party camera app or freeing up iPhone internal storage.
1. Take Photos with Third-Party App
Since you are unable to take photos with the default Camera app, you can use third-party camera app as a workaround. It can be Instagram, Snapseed, VSCO, or other app that you can take photos with. It can fix the camera not working problem temporarily, but the error shows that your iPhone is running out of space. You're better free up more space before insufficient storage influences your other activities on iPhone.
2. Free Up iPhone Storage
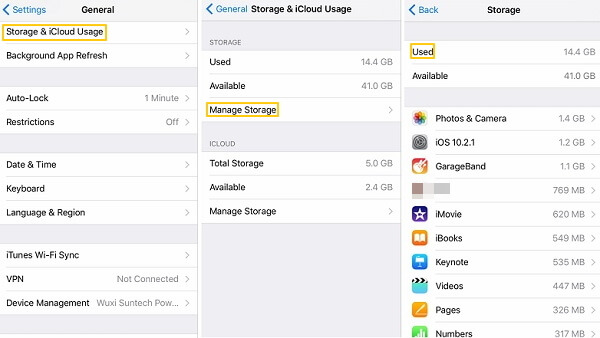
Step 1. Tap "Settings" > "General" > "Storage & iCloud Usage" > "Manage Storage", and see which apps occupy most of the phone storage. If you find the apps useless, uninstall it to free up space.
Step 2. Move photos, music, videos from iPhone to computer. There must be a large number of photos, videos or music files that you don't need right now but may want to review in the future. It is better to move this kind of files to your computer so that you can still have the files while the files won't eat up your space. FonePaw iOS Transfer (opens new window) can move music, photos from iPhone to computer (opens new window) in a easy way and without overwriting files on iPhone.
Please watch the video tutorial to transfer music and photos from iPhone to computer.
Video Tutorial: FonePaw iOS Transfer - Transfer files from iOS device to computer or iTunes
iPhone Back Camera Won't Focus
Some users reported that the back camera won't focus and the photos come out blurry. Here is some tips to fix the problems.
Tip 1.When taking a photo, keep holding the Camera button for a while until the picture becomes clear and then release the button. This will help the iPhone camera to focus. Other users find that tapping on the picture for several times before pressing the Camera button also makes the photo to turn out clearer.
Tip 2. Turning your iPhone off and on again can fix software glitches that cause the iPhone camera not focusing problem.
Tip 3. Check if the back camera lens is scratched. If it is, you may need to ask Apple store or other repair service to replace the lens. Or before the replacement, you can try to remove the scratches by wiping the lens with toothpaste or rubbing the scratches in one direction with eraser.
iPhone Camera Blurry
Some people reported that iPhone camera blurry after update or dropping. Not only iPhone 7/6 has the camera blurry problem, but also the new iPhone X/8. Even when you hold your iPhone steadily, the camera takes blurry photos. Now, let's see how to fix iPhone 7 camera blurry problem, for example.
Clean the camera lens and make sure there is no dirt or debris on it.
Set the camera to Auto mode.
Close any third-party apps running on the background.
Reset all settings to defaults on your iPhone by going to "Settings > General > Reset > Reset all Settings".
Your iPhone camera should be working by now. If you come across other camera problems, let us know by posting your comment. Share the article with your friends via Facebook, Instagram, Google +, Twitter if you find it helpful.