


I am in a state of shock. I was already using windows 10 and last night automated updates started without allowing me to stop them. This morning my computer is cleaned out with all those every important documents deleted!!! Microsoft can do that??? How can I recover them ALL?????
This is posted by a Windows 10 user in Microsoft Community. It has been long since the release of free Windows 10 version and many users have taken the opportunity to upgrade their systems. However, some users found files missing after windows 10 update: after Windows 10 forced an update, they restart the PCs and all files disappeared.
Does Windows 10 update delete files? And how to recover the files after Windows 10 update deleted all my files? This guide will give you all the answers.
Windows 10 updates usually won't delete your files. If all your files are gone after a Windows update, you should try restarting your PC first. Sometimes, you may find all your files come back after a restart. If a restart fails to restore your files, open File Explorer and check whether the free space of the volumes has significantly increased suddenly. If so, the files are definitely deleted in Windows update and you can try to restore your files with FonePaw Data Recovery (opens new window). But if there is no change in your disk space, Windows 10 didn't really delete your files. You can get back the missing files after Windows 10 update with the following methods.
Method 1: Data Recovery Software to Recover Data After Windows 10 Update
Before installing the app, I must remind you that do not write new data into the drive where your files are lost because they may overwrite the data you want to recover. As a result, if Windows 10 update erase all your files, you'd better stop using your computer for other things and just download and install theFonePaw Data Recovery (opens new window)into the drive with less or zero lost files.
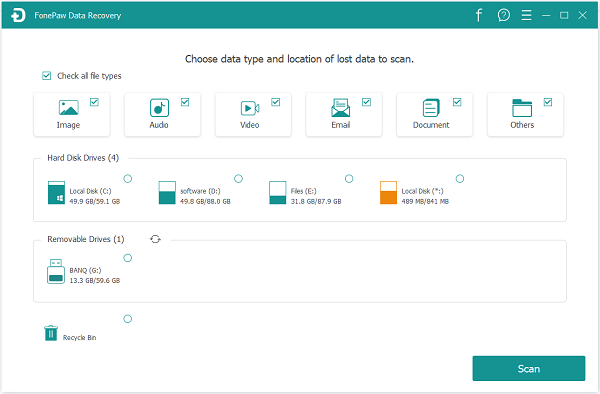
Step 1: Download and install FonePaw Data Recovery to the drive with less or zero lost files in your PC by the below button.
Free Download Buy with 20% off
Step 2: After opening the program, you can tick off the type of files you want to recover. If Windows 10 update deletes your photos, tick Photos; if text files are missing after Windows update, tick Documents; if it deleted everything, choose all types. Then select C drive or other drives that have the lost files. As the program can only recover missing files from one drive at a time, if you have multiple drives, you'll need to repeat these steps to restore all your files from each drive.
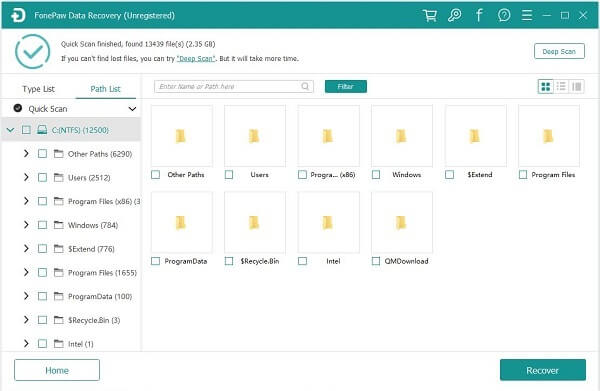
Step 3: Click "Scan" button. The program will begin to scan out the files deleted in Windows 10 update.
Step 4: After scanning, lost files will be presented according to their file types or their paths. You can preview the files to check whether they are what you want to restore. If you cannot find what you want, click "Deep Scan" to discover more deleted files on your computer.
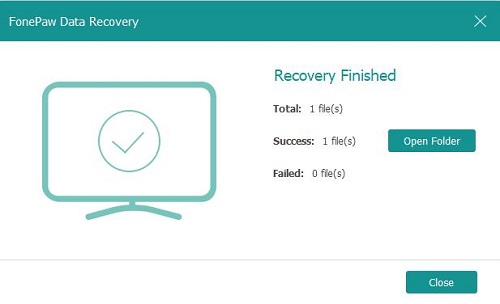
**Step 5:**After checking, tick off the files you want to recover. Click the "Recover" button on the right bottom corner to get them back.
Of course, if you find used space in the volume is nearly unchanged after Windows 10 update, it means that the files may be transferred to other file folders or may be hidden by Windows system. So you can try the below methods to locate your files after Windows 10 upgrade.
Method 2: Sign Out from Temporary Account
After updating your Windows system, your personal account may be signed out and what you are logged in by is possibly a temporary account. In such circumstances, your personal files cannot be found on PC due to the account privacy protection by Windows.
Therefore, you need to right click the Start Menu and choose "Shut down or sign out" > "Sign out". After signing out, reselect the personal account that you normally use and sign in. Then you can check whether your files are back.
Method 3: Search Missing Files After Windows 10 Update
As I have mentioned, the seemingly lost files may be transferred to other paths that you are not familiar with. So you can input the name of the files you want into the search box beside "Start Menu" and type in the file name of the lost files. Then chech if there are matching files in the results.
Besides, some users say that they find their files in the path: C:/Users/(User Name)/Desktop. You may directly go to this folder and see whether your files are there.
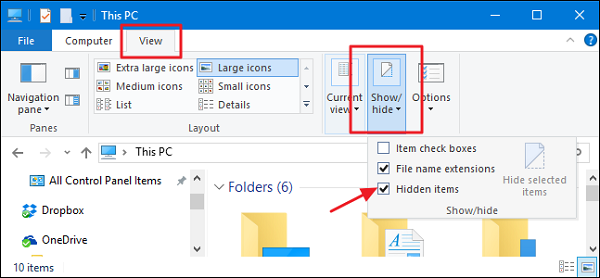
Method 4: Show Hidden Files
Some files may be hidden automatically by Windows 10 after upgrading. You need to show them by ticking off "Hidden items" under the "View" tab in File Exploer.
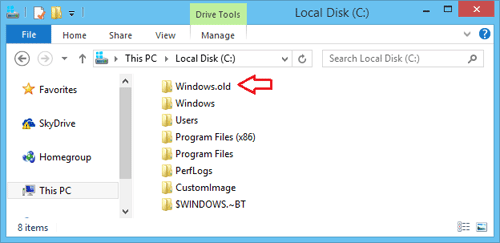
Method 5: Recover Files from Windows.old Folder
If you use the complete or custom upgrade process, the setup will back up a copy of your previous installation in the Windows.old folder, which will be saved in ten days since the upgrading. Hence you'd better go to this folder quickly as to find your files back before they are automatically deleted.
- Open "This PC" on the desktop.
- Click "Local Disk (C:)"
- Go to Windows.old folder and find your personal files; Move them to a safe place.
If you cannot find this folder, you maybe upgrade your system by clean installation process which do not back up or the backup process corrupted during upgrading. Do not give up and continue to try below methods.
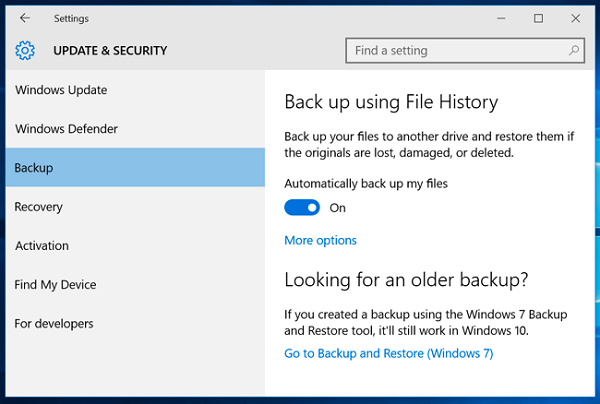
Method 6: Restore from A Previous Backup
There are two ways for you to restore your files using backup.
Step 1: Go to Start > Settings > Update & security > Backup, and click Go to Backup and restore (Windows 7) under the title: Looking for an older backup. (Precondition is that you have a backup before.)
Step 2: The other way is to create a new files in your PC using the same file name and type. Then right click the file and select "properties" and choose the previous file version to restore under the "Previous Versions" tab.
Method 7: Sign in with Windows 7 Administrator Account
If you create a new account to log in after upgrading from Windows 7, your previous files may be stored in a disabled administrator account. So you need to sign in with Windows 7 Administrator account after enabling this account. Let's see the instructions.
Step 1: Right click the Start Menu and click "Computer management".
Step 2: In the left pane, Go to System Tools > Local Users and Groups > Users.
Step 3: If the user named Administrator has a down arrow on its icon , it's been disabled.
Step 4: To enable this account, double-click the Administrator icon to open the "Administrator Properties" box. Next, clear the "Account is disabled" check box under the "General" tab and then click Apply to enable the account.
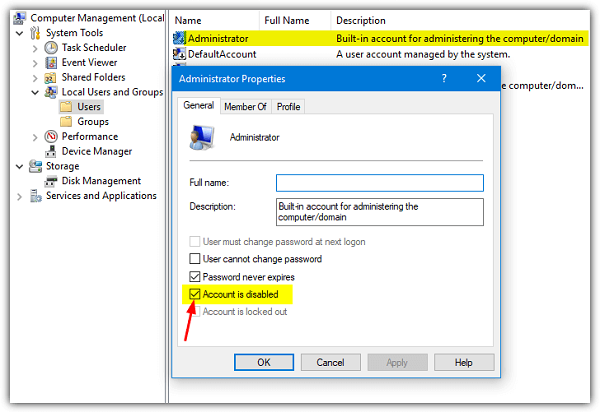
Step 5: Sign out** and then sign in again using the Administrator account.
Method 8: Roll Back to Previous Update
After trying all the methods, if you still cannot find the files, the last resort is toroll back to previous update. Go to Start Menu > Settings. Select Recovery on the left pane and click Get Started under "Go back to an earlier build".
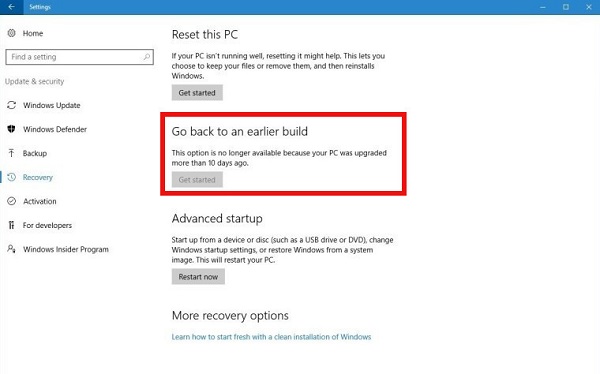
Warning: Use this method carefully because it will erase all newly saved files which do not exist in the earlier build.