


Nowadays restoring the system has become common on any hardware or device since it is a very effective method to solve almost all problems caused by users' improper operations. It also goes with the Windows operating system.
On Windows 7/8/10, there is a built-in utility called System Restore. Many users have tried to use this feature but some of them have encounter errors such as "System Restore failed" or "System Restore didn't complete successfully".
This tutorial will introduce solutions to the windows 10 system restore failed problem.
Part 1. System restore not working - common fixes
No matter what the error or error message is, the below five common fixes are always worth trying and works most time.
1. Try an alternative System Restore point
There is normally more than one restore point on the Windows computer, which represents the exact time point of backing up your PC. For any restore point, the backup process is huge and complex and all kinds of mistakes might happen in this process so it is likely that the restore point chosen by you is not damaged or incomplete. Therefore, one good solution when encountering the system restoring problem is to switch to other restore points.
The basic steps can be seen in the below:
Step 1 Search Recovery in the Start menu and open the option Recovery, which is actually under the Control Panel.
Step 2 In the pop-up window, select and click the second option: Open System Restore.
Step 3 After clicking, you can see a window displaying all the restore points with their time point and description.
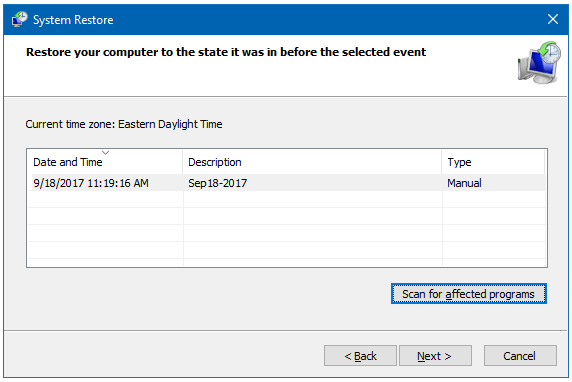
Step 4 If there is more than one restore point, choose the one before the most recent one or the other one without encountering problems.
2. Run System Restore through Safe Mode
Safe mode is a silver bullet for many problems in the Windows system. Therefore, it is worth trying to boot into safe mode before starting restoring. I will introduce three common ways for Windows 10 to boot into safe mode.
# Advanced Startup
First, open Settings from the Start menu.
Second, from the new window, go to Update & Security and choose Recovery on the side menu of the window.
Third, select Restart now under Advanced startup.
Fourth**,** after Advanced Start-up settings menu appears, select Troubleshoot > Advanced options > Startup Settings > Restart.

Fifth, once restarting, press F4 to boot into safe mode.
# System Configuration
Step 1 Search msconfig from the start menu.
Step 2 Open System Configuration.
Step 3 Click the Boot tab on the top of the System Configuration window.
Step 4 Check the box beside Safe boot under Boot options.
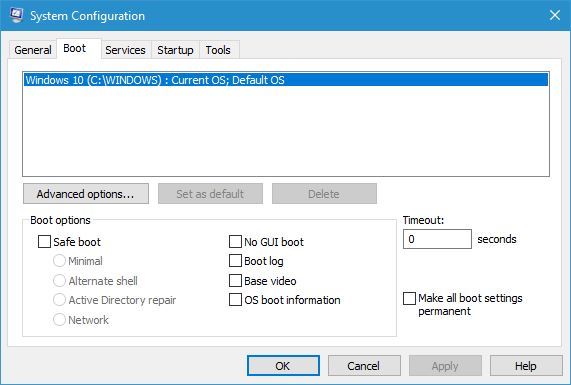
Step 5 Click Apply and close the window.
Soon, you will receive a prompt to reboot your system and accept the prompt to reboot into safe mode. Please remember to uncheck the safe mode in System Configuration by going through the above similar steps after fixing the issue otherwise it will keep booting into safe mode.
# Safe mode key
This is the easiest way to reboot into safe mode but it doesn't work always especially when the laptop uses a fast start-up feature. There is normally one safe mode key for laptops of different brands when the system is starting or restarting. You can search online the exact key for your laptop brand. For example, the safe mode key of Dell laptops is F8.
First, just keep pressing the safe mode key when the laptop is starting.
Second, then an advanced startup menu shows, use the arrow to select safe mode and press the Enter key. Once your laptop is fully started in safe mode, go to system restore to try restoring again.
Note:
There are more ways to star the Window system in safe mode and this tutorial only collects the most common 3 ways. The way of entering into safe mode may be different for Windows 8 and users can search the corresponding methods in Google.
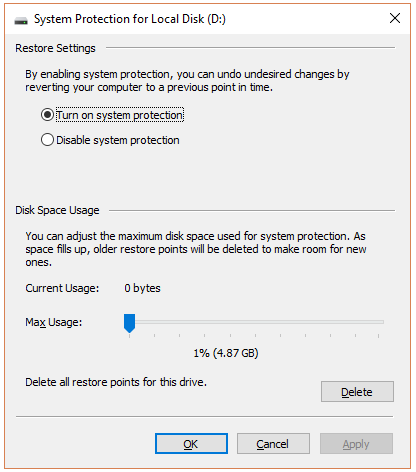
3. Configure your disk space usage
Another way to help to restore properly is to allocate more disk space for system restore. Here are the steps:
Step 1 Type system protection from the Start menu.
Step 2 Select Create a system restore point.
Step 3 Select Configure and check the disk space usage.
Step 4 Adjust the storage to at least 4 GB.
4. Perform an SFC scan on your computer
Sometimes the culprit of failed system restore can be the corruption in system files. System File Checker (SFC) can solve this issue by detecting corruption and replacing it with a healthy one. Therefore, an SFC scan can solve the issue of "System Restore Failed" in many cases. Below are the steps:
Step 1 Find cmd by searching it from the Start menu.
Step 2 Right-click Command Prompt and choose Run as Administrator.
Step 3 Then input *'*sfc /scannow' into the black window and hit Enter key to start the SFC scan. After the SFC is done successfully, you can try restoring the system again.

5. Refresh or reset your computer
If all of the above solutions failed, the only left way is to reset the Windows system. Please remember to do the necessary backup before proceeding to this solution. Here is the way of resetting the Windows system:
Go to Start > Settings.
Click Update & Security and go to Recovery located on the left side.
Under Reset This PC, click Get Started button.
Follow the on-screen instructions. Likewise, you can try the system restore after this resetting process.
Part 2. System restores failed with certain errors
If there are specific error codes for the failed system restore, you can check the below solutions targeted to them. Normally, when the restore failed, there is an alert window saying System Restore Did Not Complete Successfully with error code inside the parentheses. You can check the code against below errors:
Error 0x80070091
Step 1 Boot into safe mode based on the three common methods having been mentioned above.
Step 2 After booting in safe mode, Open "Command Prompt (Admin)" from the start menu.
Step 3 Type: takeown /f "C:\Program Files\WindowsApps" /r /d Y and press Enter.
Step 4 Type: icacls "C:\Program Files\WindowsApps" /grant "%USERDOMAIN%%USERNAME%":(F) /t and press Enter.
Step 5 Type: rd /s "C:\Program Files\Windows Apps" and press Enter followed by confirming the operation.
Step 6 Reboot your computer and System Restore should work now.
Error 0x80070005
Step 1 Search Services.msc in Start Menu Search Box and open Services.
Step 2 Find the "Volume Shadow Copy & Task Scheduler & Microsoft Software Shadow Copy Provider Service" from the right-hand list and set to "Automatic".
![Shadow Copy Provider ]https://media.fonepaw.com/windows/shadow-copy-provider-system-configuration.png)
Step 3 If the Status of System Restore Service is Not Started, Start it.
Step 4 Reboot your PC and the System Restore failed issue should be fixed.
Error 0x8000ffff
Step 1 Search System Restore in the Start Search box.
Step 2 Right-click "System Restore" and then choose "Run as administrator".
Step 3 On the System Restore window, click "Next".
Step 4 Pick a restore point, and then click "Next".
Step 5 On the "Confirm your restore point" window, click "Finish".
Finally, a heads-up should be given to every user on the importance of backup when your perform system restore or even these troubleshooting solutions.
If you still accidentally delete or lose some important files during them, you can still find them back via some third-party software. One easy-to-use such software is FonePaw Data Recovery (opens new window) and many beginners love its concise interface with modern icons. In minutes, any user can recover their deleted files. You can download and have a free trial.
Free Download Buy with 20% off Free Download Buy with 20% off