


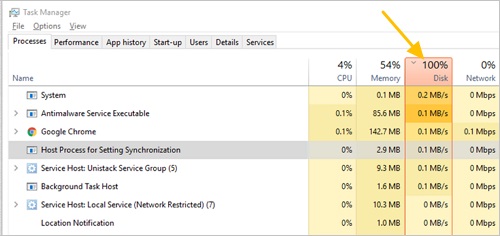
PCs with the Windows system are more likely to be lagging and unresponsive compared to MacBook. When the computer is stuck, some users may open the Task Manager to check which process has caused this problem. Then they notice that the disk is at 100% usage despite the light workload. Today let's see how to solve this 100% disk usage in Windows 10/8.
Windows Files Recovery: FonePaw Data Recovery (opens new window)
- Recover files that are emptied from Trash Bin;
- Recover deleted files from hard disk, external hard disk, USB drive, SD card and more;
- Support data recovery for photos, documents, videos, audio;
- Recover files after resetting or reinstalling Windows.
Free Download Buy with 20% off
Part 1: Why is My Disk Disk Usage at 100% in Windows 10/8
To solve this problem, we need to understand why this problem appears. The direct cause is either overworked disk or wrong message sent to the system. There are various processes or programs that can send the wrong 100% disk usage message to the system. The most common reasons are listed below.
# 1. Windows Background Services
Sometimes we may not open many big processes or have closed them but the disk usage still shows at 100%. That's probably because we ignore some system processes which are not must-have but use up the disk space.
For example, DiagTrack is a tool that collects data about your PC and sends them to Microsoft so as to improve their products. This tool constantly writes data to the hard disk, which then occupies too much space of the hard disk.
SuperFetch, which preload processes and Windows Search, which has a bug of loop search can also be the potential culprit of the 100% disk usage problem. They are all unnecessary tools that intend to optimize your system but damage it under certain circumstances. Similar tools include but not limited to: prefetch in Chrome, Windows Tips, and anti-virus software.
# 2. Windows Automatic Updates
Another possible cause is the random and automatic update of the Windows system. The updates can be downloaded automatically and sometimes the update may be stuck somehow, which takes up too much disk space and leads up to 100% disk usage.
# 3. Performance-draining Programs
The big programs you installed on the PC can also fully occupy the hard disk space. We call these programs performance-draining programs since they severely damage the performance of PC. The most common performance-draining programs are Skype, Chrome, and Steam.
# 4. Message Signaled Interrupt (MSI) mode
A known firmware bug makes the Solid-state drive (SSD) not properly complete input/output with Message Signaled Interrupt (MSI) mode enabled. As a result, the Windows storage stack will attempt to reset the device after waiting on unresponsive reads or writes for a certain period of time.
Part 2: How to Fix 100% Disk Usage in Windows
For various specific reasons behind 100% disk usage, there are different solutions. Users who don't know what the exact problem is can work your way down the below list to find the one that works for you.
# 1. Disable Windows Search
"Search loop" raised by an inherent bug in Windows Search can cause an increased workload on the hard drive.
To prevent it from happening and close Windows search during the current session (until your PC is restarted), you can follow the below steps:
Step 1: Open the Command Prompt (the quickest way is to right-click the Start button/or press Windows+X to open Power User Menu and choose "Command Prompt (Admin).")
Step 2: Enter below command and hit Enter key:
- net.exe stop "Windows search"
If 100% disk usage is gone after Windows Search is close, you can try to disable Windows Search and close it for good. Follow the below steps to stop Windows Search forever.
Step 1: Press WIN+R, enter services.msc, and hit Enter.
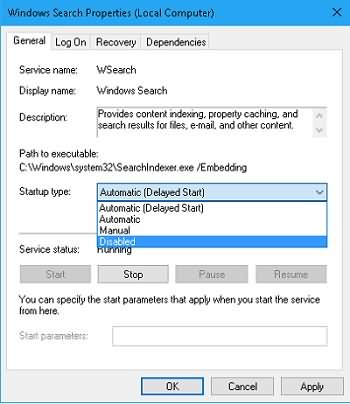
Step 2: In the opened Services window, find the Windows Search entry and double-click it to open the Windows Search Properties window.
Step 3: Under Startup type, select Disabled and click OK to save your changes.
After disabling Windows Search, your Windows system performance would improve considerably. If not, move on.
# 2. Disable Superfetch Service
SuperFetch is used by the system to lower boot time and run must-load programs quickly and efficiently at the beginning of booting. However, it has also been seen as a potential cause of a 100 % disk usage issue in Windows 8 and Windows 10. Here's the way to stop this service:
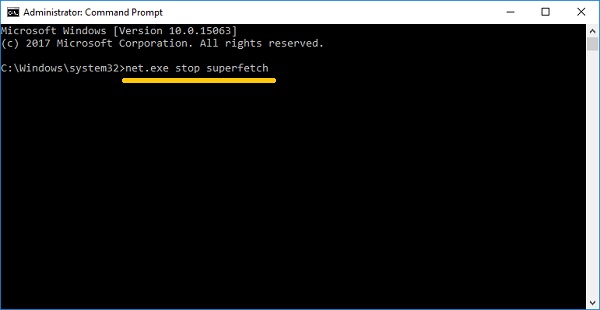
Step 1: To disable Superfetch service, you should open the command prompt as in the first solution.
Step 2: Type in the command: net.exe stop superfetch (If this command is not usable, change it to: net.exe stop sysmain).
Step 3: Hit Enter key.
After a few moments, you can observe whether the disk performance has improved.
# 3. Disable DiagTrack
I have introduced the impact of DiagTrack above so let's see how to disable DiagTrack to fix regain disk space and stop 100% disk usage issue.
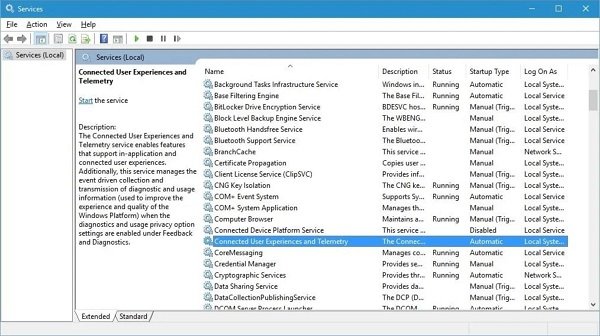
Step 1: Click the Windows Start menu, type Services and click Services tool.
Step 2: Try to search for Connected User Experiences and Telemetry in the list of services, which is the official name of the DiagTrack service.
Step 3: Right-click on the service and select Properties.
Step 4: On its Properties window, Click Stop to stop the service.
After disabling DiagTrack, you can Press Ctrl+Alt+Del, choose Task Manager and make sure the Processes tab is selected to check whether the disk usage has decreased largely.
# 4. Clear Steam Caches
If you are a game lover and install Steam on your PC, there's a good chance that this digital delivery system is causing 100% disk usage. Usually, the update of Steam can cause the background downloader to get caught in a loop. Clearing the Steam cache can help fix this.
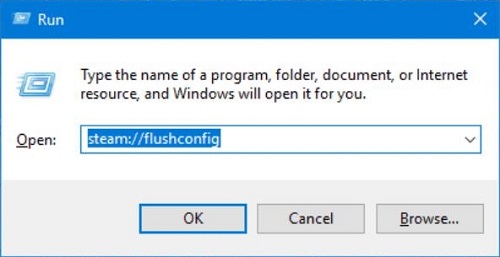
Step 1: Close Steam by exiting it or using the Windows 10 Task Manager to force close the program.
Step 2: Open the WIN+R run box and enter: steam://flushconfig.
Step 3: Hit Enter key and click OK after seeing a dialogue box that informs you that content will be deleted.
Note: Feel assured that this won't delete your games and saves.
# 5. Enable Skype Write Permissions
Enabling Skype to write permission can ensure Skype works smoothly and may help to release disk usage. Let's see how to do it.
Step 1: Press WIN+R.
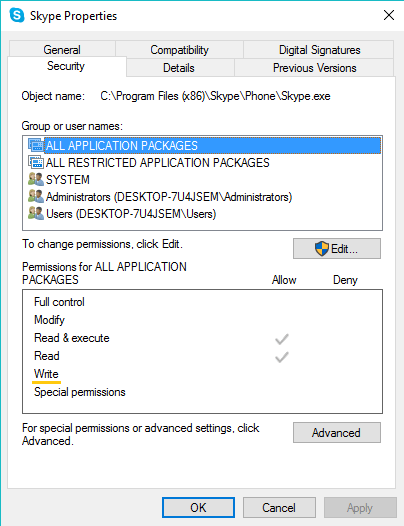
Step 2: Copy and paste the below path into the search box: *C:\Program Files (x86)\Skype\Phone*.
Step 3: Click OK to find the Skype.exe file and right-click it and select Properties.
Step 4: On the opened window, click Edit in the Security tab and then select ALL APPLICATION PACKAGES.
Step 5: Tick off the box next to Write in the Allow column and finish off by clicking Apply followed by OK.
After finishing granting the permission, you can head back to the Task Manager to see the disk usage change.
# 6. Disable Google Chrome Prefetch
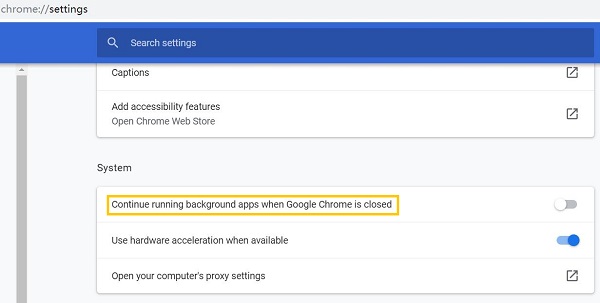
Some features in Chrome that are meant to speed up your browsing experience may overuse your disk drive and lead to the 100 percent disk usage. One of those services, Google Chrome Prefetch, is a prediction service in Chrome that can analyze what site you're most likely to visit every time you open the Chrome browser and preload those pages in the background, which also puts an extra load on the hard drive. You can work through the below steps to see whether this service is the culprit.
Step 1: Select the three dots icon near your profile image in the Chrome browser and then select Settings.
Step 2: Scroll to the bottom and click Advanced.
Step 3: In the Privacy and security section, disable "Use a prediction service to load pages more quickly" by toggling the button behind it.
Step 4: Scroll down to the System section, and disable Continue running background apps when Google Chrome is closed.
# 7. Reset Virtual Memory
The combination of RAM and hard disk space is called Virtual memory which is responsible for the 100% disk usage in your PC. If there isn't enough RAM to perform a task, the HDD is used to supplement the RAM. Data moved to the HDD is then moved back to RAM when required.
If you've come to this solution and the 100% disk usage issue is still not fixed, it could be worth trying to reset your virtual memory.
Step 1: Open the System screen by pressing Windows+Break/Pause keys together, then click Advanced System Settings on the left side.
Step 2: In the pop-up box, select the Advanced tab and click Settings then under Performance.
Step 3: Here you'll find a section labeled Virtual memory under another Advanced tab and click Change.
Step 4: Clear the checkbox for Automatically manage paging file size for all drives.
Step 5: Keep staying on this screen and select your Windows drive (usually C:) > Custom size.
Step 6: Add an Initial size and a Maximum size; note both are measured in MB rather than GB.
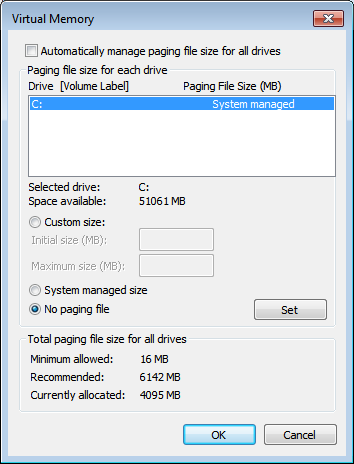
These numbers can be confusing. So the solution is to use the recommended option for the first value and a figure no more than 1.5 times your system RAM for the maximum value, (For instance, a computer with 2GB of RAM should have no more than 3GB/3072MB for the maximum value). After inputting these values, click Set and then OK to finish off the settings.
Then you need to clear the temporary files that have been used in the previous virtual memory allocation:
- Open the Run box (WIN+R) then enter "temp";
- Delete all the files in the opened temp directory.
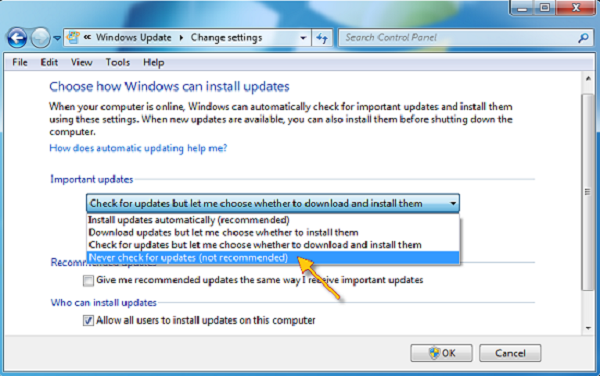
# 8. Stop Windows Automatic Update
The direct solution to 100% disk usage caused by Windows automatic updating (opens new window) is to disable it:
Step 1: Select Start and type in windows updates.
Step 2: Select Windows Update settings in the opened window.
Step 3: Click Advanced options and make Automatically download updates turned off.
# 9. Disable MSI Mode
In some Advanced Host Controller Interface PCI-Express(AHCI PCIe) models, the computer can report 100% disk usage when Message Signaled Interrupt (MSI) mode is enabled. So you are suggested to disable MSI mode and reboot the computer. Follow the instruction of Microsoft to disable MSI mode.
After rebooting, the 100% disk usage should be gone now otherwise you should go to consult the Support service of the company from which you buy your PC.