


With Windows 7 or 8, you can decide when to download the updates as you prefer. But if you are running Windows 10, you can no longer have absolute control over software updates as they will install on your computer automatically. Though automatic updates can prevent or fix problems and ensure your computer a good performance, it is not a service everyone wants. Imagine you are busy working but the automatic updates pop out to interrupt you; or you enjoy running the current system while the mandatory updates cause new issues to you, this would be rather inconvenient or even annoying. Is it possible for us to retake control over the updates and decide when to install them? Of course, we can. In the following guide, we will first show how to turn off automatic updates for Windows7/8 users; and for users who run Windows 10, we provide 4 solutions and will walk you through the steps to prevent updates from automatically installing on you computer.
Turn Off Automatic Updates Windows 7/8
Step 1. Open the Start Menu. This can be achieved by clicking the start button at the bottom-left of your screen or press the windows key on your keyboard.
Step 2. At the end of the start menu, type "windows update" , and the search will be initiated.
Step 3. Select the matching result. It is at the top of the start menu.
Step 4. Click and open the Windows Updates settings. On the upper part of the left pane, select "changing settings"
Step 5. Click the dropdown button under the "Important Updates" header, then you will see the following options:
Install updates automatically (Recommended): select this option, then the updating process will run automatically.
- Download Updates but choose when to install them: select this option, then Windows will download the updates but allow you decide which updates are to be installed and which of them are to be discarded.
- Check for updates but let me choose whether to download and install them: This option allows windows to check updates for you, but it will not download or install without your permission.
- Never check for updates (Not Recommended): Choosing this function, then windows will be prevented from downloading or installing any updates to you to your computer.
Step 6. Select "Never check for updates (not recommended)" to disable Windows update.
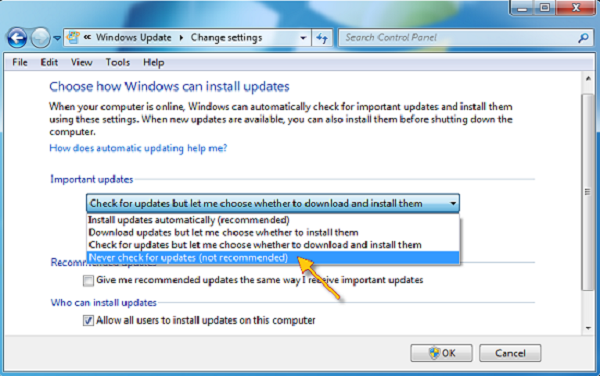
Step 7. Click "OK" at the bottom of the page to save your changing.
Disable Windows 10 Update With 4 Ways
Solution 1: Set Wi-Fi Metered Connection
Note: This method won't work for Ethernet connections. Mare sure that your computer is connected to Wi-Fi before you try this method.
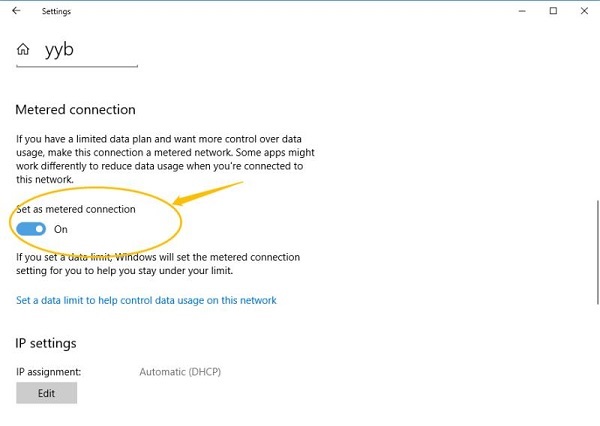
Windows 10 presumes that users have high or unlimited Internet connections, therefore it will take up as much download and upload bandwidth as it wants to run automatic updating. If you set a connection as metered, instead, Windows will assume that you have limited data plan when using Wi-Fi, so it won't push installing updates in your computer. Here is how to set a metered connection.
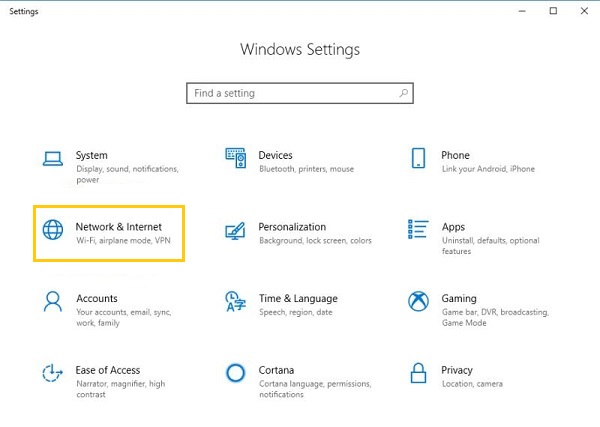
Step 1. Click the Start button at the bottom left on your desktop, then click the Settings app.
Step 2. Click Network & Internet on the setting Panel
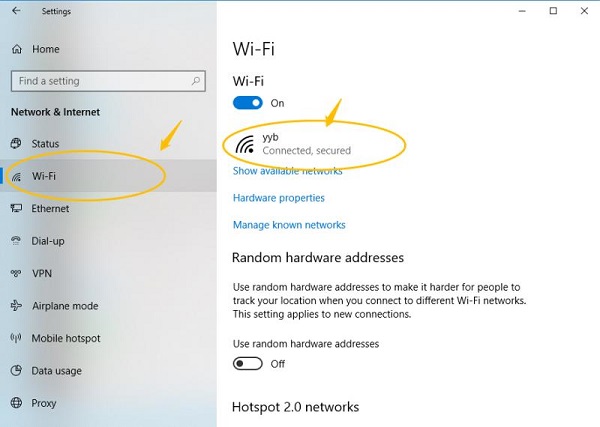
Step 3. Click Wi-Fi on the left pane, then click the name of your Wi-Fi connection.
Step 4. Click to turn on "Set as metered connection".
Solution 2: Stop The Windows Update Service
Though stopping Windows Update Service can temporarily halt any automatic update service, the service will re-enable itself after a certain amount of time.
Windows Update Service can detect, download and install the Windows updates and programs. Once disabled, you cannot receive the Windows automatic update service, and programs will not be able to automatically download or install. You can start the steps below:
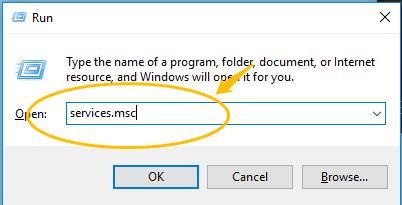
Step 1. Press the Windows logo key + R at the same time to invoke the Run box.
Step 2. Type "services.msc" and press Enter.
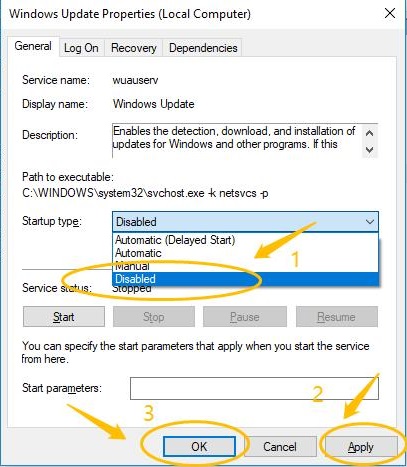
Step 3. Scroll down the pop-out window to "Windows Update" and double-click it.

Step 4. In Startup type, select "Disabled". Then click "Apply" and "OK" to save the settings.
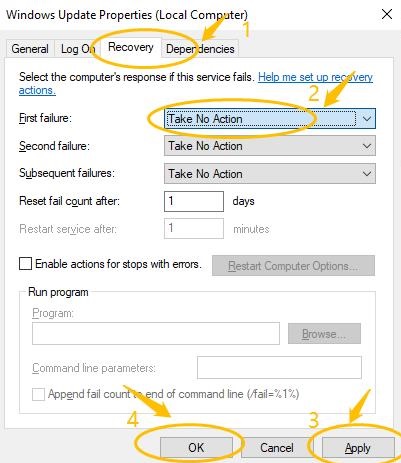
Step 5. If it's the first time that you stop the Windows Update service, you may also need to take one more step. Still on the Windows Update Properties pane, click the Recovery tab, select Take No Action in the First failure section, then click Apply and OK to save the setting.
Step 6. Restart your PC to make it take effect.
If you find it impossible to disable Windows 10 Update Service. It's likely caused by Windows 10 Update Assistant. In that case, you should uninstall Windows 10 Update Assistant in your computer first. Here are the steps:
- Use Window Key+ R shortcut to invoke the Run box; type "appwiz.cpl", and click OK.
- Find the Windows 10 Update Assistant in the listed programs, and right click on it, then select Uninstall.
- Confirm the delete.
- Open File Explorer, and click This PC.
- If the Windows Update Assistant is installed by default when you install your Windows OS, go to the file where your system is installed, normally it's This PC > C drive > Windows > Windows10 Upgrade, then delete the Windows10 Upgrade folder.
- If the Windows 10 Update Assistant is installed separately, you can go to the location where the Windows 10 Update Assistant is saved, and delete the installation folder. It's normally named as Windows10Upgrade. Go to This PC > Windows, delete the folders named Update AssistantV2 and Update Assistant.
After the full uninstallation of Windows 10 Update Assistant, restart your computer. Then you can try the methods above to stop Windows 10 from automatically updating.
Solution 3 : Change Group Policy Editor Settings
Note: Group Policy is not available in the Home edition. Only when you run Windows 10 Professional, Enterprise, or Education, can you change the settings of Group Policy Editor to prevent Windows 10 from automatically updating. If you are using Windows 10 Home, you should try the other methods. To check your own Windows 10 edition (Home, Professional, Education or Enterprise) , just go to Settings > System >About.
Here is how to change the settings of Group Policy Editor Settings:
Step 1. Use the Windows key + R keyboard shortcut to invoke the Run box.
Step 2. Type "gpedit.msc" and click OK to open the Local Group Policy Editor.
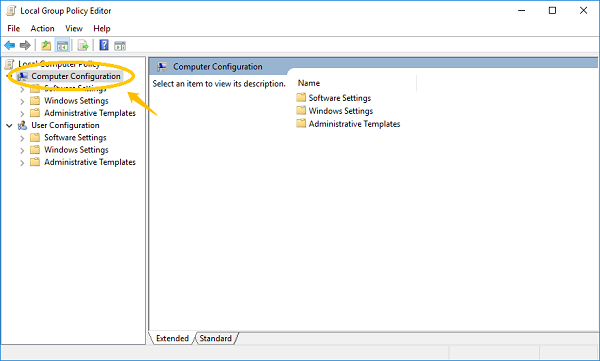
Step 3. Go to Computer Configuration > Administrative Templates > Windows Components > Windows Update.

Step 4. Double click Configure Automatic Updates.
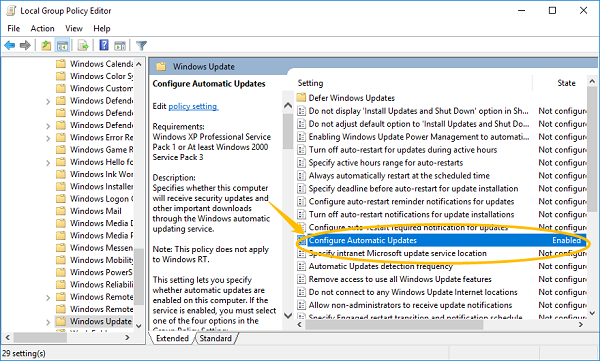
Step 5. Select Disabled in Configured Automatic Updates on the left, and click Apply and OK to disable the Windows automatic update feature.
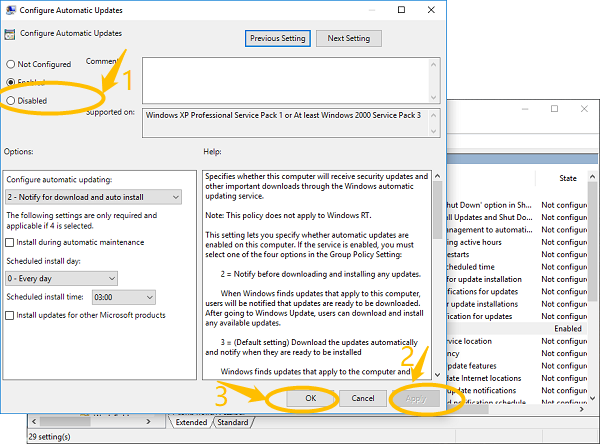
In case that you miss the important Windows update, in the final step, you can select "Enabled", then choose "2 – Notify for download and auto install". In doing so, you will receive notifications about new Windows update and you can also decide when to download and install.
Solution 4. Disable Windows 10 Updates with Registry
Note: This method helps you avoid automatic updates and at the same time receive update notifications. However, it is a bit risky, for if not correctly operated, it will cause irreversible damage to your installation. So it is strongly recommended that you make a full backup of your computer before trying this method.
Follow the guide to see how to do it:
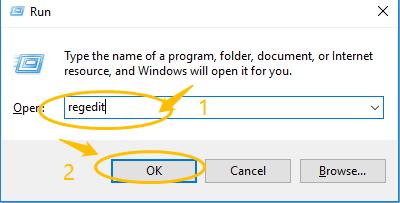
Step 1. Use the Windows key + R keyboard shortcut to invoke the Run box.
Step 2 Type "regedit", and click "OK" to open the Registry.
Browse the following path: HKEY_LOCAL_MACHINE\SOFTWARE\Policies\Microsoft\Windows
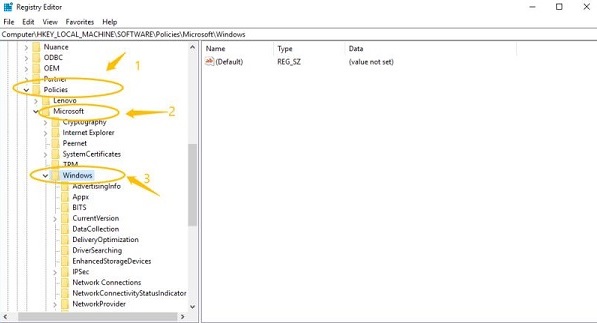
Step 3. Right-click the Windows (folder) key, select New, and then click Key.
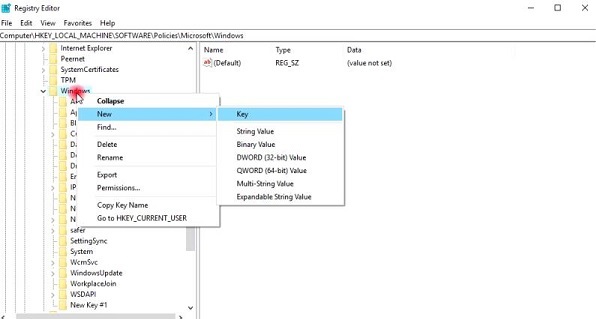
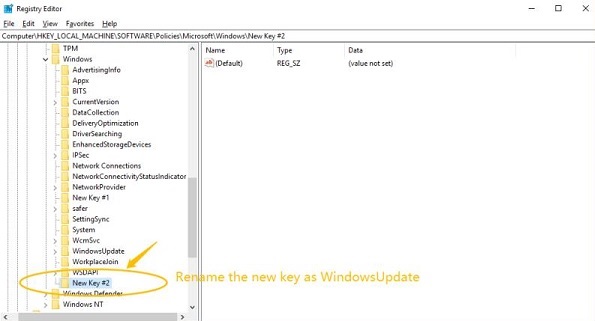
Step 4. Name the new key WindowsUpdate and press Enter.
Step 5. Right-click the newly created key, again select New, and click Key.
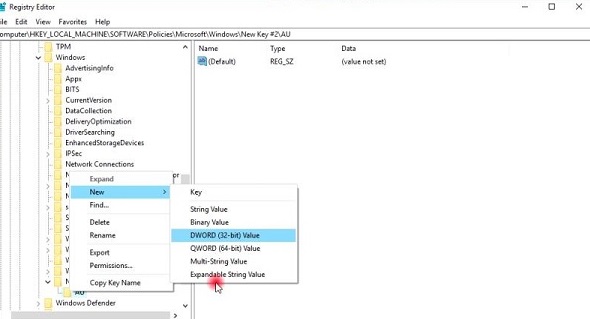
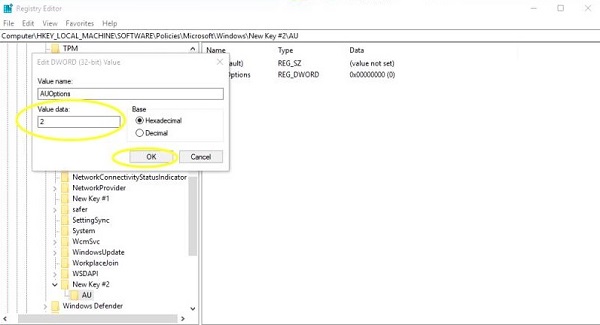
Step 6. Name the new key AU and press Enter. Inside the newly created key, right-click on the right side, select New, and click on DWORD (32-bit) Value.
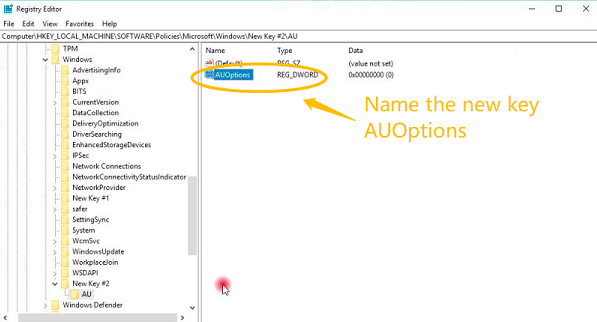
Step 7. Name the new key AUOptions and press Enter.
Double-click the newly created key and change its value using one of the following options:
- 2 - "Notify for download and notify for install."
- 3 - "Auto download and notify for install."
- 4 - "Auto download and schedule the install."
- 5 - "Allow local admin to choose settings."
Although you can choose any of these options, you are advised to change the value to 2 so that you can not only prevent Windows 10 from downloading updates automatically, but you will also get a notification when new updates are available. Then Click OK.
Step 8. Close the Registry to complete the task.
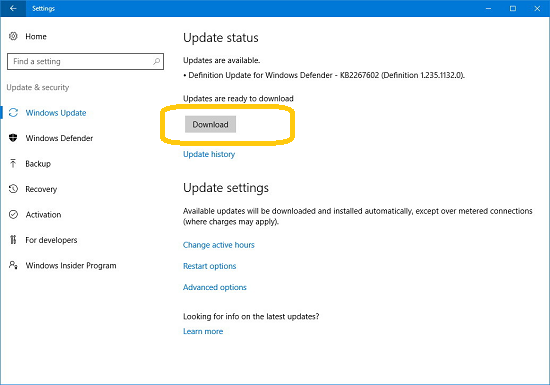
After changing the settings of the Registry, next time when new updates become available, you'll receive a notification in Action Center. If you are ready to download the updates, do the following manually:
- Open Settings.
- Click on Update & security.
- Click on Windows Update > Download. Click Restart to complete.
That's all the methods you can try to stop automatic updates on your computer. Just choose one that works best for you.