


Losing a word document could give you a heart attack. The lost document may be an assignment, a report, or an article that you have been working on for days, weeks, or even months. Sometimes, the Word crashed, or your Mac suddenly shut off, leaving the Word document you are working on unsaved. Or you accidentally saved over a Word document on Mac, thus the document is overwritten. Even worse, you may find a document missing and realize that you have deleted it by accident.
Whether you need to recover an unsaved or deleted Word document on Mac, this article can give you some hints. Read the methods below to recover Word documents on Mac.
How to Recover Unsaved Word Documents on Mac
The good news is that by default, Word on Mac enables an autosave feature which automatically save the document you are working on every 10 minutes in the AutoRecovery folder. It is very likely that you can recover the document that you didn't save with the autosave files.
 Note:
Note:
- The prerequisite for Word AutoRecover to work on Mac is that you have saved the document for at least one time. That is to say, if you just create a Word file, make some edits and then close the file by clicking Don't Save, there is no available AutoRecover file to recover the unsaved document.
If Word or Mac system crashed
After an application (such as Microsoft Office) crashes or macOS freezes, the next time you open Word, an AutoRecover file will be automatically opened and you can save it and pick up where you left off.
In the ideal world, you should see the unsaved document right after you relaunch Word. However, if things doesn't work as expected, you can find Word's autosave location on Mac and automatically recover the unsaved document.
Find AutoRecover files in Word 2011 on Mac
To recover unsaved Word document on Word 2011 on Mac, there are two ways.
1. Open AutoRecover files
Step 1 On Word, click File > AutoRecover.
Step 2 You should be seeing a list of AutoRecover files. According the saving date, open the unsaved file you are looking.
2. Locate AutoRecovery folder on Mac
Step 1 Open Finder.
Step 2 Press Alt key while clicking Go to reveal Library folder.
Step 3 Go to the Word autosave location: Library/Application Support/Microsoft/Office/Office 2011 AutoRecovery.

Get AutoRecover files in Word 2016/2017 on Mac
There are also two methods to recover a Word document that was not saved on Mac for Word 2016, 2017 or newer.
1. Go to Microsoft User Data folder
Step 1 Close Microsoft Word on Mac.
Step 2 Open Finder > Documents > Microsoft User Data folder.
Step 3 Look through the files that are named "AutoRecovery save of" and find the autosave files you need.

If you have problem in opening the AutoRecover Word files, rename the files and add ".doc" to the file extension.
2. Go to AutoRecovery folder
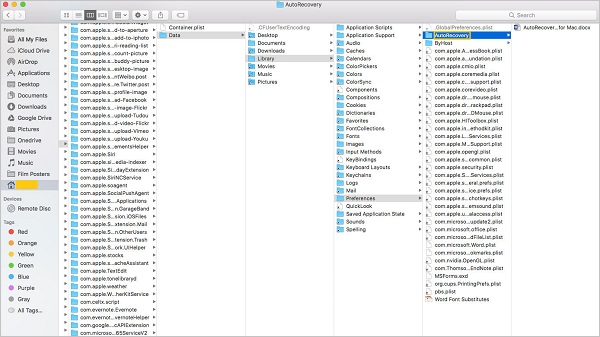
Step 1 Open Finder. Click Go > Go to folder.
Step 2 Enter the path as follow:
~/Library/Containers/com.microsoft.Word/Data/Library/Preferences/AutoRecovery.
If you fail to recover unsaved Word documents with AutoRecover files, you can also check temporary folder on Mac, which may contain the files you are looking for.
Recover unsaved Word document with Mac Temporary folder
Step 1 Launch Terminal with Spotlight or go to Applications > Utilities.
Step 2 Enter the command line: open $TMPDIR. Hit Enter.
Step 3 The temporary folder will be open. Check if there is the Word document that you didn't save.

How to Recover Lost/Deleted Word Documents on Mac
Compared to getting back unsaved Word files by finding autosave files one by one, it can be easily to retrieve the deleted word document on Mac, as there are many data recovery programs in the market that can help you recover deleted files.
These programs are able to scan your deleted or lost files from the disk and recover them before they are overwritten by new data. As long as you minimize the operation on Mac after the Word file is deleted, it’s high possibility that you can get it back successfully.
Free Download Buy with 20% off Free Download Buy with 20% off
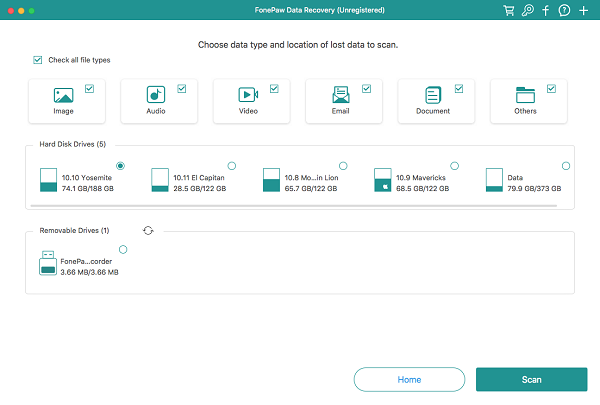
FonePaw Data Recovery is a reliable Mac data recovery tool that can recover the deleted Word documents for you. Sometimes, when you cannot find the unsaved documents from AutoRecovery folder, you can also use this program to see if it can scan out the files that you need.
This program enables you to select a specific file type (like document) and disk to scan, which can help you save your time and effort. When it scans out some files, you can click to preview and then choose to recover the files you want. Though the recovering function is not supported by trial version, you are free to preview it.
Note:
- After a Word document is deleted or lost, you should run FonePaw Data Recovery as soon as possible because the deleted document can be covered by new data on your Mac anytime. A rule of thumb for successful data recovery is Act Fast.
Step 1 Run FonePaw Data Recovery for Mac.
Free Download Buy with 20% off Free Download Buy with 20% off
Step 2 To recover deleted Word documents from Mac drive, click Documents and select the drive that the deleted Word files were saved. Click Scan.
Step 3 The program will begin to scan and find the deleted documents on the drive, which include deleted Word, Excel, PDF, PPT and more.
Step 4 When the scanning stops, click DOC or DOCX and view if the deleted files you need are found. If not, click Deep Scan to find the deleted files are buried deeper.
Step 5 When you see the Word files you want to recover, click Recover.

Free Download Buy with 20% off Free Download Buy with 20% off
With a few steps, you can recover the deleted Word document on Mac. If you want to retrieve files without hassle, have a try of FonePaw Data Recovery. If you prefer to recover the Word file manually, you can also try to restore it from a Time Machine backup on Mac.
How to Recover Overwritten Word Documents on Mac
When you accidentally saved over or deleted a Word document that you actually need on Mac, you can try to recover the Word document from AutoRecovery or a data recovery program. Besides the two ways, the final way is to recover the previous version of the document from Time Machine backups on Mac.
Note:
- This method requires you to have a Time Machine backup which contains your previous data. If not, it may not be workable, and you can try to use this feature from now on.
Step 1 Open Time Machine with Spotlight.
Step 2 Find the files you want to restore.
Step 3 Click Restore to restore the Word file.

Tips: Avoid Data Loss in Word for Mac
Set a shorter AutoRecover interval
By default, Word automatically save a copy of the Word document you are working on every 10 minutes. You can shorten the interval. On Word, go to Preferences > Output > Sharing > Save > Save every XX minute. For example, enter 5 to save a Word document every 5 minute.
Enable AutoSave
if you are subscribed to Word for Office 365. With AutoSave enable, Word saves the changes you made every few seconds so you don't need manually click the Save button. Even if Word crashes unexpectedly, most changes on a document are saved automatically.