


HP computers or tablets are widely used nowadays. From time to time we feel a need to take a screenshot or screencast to show others what's on our screen. In this article, we will introduce three useful ways for you to capture a screenshot on HP Envy laptop, HP Elitebook, HP Stream Laptop, HP Spectre, and more on Windows 10/8/7.
1.FonePaw Screen Recorder
FonePaw Screen Recorder (opens new window) is applicable to all HP laptops as well as a desktop computer. It can be used as a tool to take a screenshot of the entire screen, a customized area, or a certain window. Its rich-featured editing tools allow you to add lines, arrows, different shapes, or text to the captured screenshot before saving it. It can also save screenshots on HP computers as PNG, JPG, GIF, and more.
Step 1. Download, install and launch the FonePaw Screen Recorder.
Free Download Buy with 20% off
Step 2. Click the third icon Screen Capture on the homepage. You can also use the hotkey to take a snapshot. It is Ctrl+Alt+C by default, but you can redefine it as you like.

Step 3. Click and Drag the cross cursor to select an area for capturing. You will then see an editing toolbar pop up. By using the adding tools, you can add the annotation to your screenshot or highlight the important parts.
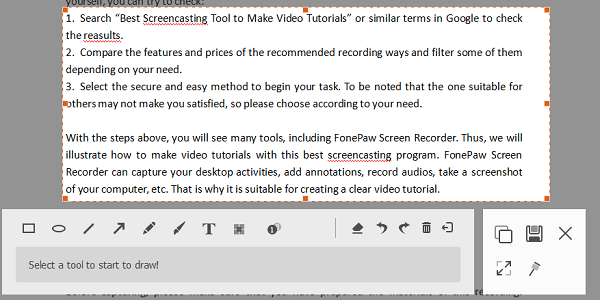
Apart from the annotation tool, the screenshot control panel of the FonePaw Screen Recorder also has other useful buttons.
Click Copy, then you can paste the screenshot wherever you like;
Click Save, then it will be saved in a different format (PNG, GIF,etc.) as you like;
The full-screen button allows you to capture the entire screen;
The Pin to Screen feature enables you to pin a screenshot of a webpage or website to your computer screen. For example, if you find a certain webpage valuable and would like to take related notes on Word, you can use the Pin to Screen function to pin this webpage on your Word interface, so that you don't have to shift between different programs.
Apart from capturing screen, FonePaw Screen Recorder can also be used to record a screen video (opens new window) or a webcam video along with the audio. During the recording process, the screenshot function is still available.
Video Tutorial: How to Record Your Computer Screen with Audio?
You May Like:
Windows 10 Screen Recorder: Capture Screen to Image/GIF/Videos (opens new window)
Windows 7/8 Screen Recorder: Capture Screen to Image/GIF/Videos (opens new window)
2. Keyboard Screenshots on HP Pavilion/Stream Notebook/HP Envy/ ELITEBOOK/Omen /Spectre
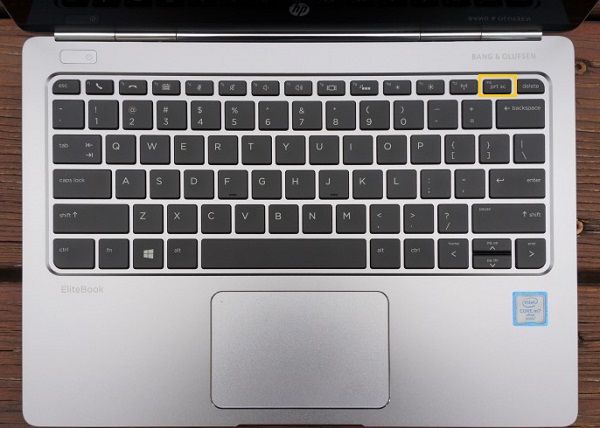
Keyboard shortcuts have a lot of unexpected functions waiting for us to discover, for example, you can take a screenshot easily and quickly with the print screen button on your HP computer. On HP laptop, there is usually a button labeled as PrtSc, "PrntScrn," "Print Scr," or something similar according to different HP models, and it is usually found in the upper right of the keyboard. With this button, you can have a screenshot taken instantly and saved automatically as a file in the screenshot folder; you can also take a screenshot and paste it to wherever you like, or select a certain window or a certain part of the screen to capture.
Follow our guide to see how to take a screenshot on HP laptop and desktop using keyboard shortcuts.
To take a screenshot on HP computer, you can try the keyboard combinations below.
- Windows logo key + PrtScn
- Windows logo key + Ctrl + PrtScn
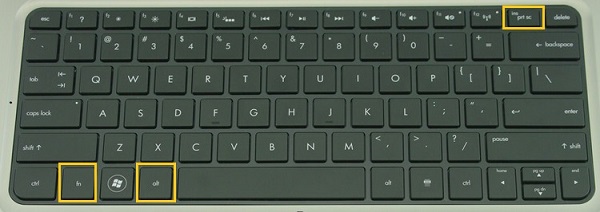
- Windows logo key + Fn + PrtScn
As screenshot shortcuts differ according to different HP models, you had better check your laptop's manual for more information.
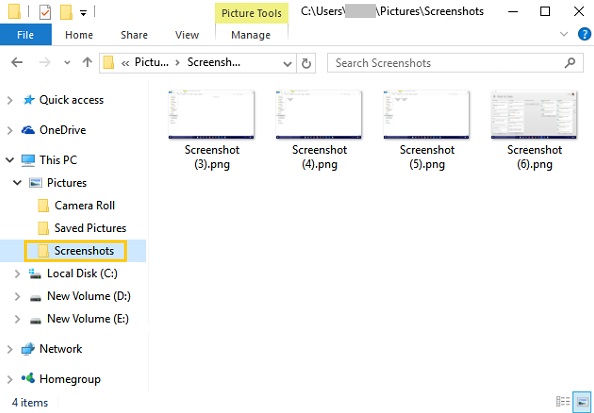
After that, you can see your screen dim for a moment, which means it has been captured. If your HP laptop is running Windows 7, the screenshot is copied to the clipboard, so you can use Paint or Word to save it as an image. But if your HP device is running Windows 8 or 10, the screenshot is automatically saved as a file. To get it, go to your default Pictures folder >Screenshots. You can see that the screenshot has been automatically labeled with a number. You can rename it as you like.
Sometimes you don't have to save your screenshot as a file if you just want to share it with others or paste it on other programs immediately. To do this, you just need to press the "PrtScn" key, then a screenshot of your current screen will be copied to the clipboard. Open the program where you would like to use this screenshot, right click and select Paste, or press Ctrl+V. Then the screenshot will be pasted on the designated area.
Note: On some HP laptops, the shortcut may be "Alt + Fn + PrtScn" keys instead. Check your laptop's manual for more information.
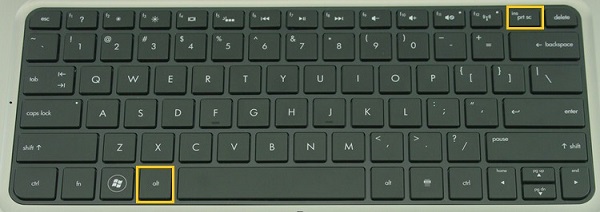
With the shortcut "Alt + PrtScn", you can also capture a certain window. For example, if you want to snap your PowerPoint Presentation, click this program, and then click "Alt+PrtScn", then this active window will be captured and stored in the clipboard. You can paste it into any place as you like.
Note: On some HP laptops, you may need to press the "Alt + Fn + PrtScn" keys instead. Check your laptop's manual for more information.
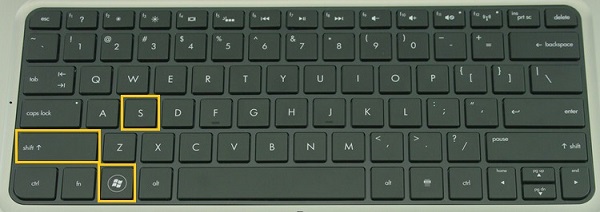
If your HP computer is running Windows 10, you are also allowed to capture a certain part of the screen or window. Press "Windows +Shift+S", you will see your screen appears grayed out, and the mouse cursor changes into a cross cursor. Click and drag on your screen to select the part of the screen or window that you want to capture, a screenshot will be taken immediately and copied to your clipboard. You can paste it anywhere as you like.
3. Take Screenshot on HP with Windows Snipping Tool
Windows Snipping Tool which loaded on your HP is also a powerful screenshot tool. It not only allows you to take a screenshot of an open window, a customized area or the entire screen, it also allows you to add an annotation to the screenshot by using different colored pen or highlighter. You can save the image as HTML, PNG, GIF, or JPEG file; copied it or send it to others by email. Here are the steps to use it:
Step 1. Press Windows key+ R to invoke the running box. Type the snipping tool and click OK. Then the interface of the Snipping Tool will come to your eyes.
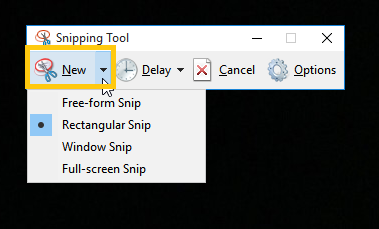
Step 2. Click the drop-down button next to New. This allows you to choose the type of screenshot you would like to capture. There are four types for you to choose: free-form, rectangular, window, and full-screen.
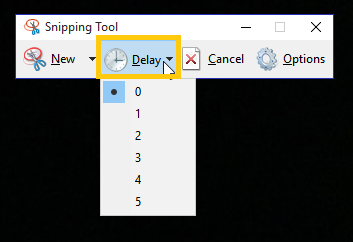
Step 3. The Delay function allows you to decide when to start capturing. You can choose to have your screen captured without delay, or choose to wait for 1 to 5 seconds before the screenshot is taken.
Step 4. Once the screen is captured, you can use the editing tools to add annotations to it; save it as a file, or email it to others.
With the above-mentioned methods, you must find it easy to take screenshots now. If you just need to take one or two screenshots instantly, windows built-in methods are simple and useful. But if you need to take a lot of screenshot with more flexibility; or if you would like to enjoy better functionality, a third-party tool would be your best option. FonePaw Screen Recorder has a trial version, download it and have a try!