Time Machine is a built-in feature equipped on Mac computers to help back up data regularly to avoid sudden data loss caused by different situations such as accidental deletion and system crashes. It is also capable of reinstalling macOS. So when you want to retrieve partial data, a whole backup, or reinstall macOS on Mac, Time Machine is definitely a good helper.
In this article, detailed tutorials will guide you on how to restore files, macOS, or even backup from Time Machine to retrieve data easily. Now, just keep reading.
![]()
How to Restore Files from Time Machine
You may suffer from sudden system errors causing data loss, or just mistakenly deleted files, and now want to get them back. If you have regularly backed up data before, you can easily restore backup from Time Machine to find lost data back or recover deleted files on Mac. With its support, you can also selectively recover lost files, helping you out of the hassle of sorting particular ones from a pile of recovered files. Now, check the steps below and learn how to operate the recovery:
- Connect the external storage device to your Mac if you have backed data up there before.
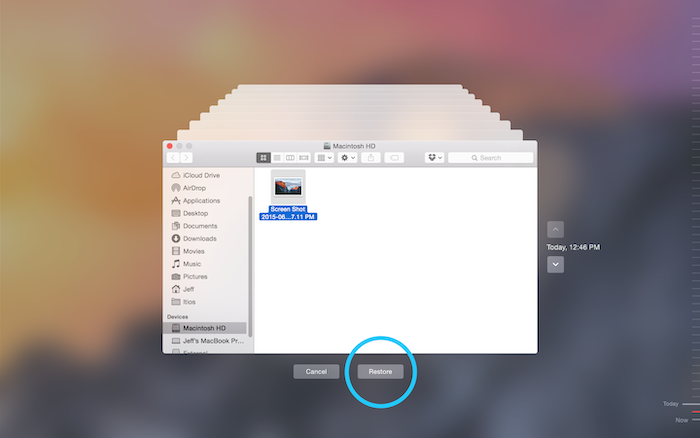
- Open Time Machine and search for backup files you want to recover on Mac again from its timeline. The app offers a previewing mode to let you pre-check the files before starting recovery.
- Select files and simply click the "Restore" button, then they will be saved back to the same folder where you stored them before.
How to Restore Files without Time Machine Backup
If you didn't back up files on Mac with Time Machine, but now suddenly lose important data, you’d better find a professional recovering software to restore files, because Time Machine only works to retrieve lost data under situations when you have backed up data before.
FonePaw Mac Data Recovery can be a powerful third-party data recovery tool, running smoothly for Mac users to recover files without Time Machine backups at all. It supports 1000+ types of files and offers two modes to detect data or files lost under different life scenarios, which also ensures a high success rate without failures occurring.
Also with an advanced security system developed, FonePaw Mac Data Recovery will not harm your device or steal your data while you are doing data recovery with it. The software is 100% safe to use.
Free Download Buy with 20% off Free Download Buy with 20% off
 Key Features of FonePaw Mac Data Recovery
- Supports retrieving 1000+ file types without quality loss, including photos, documents, emails, browsing data, and so on
- Supports recovering data from lots of hardware storage devices, including Mac (from trash bin as well)
- Works under different situations, such as accidental deletion, formatting, system crash
- Provides both Quick Scan and Deep Scan nodes to recover data quickly and with a high success rate
- Supports previewing mode (file name, file size, created date, modified date) to selectively recover partial data flexibly
Next, also learn how to use FonePaw Mac Data Recovery to restore files without Time Machine backup just in several easy steps.
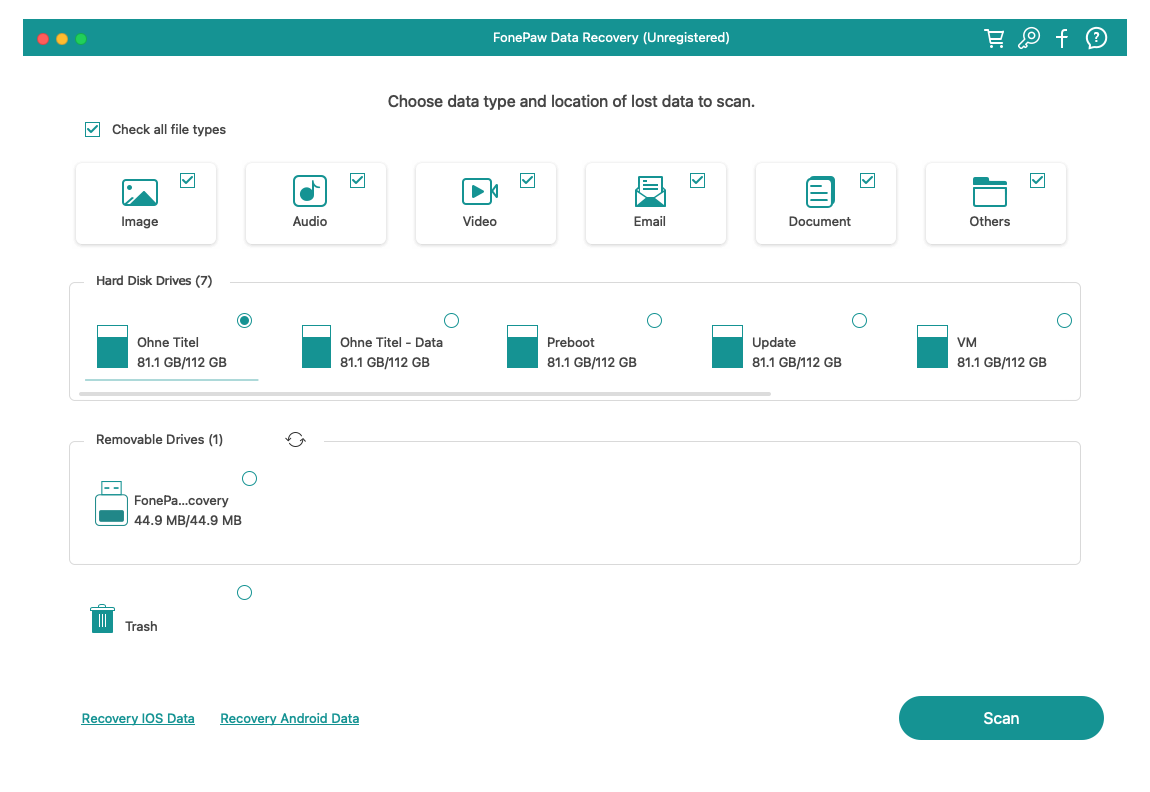
Step 1. Install FonePaw Mac Data Recovery on Mac and open the software. From its Home Screen, select both the file types and Mac device to start scanning.
Free Download Buy with 20% off Free Download Buy with 20% off
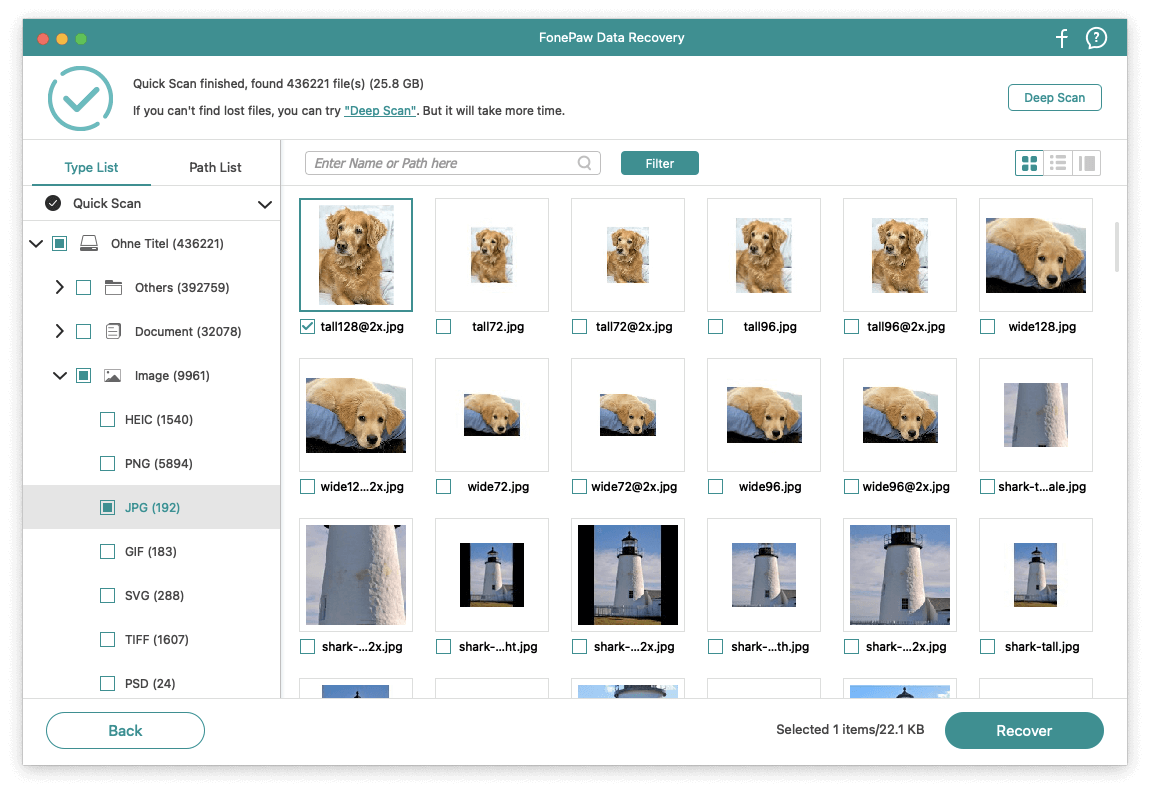
Step 2. When the scanning completes, the software will list all its detected items in a previewing window. Simply browse the list and choose the ones you want to recover. Click "Recover" and FonePaw Mac Data Recovery will start retrieving them for you.
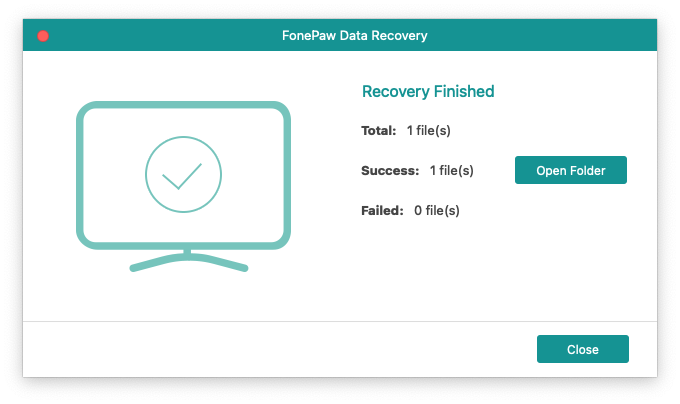
Step 3. Finally, select a path to save recovered data. Once FonePaw Mac Data Recovery finishes recovering these files after a while, you can click the "Open Folder" button to check them immediately.
How to Restore macOS from Time Machine
More than file recovery, Time Machine can also help restore macOS systems supported by macOS 10.15 or later. When your Macbook/iMac causes errors frequently, like Mac won't turn on, you can use this function to restore macOS to fix them. For those who don't enjoy the upgraded version, you can also downgrade macOS with this feature. The operations are not complex to follow, now you can check the tutorial and learn how to do it properly.
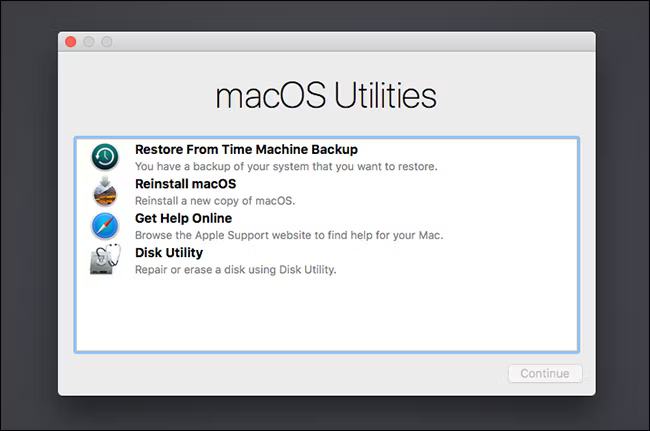
Step 1. Firstly, put your Mac into Recovery Mode by restaring your Mac and then immediately press both the "Command" and "R" keys at the same time until you see the Apple logo.
Step 2. Once the Recovery Mode runs, you need to select the "Restore from Time Machine Backup" option in the pop-up window, then click "Continue".
Step 3. Now, you can select a Time Machine backup drive. Then click "Continue" to choose a backup that was made before the error occurred.

Step 4. Once selecting the backup, finally, simply press the "Restore" button, and then the Time Machine will begin to restore macOS.
How to Restore Backup from Time Machine to New Mac
Except for data recovery, Time Machine can also help transfer data among Macs, especially when you buy a new computer and need to restore all data and settings from the old to the new one. Now, also read the following tutorial and restore a backup from Time Machine to your new Mac immediately.
- Connect the drive with all Time Machine backup data to your new Mac first.
- Then, open the "Migration Assistant" app in Utility. On the pop-up window, select "From a Mac, Time Machine backup, or startup disk" to transfer backup from Time Machine.
- Now, select one Time Machine backup you want to restore on Mac. Click "Continue".
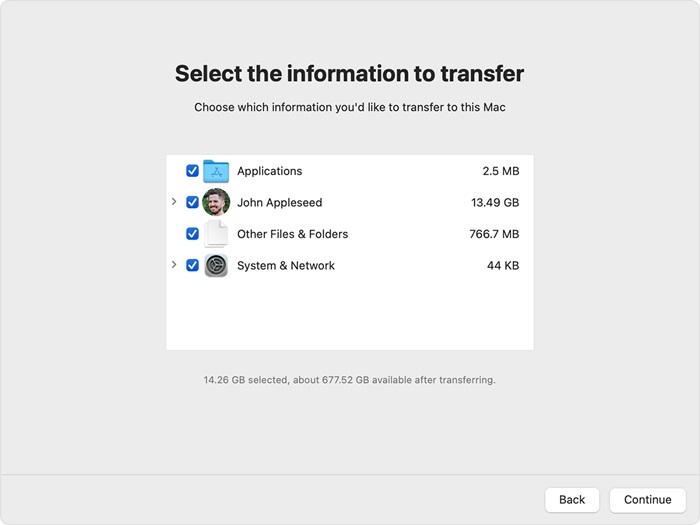
- When Time Machine lists detailed file types saved in this backup, you can select those you need to recover partially. For example, photos, messages, contacts, emails, and so on, you can just choose them to restore on a new Mac independently.
Conclusion
No matter if you lose important data because of sudden errors occurring or mistaken deletion, don't panic because you can easily restore them from Time Machine if you have backed them up with this default function. More than data recovery, Time Machine can also help you restore macOS systems or transfer data between Macs by easy operations.
However, if you haven't backed up files on your Mac before, FonePaw Mac Data Recovery, the professional Mac data recovery software, can help you get back lost files without Time Machine backups with just a few clicks! Feel free to give it a try!