What is iCloud? It's a cloud storage and cloud computing service from Apple Inc since 2011, which now bloats over 800 million users. iCloud service offers means to store data on remote servers like documents, photos and music, to transfer content to others and to manage iDevice what if lost or stolen. Better yet, iCloud allows users to make a wireless backup (opens new window) uploading to service other than iTunes service.
Users enjoys convenience thanks to iCloud service. However, if you're new to iCloud? Please check out this full guide to get started with iCloud service on iOS device, Mac, PC or Apple TV.
Part 1: How to Set up iCloud on iPhone/iPad/iPod?
Before you get started with iCloud on iPhone/iPad/iPod touch, please make sure that your iOS device meets the recommended system requirements as following.
Recommended System Requirements:
- iOS 10
- iWork for iOS (Pages 2.5 or later, Numbers 2.5 or later, Keynote 2.5 or later)
Steps to Set up iCloud on iDevice:
Step 1. Make sure that your device meets the system requirement.
Step 2. When you set up your iDevice for the first time, you would be asked to enter your Apple ID. Please follow the onscreen instructions to complete.
Note that if you don't have an Apple ID, please tap "Don't have an Apple ID or forgot it?" to create or reset the password.
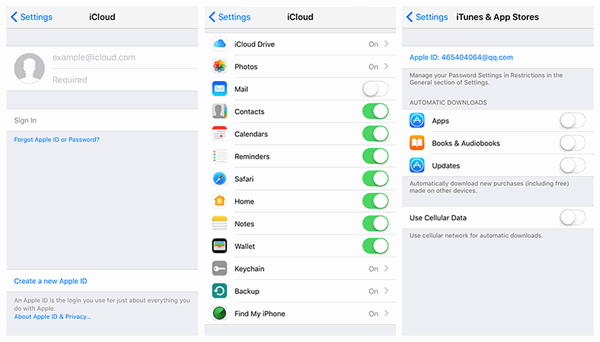
Optional Step. If you skipped the setup process. Please go to "Settings" > "iCloud" and enter your Apple ID.
Step 3. Launch "Settings" app and select "iCloud".
Step 4. Toggle on the items that you wish to sync with iCloud.
Step 5. Tap "Backup" to enable auto backup feature.
Step 6. Back to "Settings" and select "iTunes & App Store".
Step 7. Enable Automatic Downloads and whether to use cellular data.
Part 2: How to Set up iCloud on Mac?
Before you set up iCloud on Mac, please make sure that Mac meets the recommended system requirements as following.
Recommended System Requirements:
- macOS Sierra
- iTunes 12.5
- Safari 9.1 or later, Firefox 22 or later, or Google Chrome 54 or later
- iWork for Mac (Pages 5.5 or later, Numbers 3.5 or later, Keynote 6.5 or later)
Steps to Set up iCloud on Mac:
Step 1. Ensure that your Mac is running the latest version of OS X.
Note: if not, navigate to the "Apple" menu and choose "About This Mac" > "Software Update" to upgrade to the latest version.
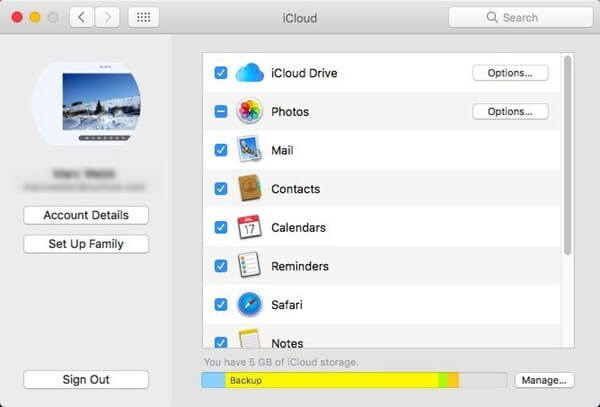
Step 2. Click "Apple" menu and select "System Preferences".
Step 3. Choose "iCloud" and enter your Apple ID.
Step 4. After logging in, tick up the desired service on the left side.
Step 5. Click "Options" after "iCloud Drive" to manage your document settings.
Step 6. Select "Options" behind "Photos" to enable "iCloud Photo Library", "My Photo Stream" and "iCloud Photo Sharing".

Part 3: How to Set up iCloud on Windows?
Before you set up iCloud on PC running Windows system, please ensure that it meets the recommended system requirements as following.
Recommended System Requirements:
- Microsoft Windows 10
- iCloud for Windows 6
- iTunes 12.5
- Outlook 2007 - Outlook 2017
- Internet Explorer 11 or later, Firefox 45 or later, or Google Chrome 54 or later (desktop mode only)
Steps to Set up iCloud on Windows:
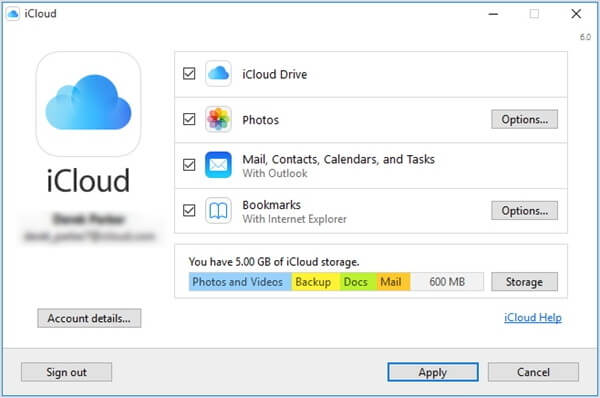
Step 1. Download iCloud for Windows at first.
Step 2. Launch the tool and log in with Apple ID.
Step 3. Select desired services on the left side of the interface and click "Apply".
Step 4. Click "Options" to set up more features.

Part 4: How to Set up iCloud on Apple TV?
Before you set up iCloud on Apple TV, please ensure that your Apple TV meets the recommended system requirements as following.
Recommended System Requirements:
- Apple TV software 7.2.1 or later
Steps to Set up iCloud on Windows:
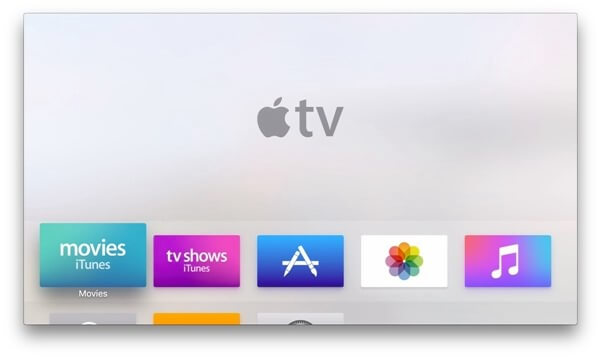
Step 1. Manually assemble your Apple TV. Step 2. Turn on Apple TV and sign in with Apple ID for the first time.
Step 3. Now, you are able to get access to all your photos and videos, shared photo albums, Apple Music, and any movies or TV shows you've purchased with your account.

To begin with your enjoyment with iCloud, Apple offers 5GB of free storagefor each account that can be used for photos, videos, documents, app data, and more. Also, there are different storage plans for your reference.


