


When you buy a brand new disk, you may not realize that after installing it into the computer, it will not work until you initialize it manually.
Besides, if your disk is in use and with a lot of data, it shows "Unknown, Not initialized" because of disk corruption or several system errors.
Now, you may be curious about what does initialize mean? Will it erase data? Let's read on to find out the answers.
What Is Initializing a Disk?
Generally speaking, initializing means to activate your hard drive. It's the process of building and rebuilding MBR. MBR stands for Master Boot Record. It is the first sector of the disk that identifies how and where an operating system is located so that it can be loaded into the computer's main storage or random access memory.
In a word, initializing only affects the data that keep track of where files are on a drive.
Does Initializing a Disk Erase Data?
Since initializing only erases the data that record where data are stored on the drive, it won't erase the actual data on the hard drive. Then does it mean we can initialize disk without losing data? Broadly speaking, the answer is No. Initializing only activates the disk but won't make it usable. That means if you want to read and write data on that disk, you need to create partitions on it and format the partitions after the disk is initialized.
Although initializing a disk only affects the front sector and won't erase data on it, formatting the disk will. Thus, to initialize disk without losing data, you need to recover the data after initializing and before formatting with the help of a data recovery tool like FonePaw Data Recovery (opens new window).
The main processes are:
- Initialize your hard drive. When you finished initializing the hard drive, you would find it is still inaccessible
- Recover data on your hard drive. Since you don't have the access to the hard drive from Windows File Explorer, launch FonePaw Data Recovery (opens new window) to scan and recover the data. Save your data to a different disk on the computer.
- Format the hard drive. When you save the data you need, right-click the disk and click "Format".
Now, your hard drive is accessible and it also saves your data to the fullest extent possible.
How to Initialize Disk (2 Ways)
In this part, we will introduce 2 ways to initialize disk in detail.
# Disk Management
Step 1 Type "Disk Management" in the taskbar and select "Run as administrator ".
Step 2 In Disk Management, right-click the disk you need to initialize.
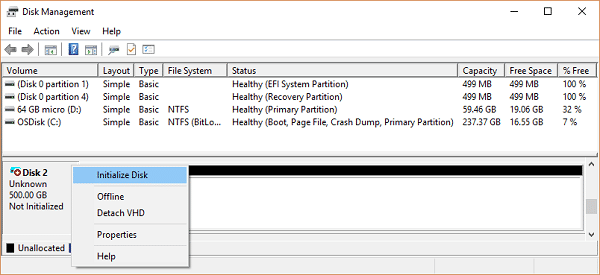
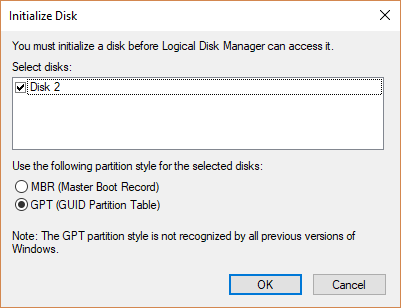
Step 3 Check if you select the right disk and click "OK".
Step 4 Right-click the unallocated space on the drive and select "New Simple Volume".
Step 5 Select "Next", set the size of the volume and the file system you want to use then click "Next".
Now it will be finished.
# initialize-disk cmdlet in Powershell
Here, we focus on two commands:
First of all, type "Powershell" in the taskbar and select run as administrator. Then enter one of the following initialize-disk commands in the Powershell to initialize the disk using different styles.
Initialize a disk using default values:
PS C:>Initialize-Disk -Number 1
It initializes the first disk in the computer (disk number 1), using the default values, which initializes the disk using the GPT partition style.
Initialize a disk using the MBR partition style:
PS C:> Initialize-Disk -Number 1 -Partition Style MBR
It initializes a disk using the MBR partition style.
Recover Files from Initialized Disk
When you finish initializing, you need to recover the files from the initialized disk before formatting. Here we take FonePaw Data Recovery (opens new window) as an example.
Step 1 Download and install FonePaw Data Recovery.
Free Download Buy with 20% off Free Download Buy with 20% off
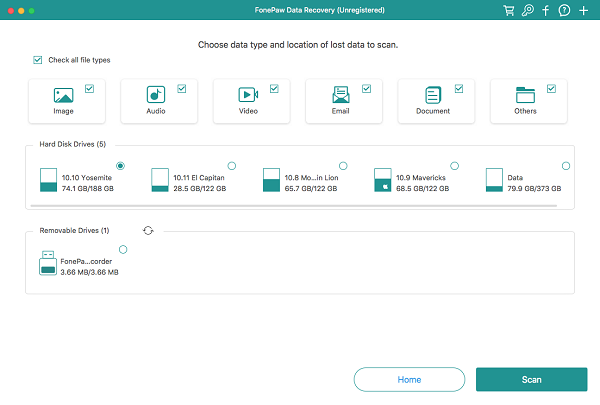
Step 2 Launch the program and choose the types of files and the initialized disk. Then click "Scan".
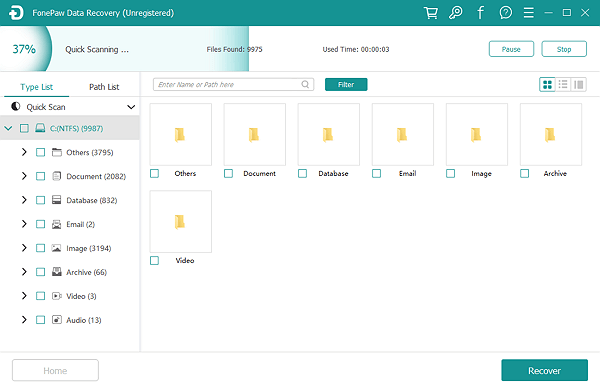
Step 3 Find the files you need in the scanning result. If you cannot find the data you want, try a deep scan.
Step 4 Select the files and click "Recover"
Save your files to a different disk on your computer. Now, you can format your initialized hard drive.
Should I Choose MBR or GPT
When you are initializing the disk, you will notice two partition style: MBR (Master Boot Record) and GPT(GUID Partition Table).
Windows uses the partition style to understand how to access the data on the disk.
GPT is for hard drives and SSDs. Also, GPT is compatible with volumes bigger than 2TB.
MBR is for 32-bit PCs, older computers and removable drives like memory cards.
But nowadays Windows will automatically use the appropriate disk type so you don't need to worry about it.