


"When I was transferring files from external hard drive [Seagate, 250gb], the power shut off. And when I use the drive again, a cyclic redundancy check error occurred and Windows suggests formatting the drive. Can anyone fix this? Because I don't want to format for I have many important files on the hard drive."
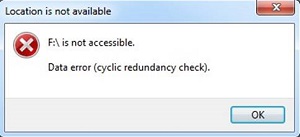
Many people would come across the cyclic redundancy check error like the user above when inserting external hard drive, SD card, DVD or Raw CD into the computer. And when it said that "Drive not accessible, data error cyclic redundancy check" or "Cannot initialize disk: cyclic redundancy check", Windows usually requires us to format the drive. However, most of us would not choose to format drive so easily, then what to do? Don't worry, the following parts are some solutions to fix data error cyclic redundancy check on initialize disk/external hard drives/SD card/DVD. Keep reading.
1. What is Cyclic Redundancy Check (CRC) Error?
Cyclic Redundancy Check (CRC) is an error-detecting code mostly used in digital networks as well as the storage device to detect sudden changes to raw data. In CRC, redundancy is checked according to the algorithm based on cyclic codes.
Commonly, the Cyclic Redundancy Check error on hard disk, SD card or DVD would be caused by the following factors:
- Registry corruption;
- Unsuccessful installation of a program;
- Misconfiguration of files;
- A cluttered hard disk.
2. Recover Data from Initialize Disk/External Hard Drive/SD card
Before fixing the data error (cyclic redundancy check), you may want to recover data (opens new window) from the initialize disk/external hard drive/SD card to ensure that you still have the important files no matter what happens to the storage device. Since the drive is not accessible or cannot be initialized right now, you can recover data with FonePaw Data Recovery.
FonePaw Data Recovery (opens new window), aiming to restore data lost logically, is a data recovery tool which supports the retrieve of photos, videos, audios, emails, documents from inaccessible hard drive/SD card on Windows 10/8/7/XP by quickly and deeply scanning the storage device.
Next will be the tutorial on how to restore data from hard drive, memory card showing CRC data error via FonePaw Data Recovery.
Step 1. Download and Install FonePaw Data Recovery
Free Download Buy with 20% off
Step 2. Launch and Select Data Type to Scan
Launch FonePaw Data Recovery (opens new window), you can select the data type and hard disk drive to recover, and then tap "Scan".
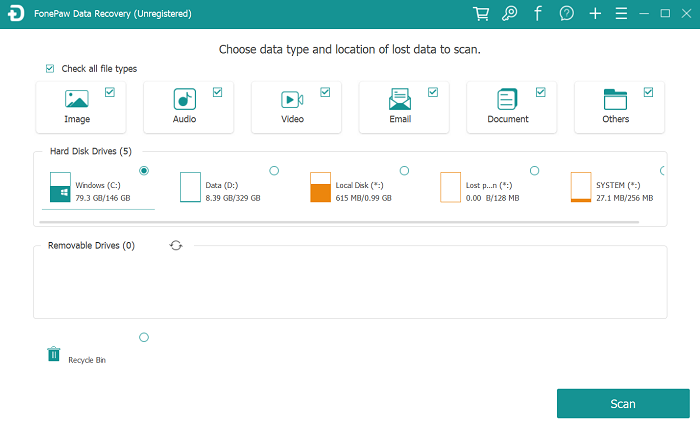
P.S. If you want to restore data from removable drive (SD card, hard drive), just link the removable storage device to your computer, and then FonePaw Data Recovery (opens new window) will scan it as well.
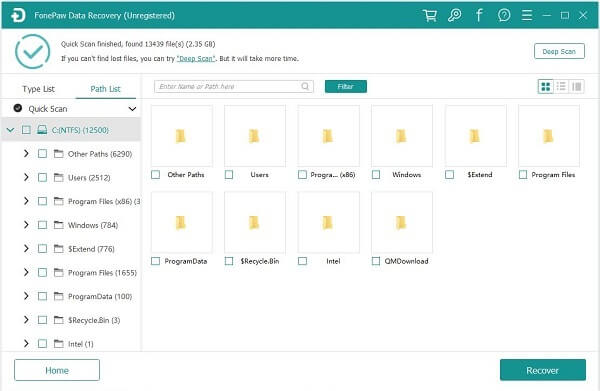
Step 3. Check the Scanning Results
Two scanning options are available: Quick Scan and Deep Scan. Basically, the software will start Quick Scan and finishes it soon. If you want to get more data out of the inaccessible drive, you are allowed to select Deep Scan, but this scanning mode will take longer time, let's say, a few hours.
Scanning results will be shown on Type List and Path List, check them.
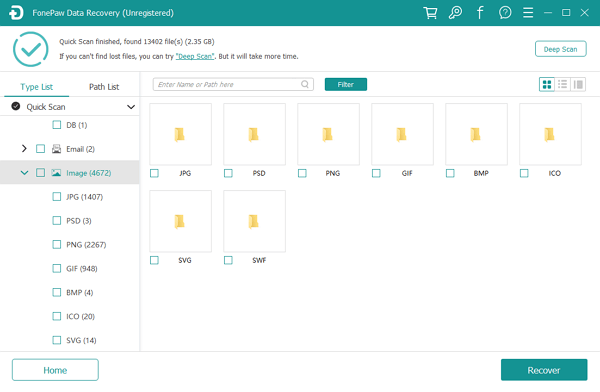
Step 4. Tick What You Like to Recover
All the lost files from the drive with Cyclic Redundancy Check error will be shown on the screen, tap whatever you want to restore and click "Recover" to save the files on other workable drives.
#Additional Tips:
Toshiba, Lenovo, Acer, ASUS, and more other brands are supported by FonePaw Data Recovery.
3. Run CHKDSK Utility to Fix Cyclic Redundancy Check Error
CHKDSK (short for "Check Disk"), a system tool in DOS, OS/2, and Windows, verifies the file system integrity of a volume and fixes logical file system errors. By using CHKDSK, you can find and repair tiny errors or file corruptions on the hard drive that cause the cyclic redundancy error.
Follow steps below to fix Cyclic Redundancy Check Error by CHKDSK utility.
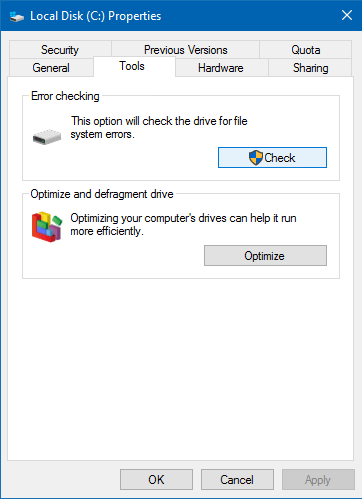
Step 1. Launch the CHKDSK Utility
Right-click the drive that cannot access because of cyclic redundancy check error, and then tap "Properties" and go to "Tools". Under Error-checking, click "Check Now".
Tip: If you are using Mac system, use the built-in Disk Utility to Repair the disk.
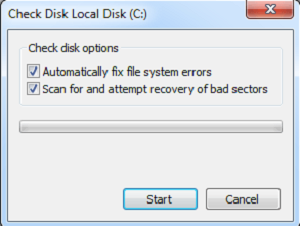
Step 2. Choose Check Disk Options
You will be provided with two check disk options below. The first one "Automatically fix file system errors" is a basic scan of the hard disk, which takes 15 to 20 minutes, while the second one takes hours to scan deeper for bad sectors on hard drive. Select whichever mode you want and start scanning.
Step 3. Reboot Your PC to Start the Scan
If you run CHKDSK to repair the initial drive(the one that Windows boots up on), CHKDSK utility cannot begin scanning immediately. Restart the computer to let CHKSDSK start scanning the drive.
Alternative CHKDSK Utility: Use Command Prompt
Right-click the CHKDSK sometimes will not scan and restore the drive properly, therefore, try the alternative access to CHKDSK when the right click doesn't work.
- Right click on Start button and open "Command Prompt" under administrator.
- Type "chkdsk /f x:"into the Command Prompt. For the advanced scan, type "chkdsk /r x". The letter "x" is the name of the drive you want to scan.
- When the scan is completed, CHKDSK will provide a report and then restart your computer.
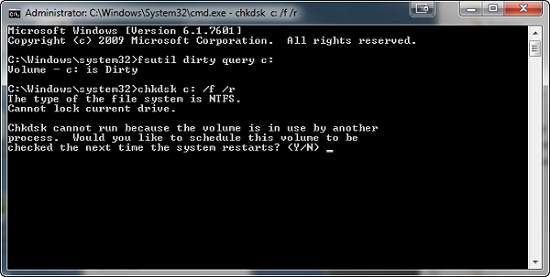
However, if the /r repair got stuck and ever ended, it is due to too many damaged files in your PC and CHKDSK is unable to fix all of them.
4. Fix Cyclic Redundancy Check Error on DVD
Before fixing cyclic redundancy check error on DVD, make sure the DVD disc is not damaged or scratched and also clean any dust on DVD disc with a cleaning kit. Moreover, defrag the disc helps to remove the data error cyclic redundancy.
If nothing works, then the following steps will help:
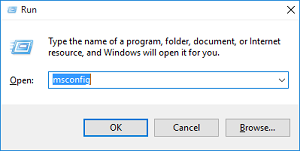
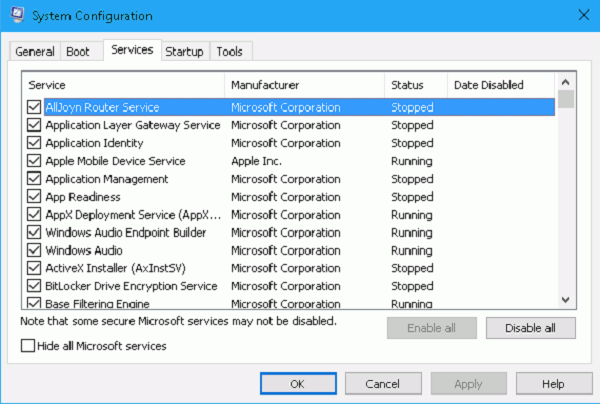
Step 1 Open System Configuration. You can right click Start, choose Run and type "msconfig" to open it.
Step 2 Click Service tab and choose Disable all to disable all service items.
Step 3 Also, disable all startup items.
Step 4 Restart the computer and long press during the boot up to boot the device into safe mode.
Step 5 Insert "The Sims 3DVD disc". Go to This PC, open the disc, right click "SETUP.EXE" and run it as Administrator.
Step 6 Finish the installation and reboot the PC. Try to the DVD disc again and see if Data Error (Cyclic Redundancy Check still shows up.
Above all the solutions, I believe you have the general idea about how to fix the cyclic redundancy error issue, whether it happens on the external hard drive, SD card, raw CD or DVD discs. Keep following us for more tutorials.