


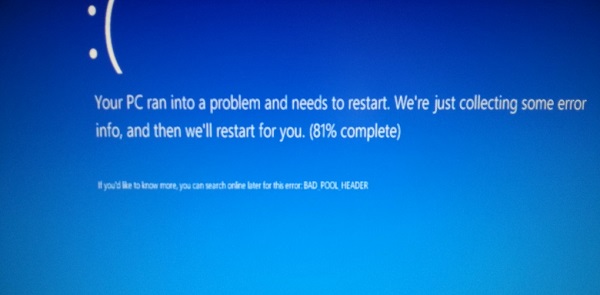
"My Windows PC won't boot up and shows a blue screen saying 'bad pool header'. The error reads 'Your PC ran into a problem and needs to restart. We're just collecting some error info, and then we'll restart for you. (0% complete) If you'd like to know more, you can search online later for this error: BAD_POOL_HEADER'. What should I do?"
Bad pool header is one of the blue screen of death errors. When the blue screen error appears on Windows 7, it shows error code 0x00000019 (bad pool header). Here is a rundown of all solutions to fix bad pool header in Windows 10, 8, 7, XP, Vista.
1. What Is Bad Pool Header Blue Screen Error?
Bad Pool Header indicates that your computer runs into a problem in allocating memory. "Pool" is "Memory pool", which is mainly created by the memory manager of Windows system to allocate memory, while "Header" refers to header annotation which defines how a function uses its parameters and return value. So Bad Pool Header is an error that happens when the header of the memory pool is corrupted because a process is not properly removed from the memory pool.
Many things may cause memory allocation on Windows. The Bad Pool Header error usually happens when:
- An Anti-malware software is installed and is not compatible with your computer;
- There are outdated drivers driver conflict on your computer;
- RAM memory is faulty.
2. How to Fix Bad Pool Header Error in Windows 10, 8.1, 8, 7, Vista
When you see the blue screen with Bad Pool Header on Windows 10/8/7, the first thing you should do is let Windows restart the computer. If the Windows never boots up and is stuck at X% complete, you need to enter the computer into Safe Mode.
To enter Safe Mode, press the F8 Key again and again on your computer's startup until you see Safe Mode option. Then choose Safe Mode and hit Enter.
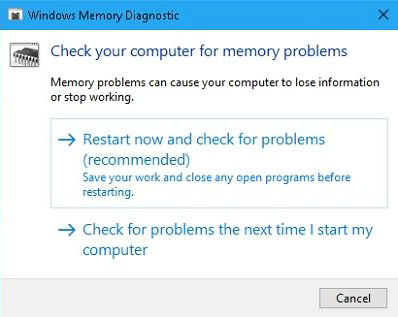
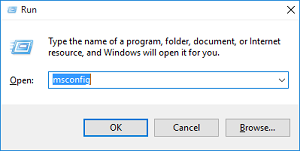
Method 1: Test RAM with Memory Diagnostics Tool
Since faulty RAM memory is one of the possible reasons that lead to Bad Pool Header tool, you should start with a test on RAM memory with Windows' built-in Memory Diagnostic tool. There are two ways to run Windows Memory Diagnostic tool.
- Click Start menu, type "Windows Memory Diagnostic" in the search bar, and hit Enter.
- Press Windows Key + R to open the Run dialog, type "mdsched.exe" and hit Enter.
Once the Windows Memory Diagnostic dialog appears, click Restart now and check for the problem to check if there is any problem with RAM memory.
Method 2: Disconnect External Hardware
If the Bad_Pool_Header error happens after you recently install a new external device (a new RAM, e.g.) on the computer, the culprit could be the external hardware or its driver. If you cannot decide which external device is messing up the computer, disconnect all the external hardware except the keyboard and mouse and restart the PC.
If the Bad Pool Header blue screen error stops showing up, plug the devices back to your computer. Instead of connecting all external devices to PC, you want to connect the device to PC one at a time and restart the PC each time a device is connected. If the Bad Pool Header error comes up again right after a hardware device is connected, you'll know that it is the device or its driver is causing the head pool header.
Method 3: Uninstall Anti-malware Software
The bad pool header could also occur because of incompatible anti-malware software. So if you have installed anti-malware program such as Malware Bytes, uninstall the software and restart your PC.
Method 4: Temporarily Uninstall Recently Installed Software & Hardware
If you never see the Bad Pool Header error before until a software or hardware is recently installed, the software or hardware could be the problem. Uninstall the recently installed third-party applications and go to Devices Manager and uninstall the drivers of recently connected hardware.
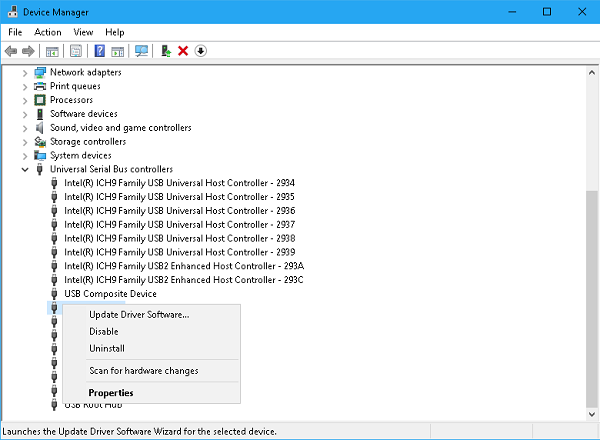
Method 5: Update Drivers
Outdated drivers could also cause the error. So update drivers on Windows.
Step 1 Right-click Start button and choose Device Manager.
Step 2 Right-click a driver and choose Update Driver.
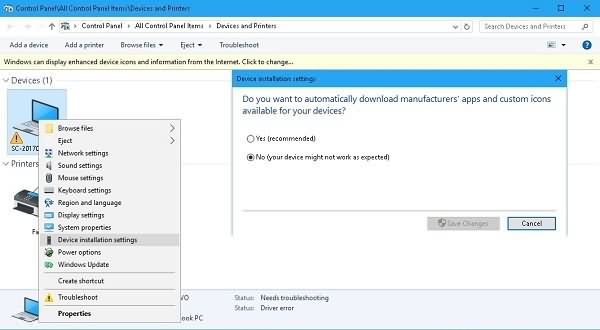
You can also set your computer to update drivers automatically.
- Open Settings > Control Panel > All Control Panel Items > Devices and Printers.
- Right click on your computer and choose Device installation settings. Select Yes and save changes.
Method 6: Disable Indexing Service
Indexing Service maintains an index of files on your computer to improve searching speed. Sometimes, index may be corrupted. To avoid any corruption, disable indexing service altogether.
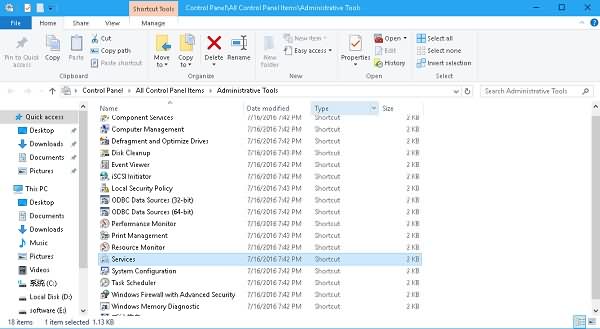
Step 1 Open Control Panel > All Control Panel Items > Administrative Tools > Services.
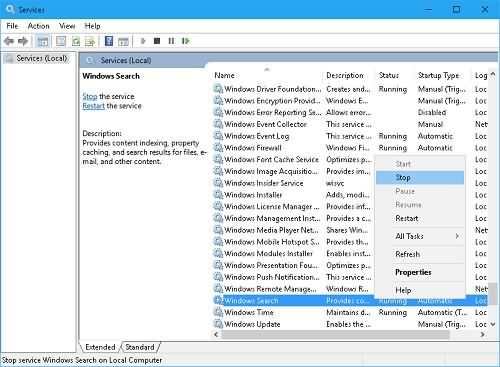
Step 2 Find Windows Service or Indexing Service from the list. Right-click on Windows Search/Indexing Service and click Stop.
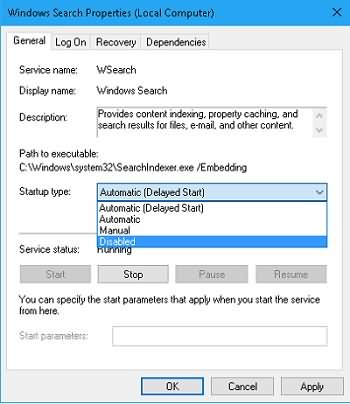
Step 3 Then choose Properties of Windows/Indexing Service and select Disabled as Startup type. Restart the computer to save changes.
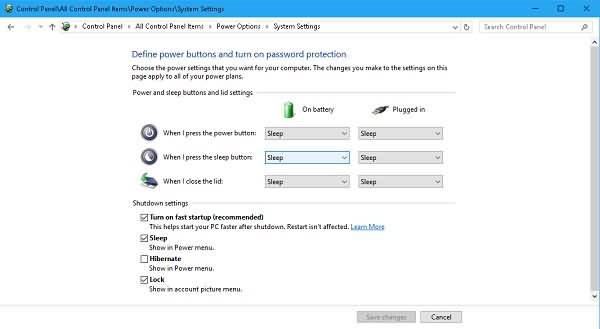
Method 7: Disable Fast Startup
Another method that helps to fix Bad Pool Header on Windows 10/8/7 could be to disable fast startup.
Step 1 Right-click Windows logo icon and choose to open Power Options.
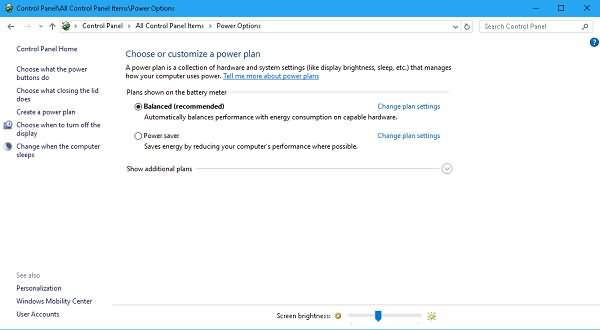
Step 2 Click Choose what the power button does > Change settings that are currently unavailable.
Step 3 Uncheck Turn on fast startup and save changes.
Method 8: Perform A Clean Boot
A clean boot is to start up Windows with the minimum of services and startup programs. So if the computer works fine after a clean boot, the programs and services that have been disabled could be the problem.
To perform a clean boot on Windows,
Step 1 Open System Configuration dialog.
Step 2 Disable startup programs: under the General tab, uncheck Load startup items.
Step 3 Disable all services: click Services tab, tick Hide all Microsoft service and click Disable All.
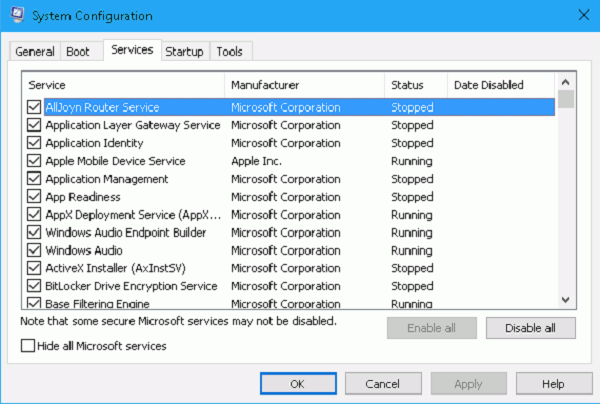
Step 4 Reboot your computer and see if the Bad Pool Header error comes up again.
Method 9: System Restore or Re-install Windows
If you have created a system restore point on the computer, you can perform System Restore to restore the system to the state before the bad pool header happens.
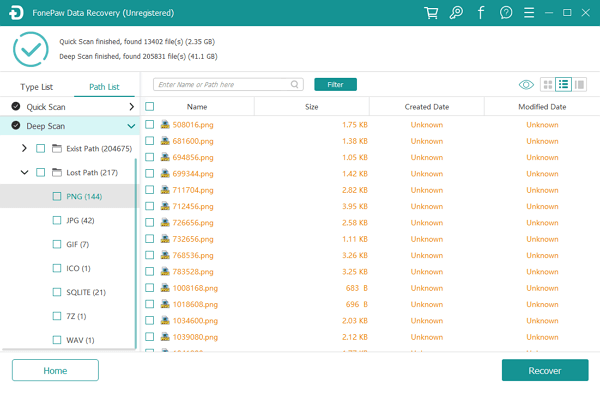
If none of this help, your last resort will be reinstalling Windows system from a bootable drive or disc. But this may cost you to lose files on your computer if you don't have a backup. But don't worry, after fixing the bad pool header error, you can use FonePaw Data Recovery (opens new window) to recover lost data. The data recovery tool can recover files from the formatted or inaccessible drive.
You can watch the video tutorial or follow the step-by-step instructions below.
Video Tutorial: FonePaw Data Recovery
Step 1 Download FonePaw Data Recovery and run it.
Free Download Buy with 20% off
Step 2 Tick photos, documents or other data thata you want to recover and select the drive.
Step 3 The program will scan out all data on the drive, including the deleted one. Tick all needed files and click Recover to get them back.
Do you have other solutions to fix Bad Pool Header error on Windows 10/8/7? Leave a comment below and discuss with others.
Free Download Buy with 20% off Free Download Buy with 20% off