


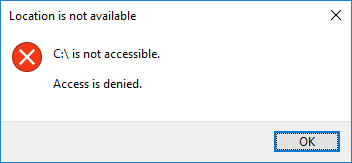
"I can not access my C drive on my computer in Windows 10. When I opened it, I got an error "C:\ is not accessible. Access is denied". How to fix this error and get my data back?"
Have you ever met this case before? "Access is denied" is one of the most common error messages on accessing hard drive or external hard drive in Windows 10/8/7. When it is showing up, your hard drive will be inaccessible so that you can’t read or change a file or folder in it. Don’t worry. After reading this article, you’ll learn why will this error happens and how to fix it.
Part 1. Causes for Drive Is Not Accessible Error
Before fixing this error, you might need to learn why "Drive is not accessible. Access is denied" error will happen so that you can immediately find out the suitable method. Generally, various factors can cause this error such as:
-
An external hard drive is plugged out improperly or damaged.
-
File systems, such as NTFS, FAT, has an error. For example, DBR, MFT file is corrupt.
-
Power failure for a powered hard drive.
-
The computer got virus.
Part 2. Methods for Drive Is Not Accessible Error
When "Drive is not accessible. Access is denied" error occurs, hard drive might become inaccessible. If you are experiencing this error, please keep reading and find out the best method to your case.
Method 1:Recover Data from Inaccessible Drive
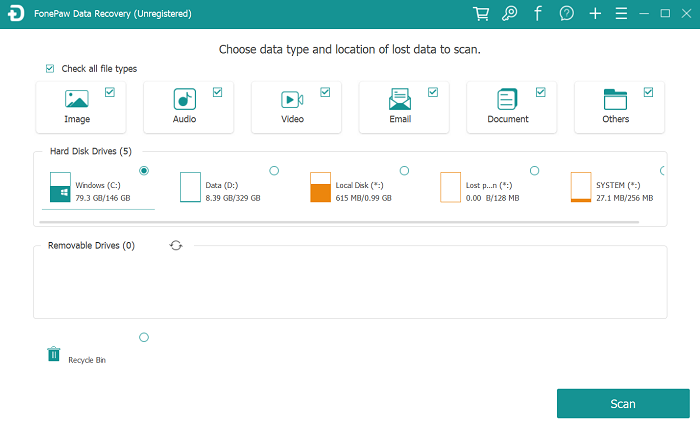
If the hard drive is going wrong, you are not allowed to access the file or folder on it. In this case, to avoid data loss, we highly recommend you to use FonePaw Data Recovery (opens new window) to recover data from the inaccessible hard drive which is supporting recovering data from inaccessible hard drive, external hard drive, USB, memory card, or digital camera.
STEP 1. Download FonePaw Data Recovery
First of all, you can download FonePaw Data Recovery on Windows 10/8/7.
Free Download Buy with 20% off
STEP 2. Select File Types
After launching it, you are able to select the file types that you want to retrieve. File types such as image, video, audio, email, document are supported. Next, choose the inaccessible hard drive.
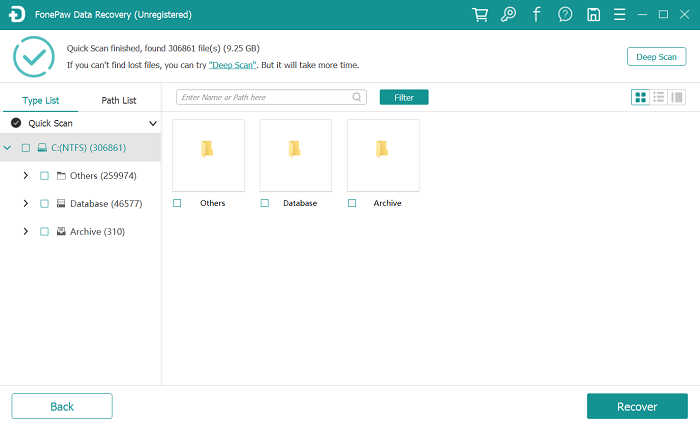
STEP 3. Begin to Scan
Click on the "Scan" button to start scanning the data on the inaccessible hard drive. Quick Scan and Deep Scan are provided for you.
STEP 4. Choose Files
When scanning is finished, pick out the files you need.
STEP 5. Recover Files
In the final step, you just need to click on the "Recover" button. And then, the files you choose will be usable on your PC.
Method 2:Add An Authenticated Users
STEP 1. Go to the "Properties" by right clicking the drive.
STEP 2. Select "Security" tab, and click on "Edit".
STEP 3. Click on "Add" button, and then, add "Authenticated User".
STEP 4. Under the Permission section, check "Full control".
STEP 5. Click on "OK".
Method 3:Take Ownership of the Drive
Sometimes, if "Drive is not accessible. Access is denied" error shows up, it might indicate that you don’t have the permission of accessing the hard drive so the Windows denies your access. To make the drive accessible, you should take the ownership of the drive with following steps.
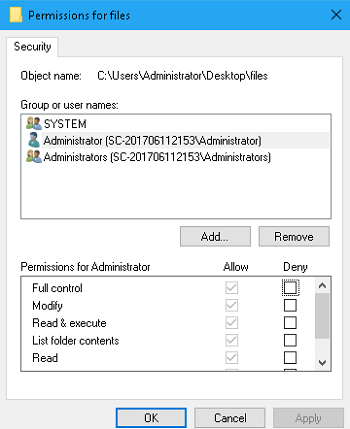
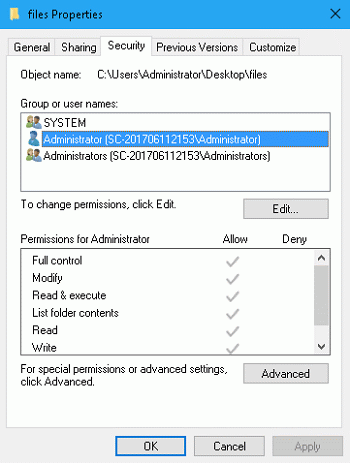
STEP 1. Right-click on the inaccessible hard drive, and choose "Properties".
STEP 2. Choose "Security" tab.
STEP 3. Select your account name under "Group or user names" to see the permissions that you have.
Besides, the steps to take the ownership of the drive on Windows XP is slightly different. If you are using Windows XP Professional, you need to disable Simple Sharing first in order to get more control over the permissions to individual users. To disable the Simple File Sharing option and take ownership of the folder on Windows XP, please follow the below steps.
STEP 1. Navigate to "My Computer".
STEP 2. Choose "Tools", and then, "Folder". Next, click on "View".
STEP 3. In "Advanced Settings", disable the "Use simple file sharing" option and click "OK".
STEP 4. Right-click the inaccessible hard drive and click "Properties".
STEP 5. In the "Security" tab, choose "Advanced" > "Owner" tab. Click "OK".
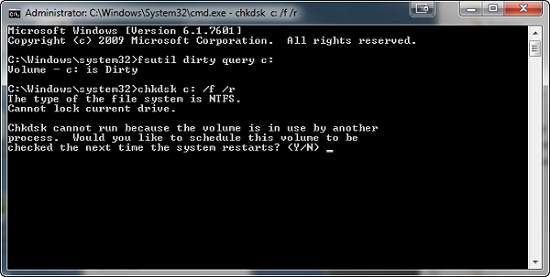
Method 4: Run CHKDSK Command
STEP 1. Search "cmd" on Start menu.
STEP 2. Enter "chkdsk /r *:" in the pop-up window and press "Enter", for example, if the F disk is inaccessible, enter "chkdsk /r f:".
STEP 3. Shut down the window.
STEP 4. Try to access the HHD again.
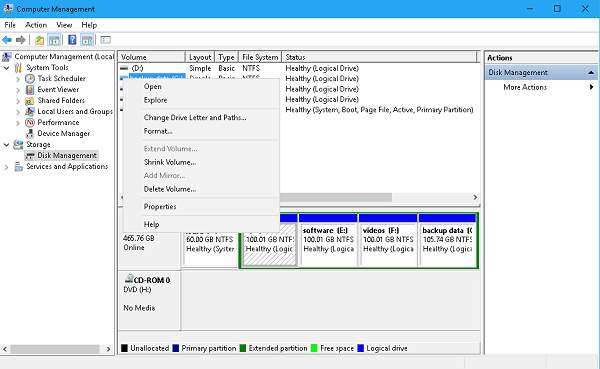
Method 5:Change the Drive Letter for the Inaccessible Drive
STEP 1. Right-click "This Computer" on the desktop.
STEP 2. Select "Manage".
STEP 3. Choose "Disk Management" under "Storage" option in the left panel.
STEP 4. Right-click the target drive.
STEP 5. Select "Change Drive Letter and Paths…" option.
STEP 6. Finish changing the drive letter with the instructions.
Method 6:Decrypt the File or Folder
As we all know, a file or folder with file encryption can only be opened by an encryption certificate. If Encrypting File System (EFS) is going wrong, you can’t access the encrypted file or folder. In this case, you should decrypt the file or folder on Windows 10/8/7 by following the below mentioned steps.
STEP 1. Go to the Command Prompt.
STEP 2. Enter "Cipher.exe /d", and then, press down "Enter" key to decrypt the file.
STEP 3. After the process is finished, copy the decrypted file on your computer’s hard disk.
STEP 4. Enter "Cipher.exe /r" to back up EFS certificates and keys.
If you have a better method to fix "Access is denied" error, please share it with comments below.