"I am simply trying to delete a few unused folders. But I get the error that 'Folder Access denied - Need to provide admin permission to delete this file'. I am the Administrator. Yet it won't let me delete. "
It is annoying when Windows tells you are not allowed to access folders or files on your own PC. Fortunately, you are not the only one who has experienced "Access Denied" error on Windows 10/8/7. According to some users, Access Denied error usually appears after updating Windows system.
Why does "Access Denied" error appear?
- The folder ownership has changed;
- You don't have the appropriate permissions;
- The file may be encrypted;
- The file may be corrupted.
To fix "Access Denied " folder or file errors, try out the following methods one by one until the problem is solved.
# Method 1: Get the ownership of the file or folder
Sometimes, some of your account information might have changed when you've upgraded your Windows to the latest version. That's why you lost your ownership of some folders and files and can't access the folders or files. In this case, you should restore your ownership of the file or folder by following the steps below.
NOTE:
The steps to get the ownership of the file or folder are slightly different between Windows 10/8 and Windows 7.
For Windows 10/8:
Step 1. Right-click on the folder, and then, choose "Properties" on the menu.
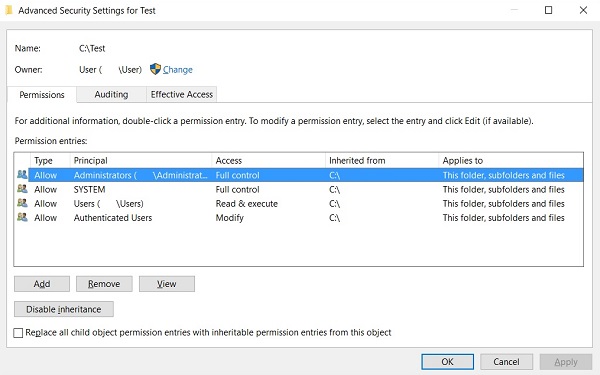
Step 2. Click "Advanced" in "Security" tab. Click on "Change".
Step 3. Type the account name that you want to assign ownership to. Then click on "Check Names" button > "OK".
Step 4. If you want to give this account the ownership of the files and subfolders contained in this folder, enable the "Replace owner on subcontainers and objects" option. Click "OK"
For Windows 7:
Step 1. Right-click on the folder, and then, choose "Properties".
Step 2. Click on "Security" tab>"Advanced" button.
Step 3. Choose "Edit" in "Owner" tab to change the owner.
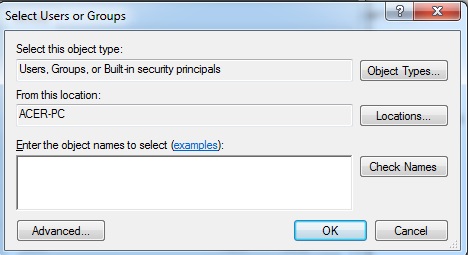
Step 4. Hit on "Other users or groups..." button to manually choose the username and type your account name.
Step 5. Next, click on "Check Names" button>"OK". Enable "Replace owner on subcontainers and objects" option, if you want to take the ownership of the files and subfolders.
Step 6. Click "OK".
# Method 2: Get Permission of the File or Folder
As we know, permission is the basic factor for users to access files and folders on PC. If you do not have the appropriate permission, you can't access or change files or folders. So if Windows denies your access to a certain file or folder, you get the permission of the file or folder in following steps.
First of all, you need to check permissions on a file or a folder. Here we'll show you a simple tutorial below.
Step 1. Right-click on the folder and then hit "Properties".
Step 2. Select "Security" tab.
Step 3. Click on your name in "Group or user names" to check the permission that you have.
If you want to change the permissions on a file or a folder, you should log on the PC as an administrator. Next, click on "Edit" in "Security" tab. And then, choose your name and enable the check boxes of the permissions that you need.
# Method 3: Unencrypt File or Folder
File encryption has the ability to protect users' files and folders. Moreover, if a file is encrypted, you need the certificate that used to encrypt it to open the encrypted file or folder. Otherwise, you may get the "Access Denied" error. To check encrypted file or folder, follow these steps.
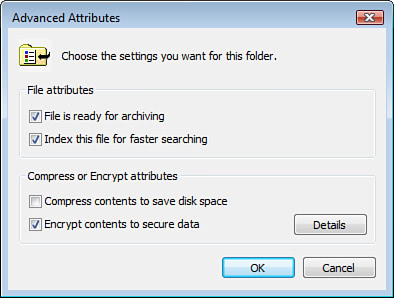
Step 1. Right-click on the folder and then hit "Properties".
Step 2. In "General" tab, click on "Advanced" button.
After that, you can check if "Encrypt Content to Secure Data" option is enabled. If it is checked, you will need the certificate to open or the file or folder. If "Encrypt Content to Secure Data" option is unchecked, the file or folder is not encrypted.
# Method 4: Recover Corrupted File & Folder
If all methods above are not helpful to fix your "Access Denied" file/folder errors on Windows 10/8/7, the file/folder may be corrupt. You are able to delete the whole file/folder and then recover the data with data recovery software. FonePaw Data Recovery has the ability to scan your deleted files and restore them to Windows 10/8/7. It takes just a few simple steps to recover the corrupted file or folder.
Step 1. Download FonePaw Data Recovery
Download FonePaw Data Recovery on your Windows PC. Next, you can launch the software to check if it's successfully running on your PC. Hint: You may want to install data recovery on a partition that doesn't contain the data you want to recover. Otherwise, the installation could overwrite the data.
Free Download Buy with 20% off
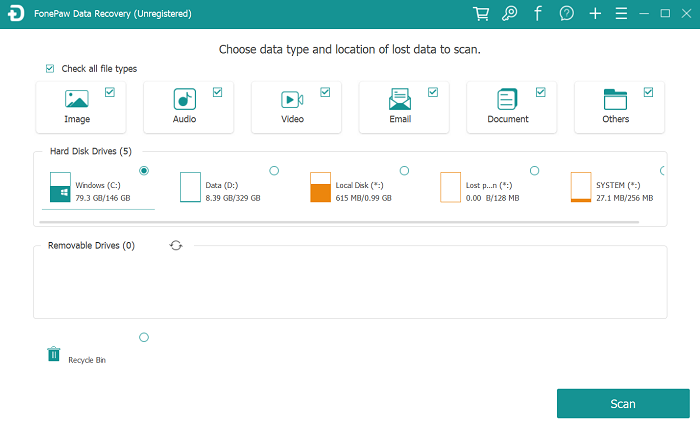
Step 2. Choose File Types and Hard Disk Drive
If the software is successfully running, you are able to select the files types you need on the main interface. Files types like image, video, audio, email, document are available to restore. And then, choose the scanning hard disk drive. Moreover, removable drives such as USB, memory card, digital camera are supported.
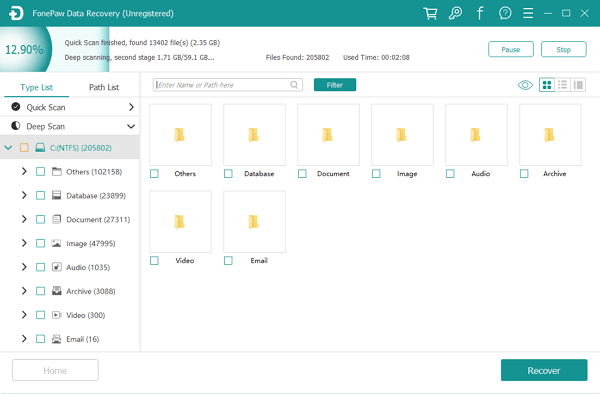
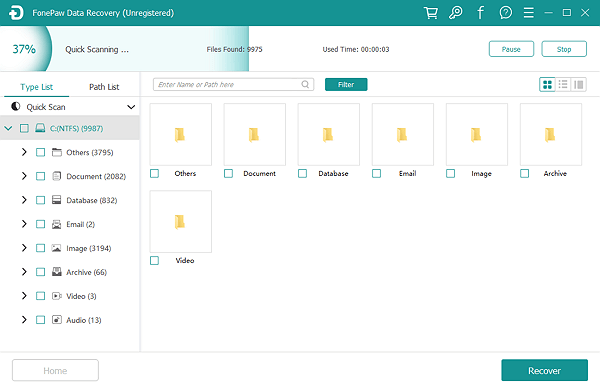
Step 3. Start Scanning Deleted File/Folder
Click on the "Scan" button, FonePaw Data Recovery will begin to scan deleted data on a drive you choose. It offers two modes: quick scan and deep scan.
Step 4. Recover File/Folder
After scanning, you can find out the file/folder you want to retrieve. And then, enable its checkbox. Then click on "Recover" button. After few seconds, the file/folder you choose will retrieve on your PC.