For Apple users, managing and protecting your music collection is critical. Whether you're switching to a new device and want to make sure your music collection is backed up, or you just want to organize your music more efficiently, transferring music from your iPhone to iTunes is a task that many users encounter. This process not only helps safeguard your favorite tracks but also provides an opportunity to free up space on your iPhone and manage your music library seamlessly.
In this updated guide, we'll explore various methods to transfer music from your iPhone to iTunes, ensuring you have all the tools and knowledge to keep your music well-organized and easily accessible.
Why Do You Need to Transfer Music from iPhone to iTunes?
Transferring music from your iPhone to computer is more than just copying files; it's about ensuring a comprehensive and secure musical experience. Here's why this step is crucial:
- Free up space on your iPhone for other important apps and data.
- Ensure your music collection is safe and recoverable in case of device loss or damage.
- Keep your music library consistent and accessible across all your Apple devices.
- Use iTunes' robust features to categorize, sort, and create playlists for easy access.
- Secure a copy of your purchased tracks, eliminating the need to re-purchase songs.
Method 1. Transfer Purchased Music from iPhone to iTunes on PC/Mac
Using iTunes is one of the most direct methods to transfer music from your iPhone to your computer. This method not only ensures compatibility with Apple devices but also integrates smoothly with your existing Apple ecosystem. Here's how you can use iTunes to transfer your music in various ways, each tailored to different needs.
This method only supports purchased music from the iTunes Store and may not support all music file formats. Non-purchased music from other sources or music downloaded from applications other than iTunes may not be transferred. In this case, you may need to seek help from a third-party tool such as FonePaw iOS Transfer, which we'll explain below.
How to Transfer Purchased Music from iPhone to iTunes
Transferring purchased music is a simple process that ensures all your bought tracks iTunes Store are available on your computer. Here's how you can do it:
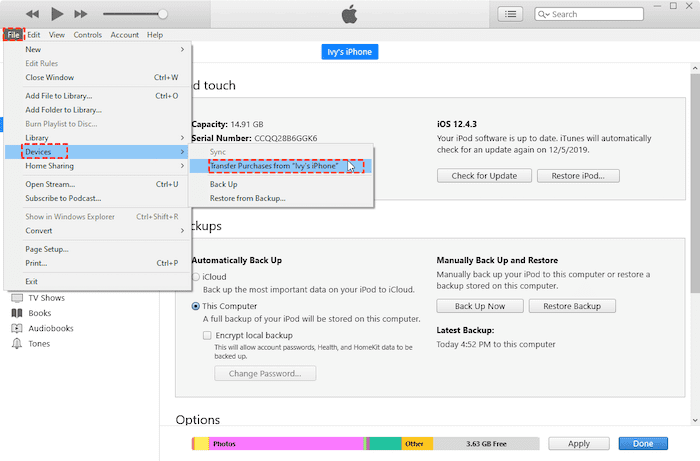
Step 1. Use a USB cable to connect your iPhone to your computer.
Step 2. Launch iTunes on your computer.
Step 3. Go to "Account" > "Authorizations" > "Authorize This Computer" and enter your Apple ID credentials.
Step 4. Click on the device icon, then select "File" > "Devices" > "Transfer Purchases from [your device]."
How to Transfer Music from iPhone to iTunes by Syncing
Syncing your iPhone with iTunes ensures that all your music, including non-purchased tracks, is available on both devices. This method helps keep your music library up-to-date across all your devices.
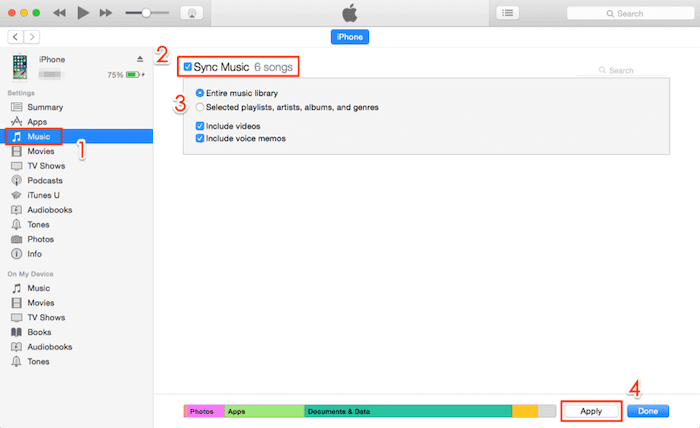
Step 1. Connect your iPhone to your computer using a USB cable.
Step 2. Launch iTunes on your computer.
Step 3. Click on the device icon in the top-left corner, and in the sidebar, click on "Music."
Step 4. Check the box next to "Sync Music" and choose to sync the entire music library or selected playlists as you like.
Step 5. Click "Apply" to start syncing.
Method 2. Transfer Music from iPhone to iTunes with Third-party Tool [Recommended]
As mentioned above, while iTunes provides basic functionalities for transferring music, it comes with limitations such as only supporting purchased music, format restrictions, and potential data loss. For a more flexible and user-friendly approach, using a third-party tool can be an excellent alternative. One such reliable tool is FonePaw iOS Transfer, which simplifies the process and provides additional features not available in iTunes.
FonePaw iOS Transfer is a versatile tool designed to streamline the process of transferring files between iOS devices and computers, serving as an effective alternative to iTunes. This best iOS transfer software streamlines the process of transferring music from an iPhone to iTunes, allowing users to transfer both purchased and non-purchased music effortlessly. It also supports comprehensive management capabilities, enabling users to organize their music libraries directly from the interface.
- Enables transfer of both purchased and non-purchased music directly to iTunes.
- Allows users to create, modify, and delete playlists easily.
- Offers options to back up the entire music library and restore it without using iTunes.
- Supports transferring music between different iOS devices or from iOS to PC/Mac.
- Easily move multimedia files in batches, including music, photos, videos, contacts, SMS, etc.
With all these features, you can easily transfer music from iPhone to iTunes, even for non-purchased music or downloaded tracks from other sources. Here's how:
Step 1. Download and install FonePaw iOS Transfer on your computer, then launch the program.
Step 2. Connect your iPhone to the computer using a USB cable. The software should recognize your device automatically.
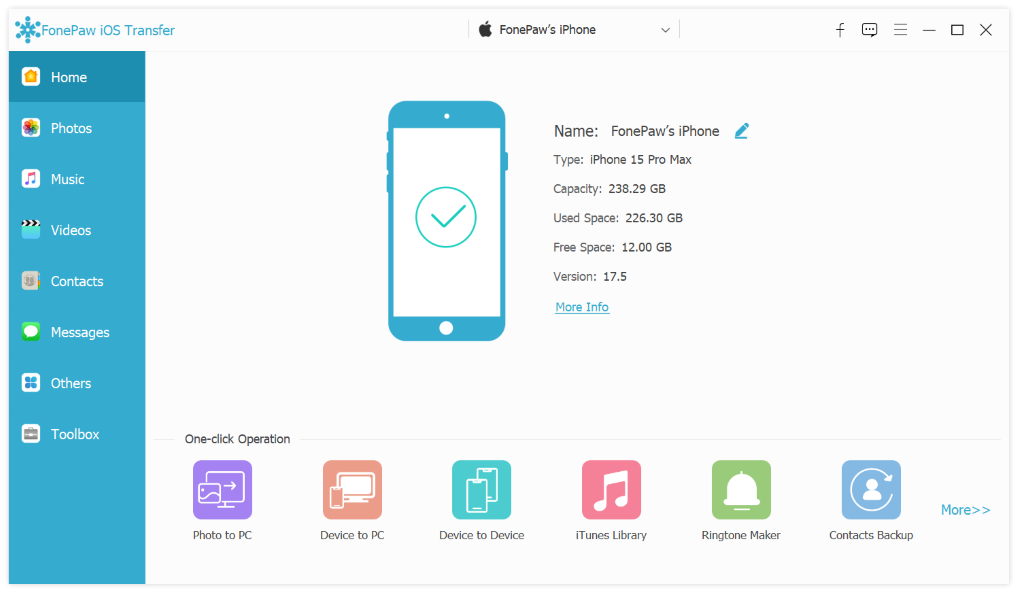
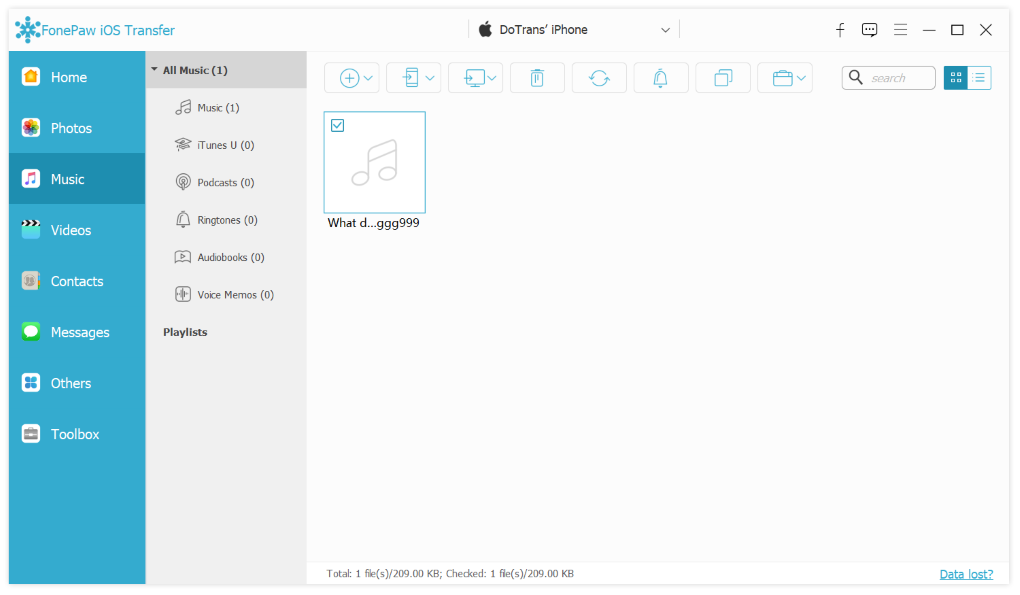
Step 3. Go to the "Music" section on the software to view all the music files on your iPhone.
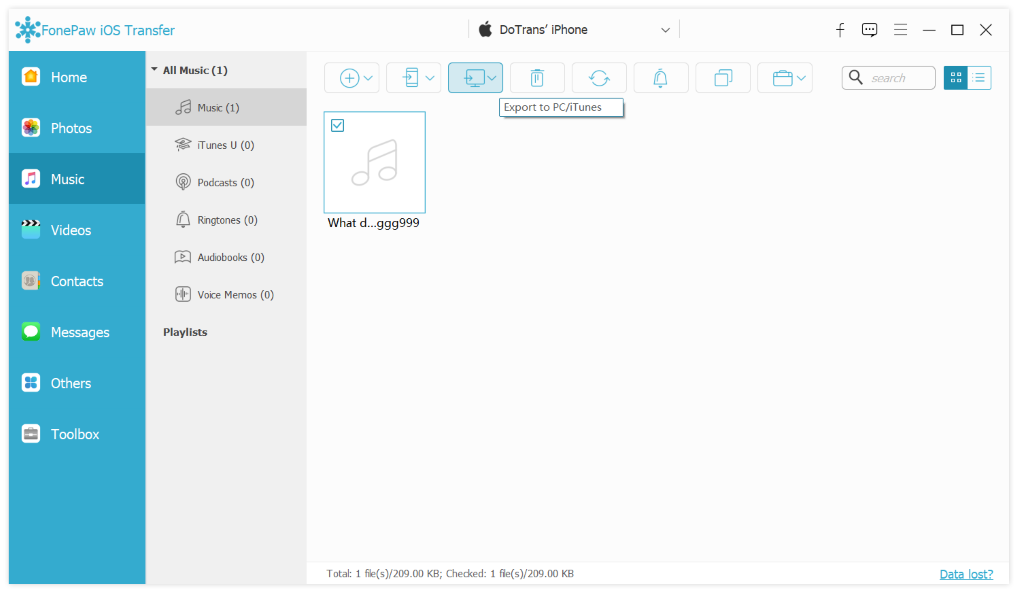
Step 4. Select the music files you want, and then click "Export to" > "Export to iTunes" to transfer music from iPhone to iTunes.
FAQs About How to Transfer iPhone to iTunes
Will transferring music delete any of my existing songs?
Transferring music using iTunes can sometimes overwrite your existing library on the iPhone if you choose to sync. This happens because syncing with iTunes typically replaces the content on your iPhone with what is currently in your iTunes library. However, using third-party tools like FonePaw iOS Transfer allows for selective transfers, which can prevent the deletion of existing songs as it lets you specifically choose which music files to move, without affecting the rest of your library.
Can I transfer music to multiple devices?
Yes, you can transfer music to multiple devices using third-party tools like FonePaw iOS Transfer. These tools are designed to transfer iPhone files to PC without iTunes, enabling you to easily add music from your iPhone to several different devices, including other iPhones, iPads, or iPods. This feature is particularly useful for users who want to share their music library across their devices or within a family.
Can I transfer music wirelessly?
Yes, for both traditional methods like iTunes and third-party tools such as FonePaw iOS Transfer, an initial connection of your iPhone to the computer via USB is necessary. This initial step is crucial for setting up the software and ensuring your devices are properly paired. It's important to transfer iPhone music to a computer first.
Conclusion
Transferring music from your iPhone to iTunes can be efficiently managed using either iTunes itself or third-party tools like FonePaw iOS Transfer. While iTunes provides fundamental synchronization capabilities, it's limited to purchased music and can overwrite existing libraries. Third-party tools offer a more versatile solution, supporting both purchased and non-purchased music, selective syncing, and more advanced management features. Choosing the right method depends on your specific needs, such as the type of music and the desired flexibility in managing your music library.

iOS Transfer