Accidentally formatting a hard drive, especially when managing multiple hard drives or external storage devices, is a common but distressing situation. But you don't have to panic too much, there is still a good chance that you can unformat your hard disk and recover the data that seems to have disappeared. In this case, taking immediate action can greatly improve your chances of data recovery, and the best first step is to limit its use to prevent data overwriting.
So how to unformat a hard drive? This article will guide you in unformatting your hard drive and recovering lost data on both Windows and Mac platforms. By following the insights and steps outlined here, you will learn how to deal with this challenge and recover your valuable data with ease.
Can You Unformat a Formatted Hard Drive?
Yes, with official tools or professional third-party software, restoring a formatted hard drive is possible. Let's take a deeper look at the process and why recovering data from a formatted hard drive is possible.
What does "Unformat" mean?
"Unformat" is not a standard computer operation or command, but a colloquial term for recovering data from a formatted storage device. To unformat a hard drive means to restore the drive to its pre-formatted state, aiming to recover all lost files in the process. This technique is crucial for data recovery, offering a chance to undo a momentary mistake.
Why can you unformat a hard disk?
When you format a hard drive, the data isn't immediately lost; this largely depends on the formatting method used and how quickly you act afterward.
There are two main types of formatting: low-level and high-level. The low-level format simply removes directories and file references without touching the data itself, leaving it intact in a recoverable state until new data overwrites. However, the high-level format goes deeper by checking for bad sectors and can overwrite data, making recovery impossible.
Additionally, the time factor also plays a vital role. If the new data has not overwritten the old data after formatting, especially after a quick format, then the chances of recovery are high. Therefore, Acting quickly after the low-level format increases the likelihood of successful data retrieval, and next we will discuss several effective methods for this situation.
How to Unformat a Hard Drive on Windows 11/10
Recovering data from a formatted hard drive on Windows 10/11 can be approached in several ways. Here are two of the most effective methods.
1. Use Command Prompt (CMD)
Command Prompt (CMD) is a powerful utility included with Windows that allows users to execute a wide range of commands for system administration and file management. While it is 100% free, its text-based interface and the need for specific command knowledge make it less user-friendly for beginners.
To unformat a hard drive, here is a step-by-step guide using the "chkdsk" Command:
- Open Command Prompt as administrator by searching "cmd" in the Start menu.
- Type the command "chkdsk X: /f" and press Enter (replace "X" with the correct drive letter). If prompted, type "Y" to confirm the operation.
- Type the command "attrib -h -r -s /s /d X:\*.*" (Replace # with the drive letter of the formatted drive.) and then press Enter.

2. Use Hard Drive Recovery Software
For people with a low level of computer skills, using specialized hard drive recovery software is the most effective way to recover data from formatted hard disks, and one notable example of such software is FonePaw Hard Drive Recovery.
FonePaw Hard Drive Recovery is a comprehensive tool to retrieve lost data from various scenarios, including accidental deletion, partition loss, system crashes, etc. It can recover files from formatted hard drives or devices like HDDs, SSDs, SSHDs, and even RAID configurations. Compatible with both Windows and Mac, it can restore 1000+ types of files, such as images, videos, archives, and more. Its user-friendly interface, free scanning, and preview features make it easy to use for both novices and tech-savvy alike.
Free Download Buy with 20% off Free Download Buy with 20% off
To use this tool to unformat your hard drive and recover data from it, follow these steps:
Step 1. Download FonePaw Hard Drive Recover from the official website and install it on your Windows PC or Mac.
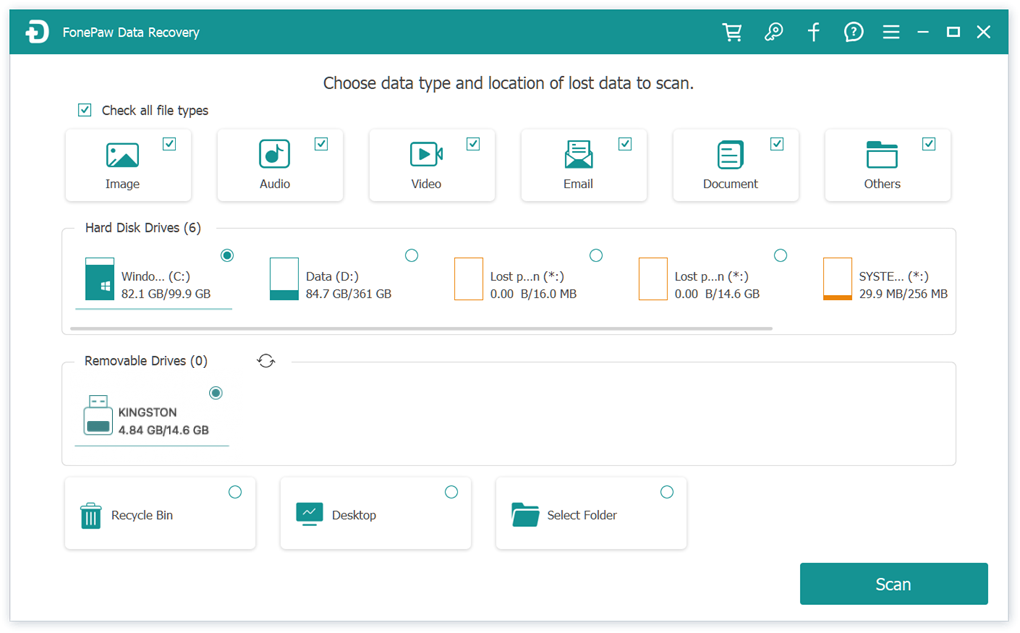
Step 2. Open the software and select the formatted hard drive from the "Hard Disk Drives" section if you're recovering from a laptop, or the "Removable Drive" if it's an external drive. Choose the types of data you want to recover, then click "Scan".
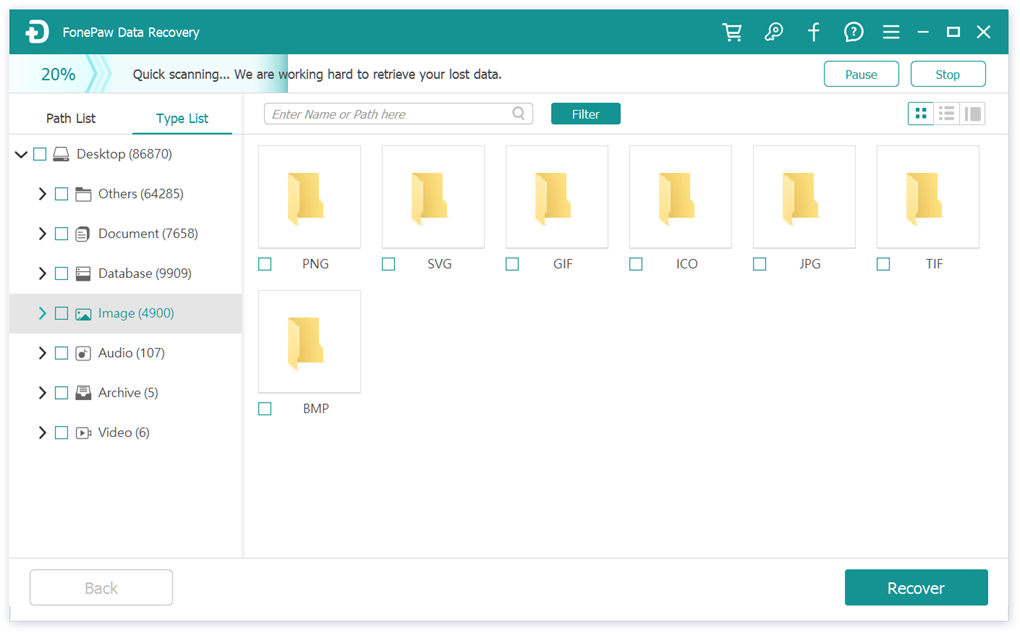
Step 3. Once the scan completes, you can browse the results to find the desired files. Use the "Type list" or "Filter" options to narrow down the results by file format, size, and modification time.
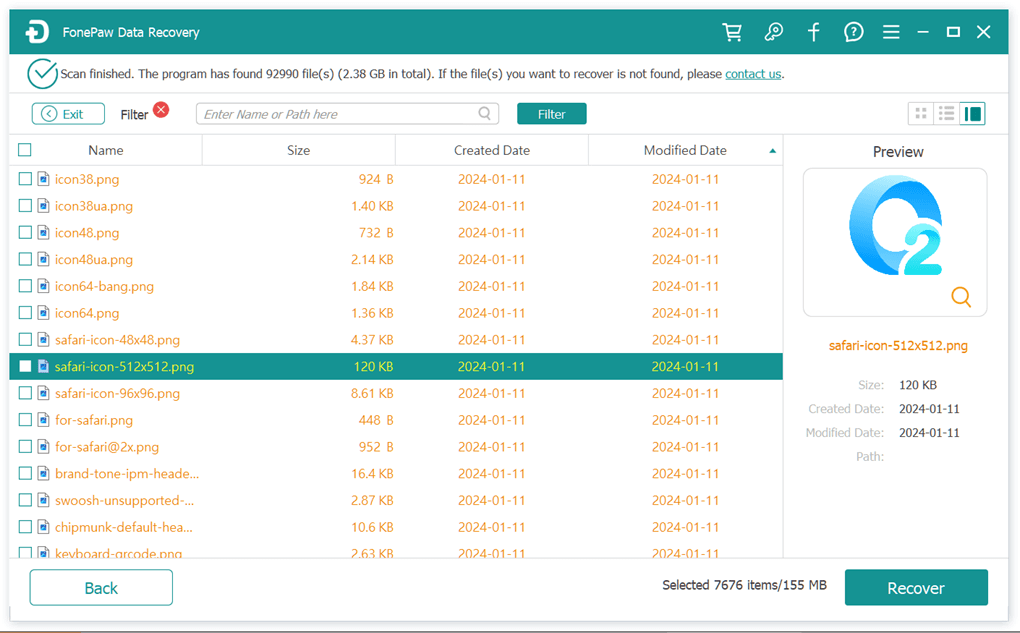
Step 4. Preview the files to verify their contents, select the ones you want to restore, and click "Recover" to save them to a safe location on your computer or another external storage device.
How to Unformat a Hard Drive on Mac Computers
As mentioned earlier, unformatting essentially means recovering data, and this applies to Mac users as well. For Mac users who have been keeping regular backups, the data recovery process can often begin with Time Machine. It's a built-in backup feature in macOS that automatically saves a copy of all your documents, photos, system files, apps, and settings to an external or network drive.
If you've accidentally formatted your hard drive or lost important files, Time Machine can be a lifesaver, allowing you to restore your system to a previous state or recover individual files. Here is how to unformat a hard drive on your MacBook/iMac via Time Machine.
Step 1. Click on the Apple logo in the upper-left corner of your screen, select "System Preferences", and then click on "Time Machine".
Step 2. Make sure "Show Time Machine in menu bar" is checked.

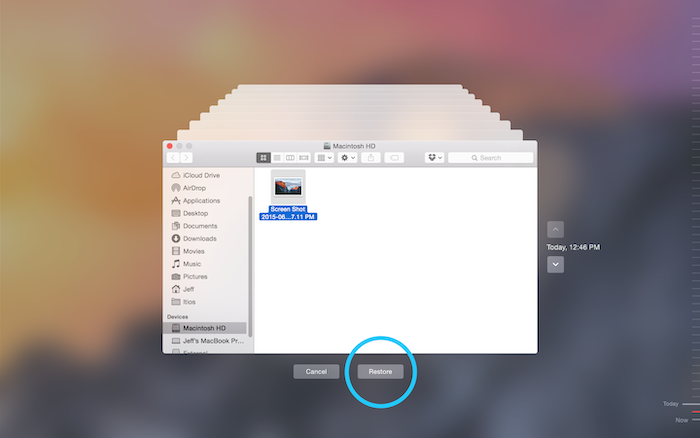
Step 3. Choose "Enter Time Machine" from the menu bar. Time Machine will display all your backups. You can browse through these backups and preview the files to locate the ones you want to recover.
Step 4. Once you find the files you need, select them and click "Restore" to recover them to their original location or a new one you specify.
 Note:
Note:
Conclusion
In short, this guide walks you through recovering data from formatted hard disks on both Windows and Mac. If you think the official tools are hard to handle, then using FonePaw Hard Drive Recovery will be a much easier way to unformat hard drives and recover your data without backup. Additionally, it's wise to get into the habit of backing up important files regularly and be cautious when performing critical operations such as formatting your hard drive to minimize the risk of accidental data loss.