


Updated on Sept. 29, 2020: This recovery method also works for data restoring after updating to iOS 14.
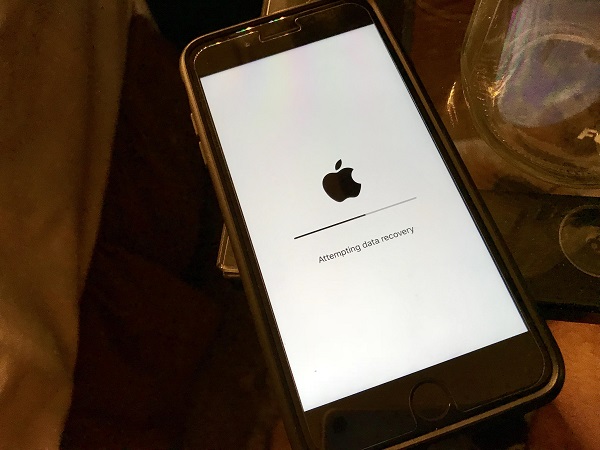
"When I was updating to iOS 11.2, this message 'attempting data recovery' appeared on my iPhone 7 Plus. Does this mean I'll lose my pictures? I haven't been able to back them up for months. How to fix it?"
-- A User From Reddit
The "Attempting data recovery" error happens when you try to update an iPhone or iPad to iOS 12, 11.2, iOS 11.3, iOS 11. 4, whether the device is updating via OTA or iTunes. No official explaination or solution has been given by Apple on the error. Based on the experiences of users who has fixed the update error, here we will try to figure out the reasons why iPhone X/8/7/6 shows "attempting data recovery" error, and how to fix the error. If unfortunately, you have lost data because of "Attempting data recovery" error during iOS update, here is also a solution to recover lost data from iPhone.

# iPhone Attempting Data Recovery, What's Going Wrong?
When you update iOS, the message of "attempting data recovery" could mean that the space of your iPhone is very low. This situation usually happens in a small storage device like 16GB iPhone, but there are large storage devices also experiencing the same error during update. Some users think it is better to update through iTunes, but sometimes "Attempting data recovery" also happens during update via iTunes.
Although there is no definite answer to why iPhone 6, 6s, 7, 7 Plus "Attempting data recovery", experiences of many users have proved that when it shows that iPhone is attempting data recovery, it's just trying to shuffle your iPhone, and it doesn't erase anything. Generally speaking, it will be okay to take a period of time to wait for its success.
However, according to feedback, some users have been caught up in the extreme situation of "Attempting data recovery" loop, which makes people crazy. Anyway, you can try the following ways to fix iPhone Attempting data recovery.
# Fix 1: Press Home Button and Give iPhone Some Times to Update
Don't panic when you first encounter the messages saying that iPhone is attempting data recovery, just press Home Button and spend a period of time waiting for updating. When the update completed, you iPhone will be back to normal. If it doesn't work to wait for a very long time, you'll have to take other ways.
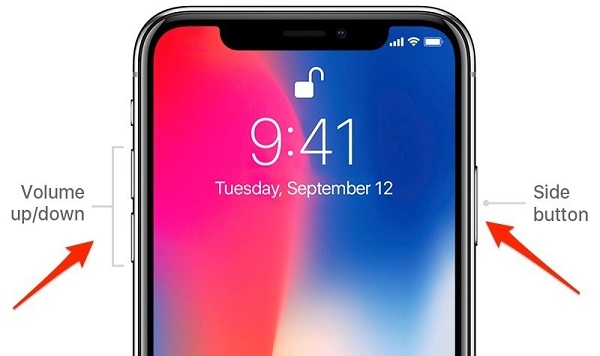
# Fix 2: Force Restart to Get Out of iPhone Attempting Data Recovery Loop**
If your iPhone keeps showing "attempting data recovery" with no progress, a force restart may help you get your iPhone out of the error.
On iPhone X/8/8 Plus:
- Press and hold the side button and either volume button.
- Press and hold the power button until you see the Apple logo.
On iPhone 7/7 Plus:
- Press the power button and volume down button at the same time
- Press the power button until the Apple logo appears.
On iPhone 6s or earilier:
- Press the home button and power button at the same time.
- Keep press both buttons until the Apple log appears.
Force restarting has proved effective every time. However, attempting data recovery fails might lead to new problems of data loss. At this point, you need to retrieve your lost data. If you have backed up on iTunes or iCloud, it will be very easy to get the data back from your backups. But, when you restore data from iTunes and iCloud it will erase all data existed on your iPhone. That is to say, you may lose some data again.
# Fix 3: How to Recover iPhone Data If Attempting Data Recovery Fails
In fact, the data that was lost because of the iPhone attempting data recovery, did not disappear forever. They will be stored in the memory of your iPhone until the other new data overwrite them. As long as they are not overwritten, you can get it back with an iPhone data recovery software.
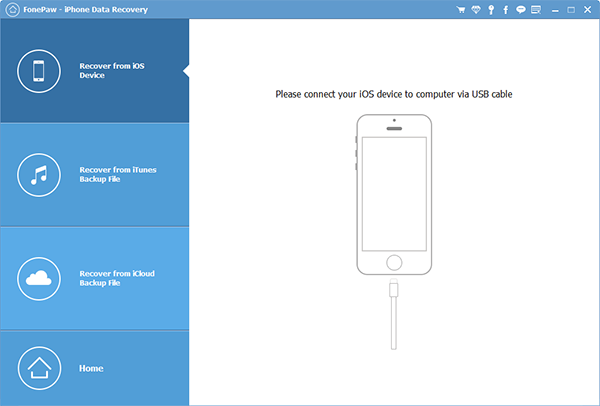
You can try an easy tool called FonePaw iPhone Data Recovery, which is an easy-to-use program to help users recover their lost data. It can not only recover data from your iPhone without backup, but also restore data from your iTunes/iCloud backup with no need to restore the whole backup. Here are only three simple steps to recover the data:
Free Download Buy with 20% off Free Download Buy with 20% off
Step 1. Download FonePaw iPhone Data Recovery (opens new window)
You could try the free trial of FonePaw iPhone Data Recovery (opens new window). Install and launch it. Then connect your iPhone to computer.
Step 2. Start to Scan
Click on "Start Scan" right in the middle to start scanning your lost data.
Tip If you would like extract data from iTunes or iCloud backup to your iPhone, choose "Recover from iTunes Backup File" or "Recover from iTunes Backup File".
Step 3. Preview Photos or Other Data
All the scanned data are displayed on the left side of the interface. The trial version allows you to preview the pictures.
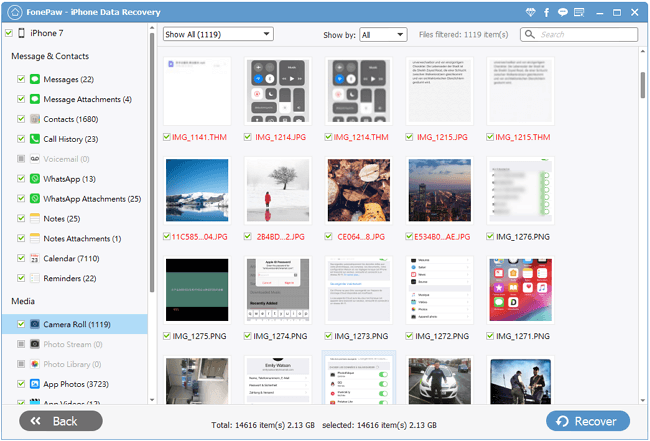
Step 4. Recover iPhone Data to Computer
You can select desired files and click on "Recover". Then you can check out the files directly on the computer.
I really hope this tutorial can help you. If there are other questions that you can't understand, you can leave comments, and you are welcome to make some suggestions.