


Webex by Cisco is a professional app providing users, especially enterprises, with services including video conferencing, messaging, online meetings, screen sharing and webinars. Since Webex meetings are often used in official situations such as corporate conferences and academic seminars, many users would like to find an efficient method for recording them.
This post will present you with four ways to record Webex meetings with and without permission. You will also be introduced to the excellent FonePaw Screen Recorder app to capture your screen and audio.
Before Recording a Webex Meeting Check Your User Role
While participating in an important Webex meeting, most people might need to record it for later review or share them with people who can’t attend. Luckily, Webex has a convenient built-in recording function. Before you start recording, it is worth mentioning that your account type can decide which recording methods you can use.
There are two ways to record meetings on Webex, recording in the cloud or on your computer. The difference between them mainly exist in Webex subscription and storage location. For people who have the Webex free plan, you can only record meetings on their computers and the recording files will be saved on the local hard drive. However, paid Webex accounts who subscribe to Webex Starter, Plus and Business plans are allowed to record on computers and mobile devices. They can save recordings to either the cloud or their own devices.
Apart from account type, your role in the meeting can also influence your recording options. Hosts, and cohosts are allowed to record Webex meetings and events. However, there are also some limitations. For hosts to perform local recordings, you need the permission of the site administrator. Besides, co-hosts can only record meetings when the host is absent.
Free Download Buy with 20% off Free Download Buy with 20% off
How to Record Webex Meeting With Webex App
Because Webex has a built-in recorder, you can record meetings directly using this feature. As a host, you can simply begin the recording. As a participant, you should contact the host to gain recording permission.
 Note:
Note:
- If the host starts meetings on a mobile phone, the Webex meeting cannot be recorded.
You can record meetings with the Webex app following four simple steps.
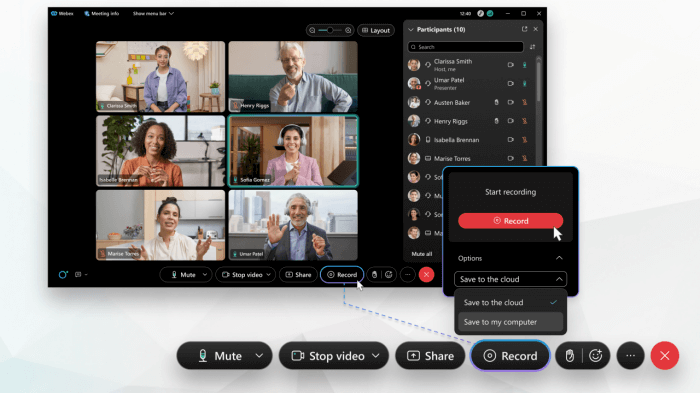
STEP 1: Navigate to Webex app, log in to your account, and open the meeting you need to record.
STEP 2: Click on the Record button and choose the recording options.
Note:
- If you want to capture audio in your recording files, select the Computer audio option.
STEP 3: Choose the saving location, on the computer or in the cloud.
STEP 4: After settings are completed, tap the red record button in the popup window to start recording.
How to Record Webex Meeting Without Permission As a Participant
For some private reasons, you may not want to contact the host for recording permission. However, as mentioned above, you can’t record a Webex meeting without permission as an attendee using the Webex recording feature. If you are still seeking an effective way to record a Webex meeting without permission, three reliable ways will be introduced below to guide you on how to do it.
Record Webex Meeting via FonePaw Screen Recorder
As a participant, if you want to record Webex meetings without permission, you can resort to a reliable third-party named FonePaw Screen Recorder, which can help you capture the meeting screen and audio on both Windows and Mac computers. This high-rated recorder can provide users with high-quality recording videos without watermarks. It is also flexible to operate, allowing you to customize the recording area and lock the recording window of Webex meetings to avoid interruption from other windows. You can also compress, edit and clip your video files.
Free Download Buy with 20% off Free Download Buy with 20% off
Here are Key Features of FonePaw Screen Recorder.
- Record screen on any occasion
This convenient tool is applicable for various occasions ranging from business presentations, live streaming, online meetings, and lectures to gameplay clips.
- Flexible and customized recording options
Users are able to tailor the recording settings, including the size of the recording area, microphone volume, and system sound. Besides, operations such as locking the recording window and annotating during the recording are allowed.
- High-quality video guaranteed
To satisfy different users’ needs, there are six standards for video quality to choose from, i.e. lowest, low, middle, high, highest, and lossless.
- Multiple output formats ensured
It also provides users with a wide selection of video formats such as MP4, MOV, WMV, and F4V. Hence, it can be compatible with multiple software.
With a straightforward interface, the recording process can be operated with ease. The following step-to-step guide will teach you how to record Webex Meeting via FonePaw Screen Recorder.
STEP 1: Join the Webex meetings you need to record
Open your Webex app and join the meeting you want to record, so that FonePaw Screen Recorder can easily capture the screen later.
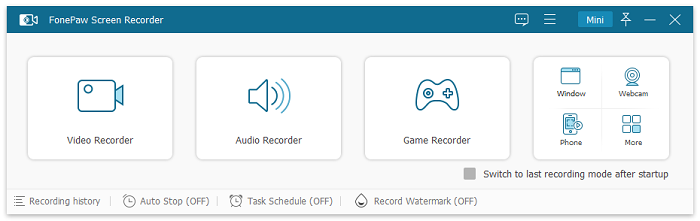
STEP 2: Install and launch FonePaw Screen Recorder
After installing the software on your computer, launch it and click the Video Recorder feature to perform screen recording.
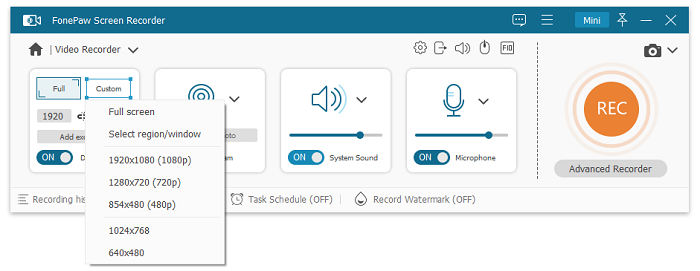
STEP 3: Customize the recording area, webcam and audio settings
When you open the interface of Video Recorder, you can customize the recording area, adjust webcam and audio settings based on your needs. If you click Custom, you are allowed to select the recording region and video frame. If you turn on the webcam, you can record your face with the Webex meeting screen. You can also choose whether or not to record sounds from the system or microphone. The volume can be adjusted by clicking the drop-down arrow.
STEP 4: Start recording your Webex meeting
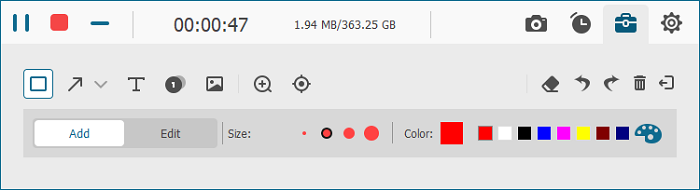
Once you have tailored the setting to your needs, you can click the REC icon to start recording. A panel will provide you with some information such as recording time and video size. You can also add real-time annotation or take snapshots during the recording.
STEP 5: Stop recording and export the video
By clicking the red rectangle icon on the operation panel, you can stop recording at any time. Then, you can preview, edit and save the recording video to your computer.
Record Webex Meeting via Built-in Tools on iPhone
If you cannot reach out to your computer, you can also record Webex Meeting on your iPhone using its built-in recorder. Here are four simple steps to achieve it.
STEP 1: Go to Settings on your iPhone and find the Control Center.
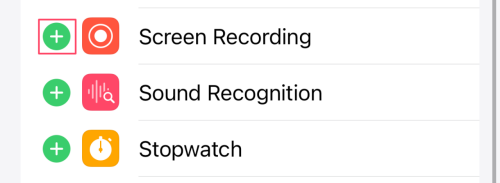
STEP 2: Find the Customize Control and Tap the green “+” icon next to the Screen Recording to facilitate later recording.
STEP 3: Open the Webex meeting that you need to record.
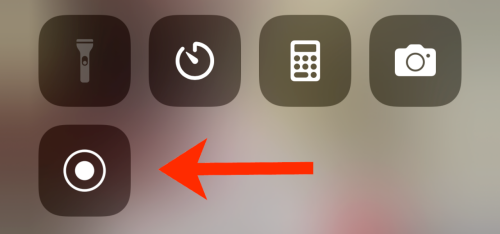
STEP 4: Swipe up from the right-hand corner of your screen and tap the Record button. The recording will start after a three-second countdown.
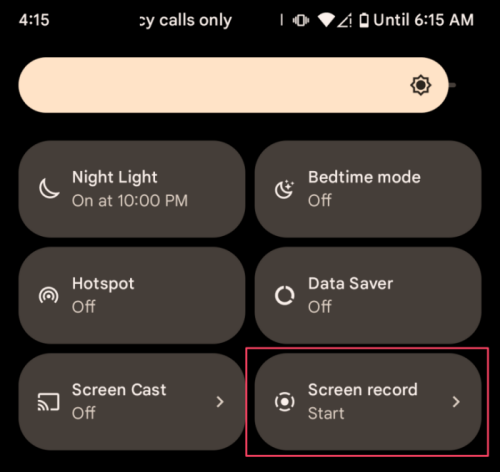
Record Webex Meeting via Built-in Tools on Android
If you choose to use Android devices to record Webex meetings, you can directly follow this process.
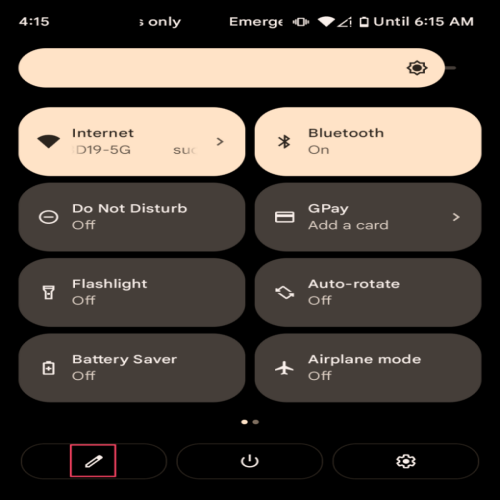
STEP 1: Swipe down from the top of your screen to check whether you can see the screen recording feature or not. If you cannot find this function, please tap the Pencil icon.
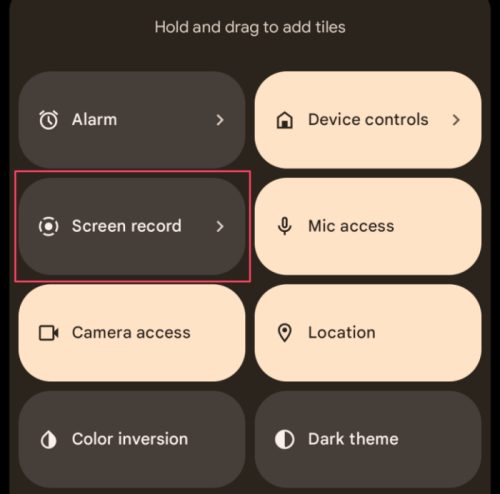
STEP 2: Choose the Screen Record to add it to your setting menu.
STEP 3: Open the Webex meeting that you need to record.
STEP 4: Click the Screen Recorder and the start button to start your recording.
Even though recording meetings with the help of the built-in tool on your iPhone and Android devices is easy and fast, there is an obvious shortcoming. You cannot enjoy any additional functions to edit your recording files. In this way, you might spend more time downloading other processing programs.
FAQs about Recording Webex Meeting
How to Record Webex Meeting with Audio on Webex?
To ensure the audio can be recorded, you should go to your Webex meeting > Session (event) > Recorder Settings. After that, choose Record on this computer and select the Record Audio option. When the audio option is set, you can go back to your meeting and start recording.
Note:
- If this option is not selected, a warning that your audio won’t record will pop up.
How to Find Webex Recording on Webex?
Webex always saves your recording files on the local computers or the cloud of Webex sites. Users who have free plan can only save files on the hard drive of their local computers. For Windows, recordings can be found in the Documents folder in My Computer. For Mac, you can gain access to their recordings from the Home folder via Finder.
Users who have subscribed the Webex plan, can save their files to both local computers and the cloud. For finding the cloud recordings, users could select Recordings from the navigation bar to browse recordings. Then, they can easily download and share them.
Conclusion
Overall, in this post, we deliver four methods to record your Webex meetings. You can directly use the recording function of the Webex app, the built-in tools on iPhone and Android devices, or resort to a third-party program. To make your recording process smooth and flexible, we highly recommend you try FonePaw Screen Recorder, which enables you to record high-quality videos and offers multiple editing options.
