


Here we introduce 4 Functions of FonePaw Screen Recorder to record a certain part of your screen. They allow you to truly customize your recording area and fulfill your different needs.
Free Download Buy with 20% off Free Download Buy with 20% off
We feel the need to record a part of our screens from time to time. Many choose OBS to capture a part of the screen; however, although OBS can capture a part of the screen, the program is not user-friendly at all. The steps are complex and difficult to understand especially for those rookies.
So, is there an easier way to capture a part of our screen easier? There is!
FonePaw Screen Recorder is a powerful recorder providing various features that allow you to truly customize the recording area and record a part of your screen according to your actual needs. Scroll down to learn about how to capture a part of your screen on Windows.

FonePaw Screen Recorder provides 4 different functions to capture a part of the screen.
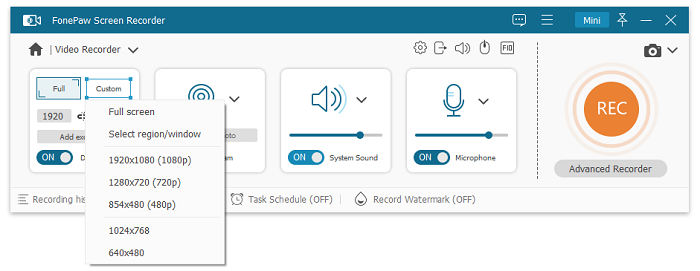
Record a Part of Your Screen by Changing Resolution
Changing the resolution of the recording area is the most regular way to customize the recording area. By choosing different resolutions, you can change the size of the recording area. What’s more, after changing the resolution, you can also further customize the size of the recording area by dragging the four sides of the recording square.
Step 1. Download and launch FonePaw Screen Recorder.
Free Download Buy with 20% off Free Download Buy with 20% off
Step 2. Click Video Recorder > Custom. You are free to select a fixed area or create one by choosing Select region/window. Click REC to start recording.
Step 3. Recording. Click the red square button to end the recording.
Step 4. Edit and save the video.
Capture a Part of Your Screen by Recording Around/Following the Mouse
Sometimes we need to track and highlight the mouse movements in video recording, especially in tutorial videos. Luckily, FonePaw Screen Recorder provides a simple solution – recording around/following the mouse. Unlike some other screen recording programs that just aren’t equipped with this feature, FonePaw Screen Recorder not only has this feature but also allows users to customize the recording area around the mouse, ranging from 192 X 144 to 1920 X 1080 (1080P). It also provides the recording size of iPhone and iPad, making the recorded videos perfect to be watched on mobile devices.
Step 1. Download and launch FonePaw Screen Recorder.
Free Download Buy with 20% off Free Download Buy with 20% off
Step 2. Click Video Recorder > Advanced Recorder > Around mouse/Follow the mouse. Hit REC to record.
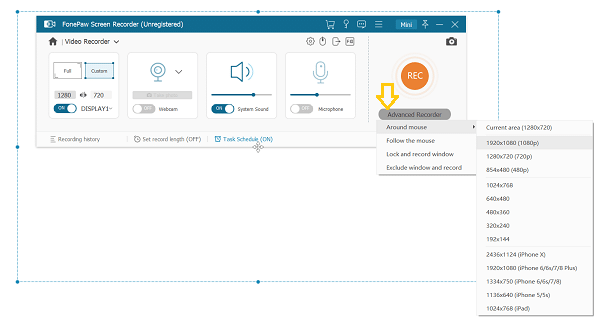
Tips: In Around mouse, the recording area moves together with the mouse. In Follow the mouse, the recording area moves when the mouse touches the side of the recording square.
Step 3. Recording. Click the red square button to end the recording.
Step 4. Edit and save the video.
Capture a Part of Your Screen by Locking & Recording a Window
To record activities in a certain program or a certain window, you can use the Lock and Record Window feature in FonePaw Screen Recorder. This function can precisely locate the window of a program or a part of the selected program window to record. It is widely used to record live sports, concerts videos from YouTube, Vimeo, and so on.
Step 1. Download and launch FonePaw Screen Recorder.
Free Download Buy with 20% off Free Download Buy with 20% off
Step 2. Click Video Recorder > Advanced Recorder > Lock and record window.
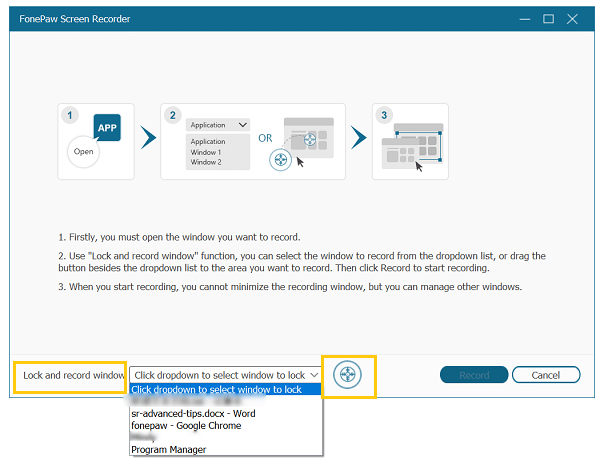
Step 3. Choose the program that is already running. If you need to record a certain part of the selected window, drag the target icon to the area that you want to record. You can preview the selected area. Click Record to start recording.
Step 4. Recording. Click the red square button to end the recording.
Step 5. Edit and save the video.
Record a Part of Your Screen by Excluding a Window
Annoying notifications often pop out while recording. With Exclude Window and Record feature of FonePaw Screen Recorder, you no longer have to worry about messages or notifications popping out in the process of recording. This function can block 2 or more programs at the same time, promising a smooth and precise recording.
Step 1. Download and launch FonePaw Screen Recorder.
Free Download Buy with 20% off Free Download Buy with 20% off
Step 2. Click Video Recorder > Advanced Recorder > Exclude window and record.
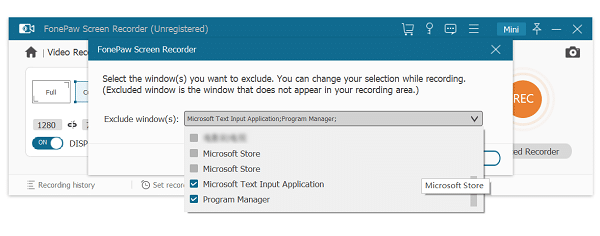
Step 3. Tick the programs that you want to exclude while recording. Click Record to start recording.
Step 4. Recording. Click the red square button to end the recording.
Step 5. Edit and save the video.
Conclusion
In sum, FonePaw Screen Recorder provides 4 ways to record a part of your screen, namely by changing resolution, recording around/following the mouse, locking & recording a window, and excluding a window. With these 4 functions, you can easily capture a part of your screen according to your needs.
Free Download Buy with 20% off Free Download Buy with 20% off