


"The iPhone/iPad/iPod [device name] cannot be synced. An unknown error occurred (-54)."
This alert message might come to you when you try to sync your iOS device with iTunes. When the error message shows up, you're prevented from continuing the process. Most of the time, the process proceeds with a click of "OK". However, in some cases, it fails to go on.
Don't Miss Out:
- How to Transfer Data from iOS Devices to Computer? (opens new window)
- How to Fix Error 4013/4014 on iPhone 6/7? (opens new window)
Why iTunes error 54 occurs? What make you such a headache might be:
- 1.The content being transferred might be incompatible with your computer or iPhone/iPad/iPod.
- 2.iPhone/iPad/iPod is not updated to the latest version of operating system.
- 3.iTunes is not upgraded to the latest version.
- 4.The file on your computer/iOS device is locked.
- 5.Process is stopped via third-party security software.
- 6.The content is too much to be synced at a time.
When you have a better knowledge of what causes the iTunes error 54, it's time to get it fixed. I'm going to introduce to you 8 solutions, please dive in and take a look one by one.
Method 1: Update Your iTunes/iOS Device to the Latest
The reasons why a new version of iTunes or iOS operating system rolls out are to bring fresh new features and fix previous bugs. Though it remains unknown whether iTunes error 54 is caused by a system bug, You'd better upgrade your iTunes to the latest version and iPhone/iPad/iPod to the latest iOS.
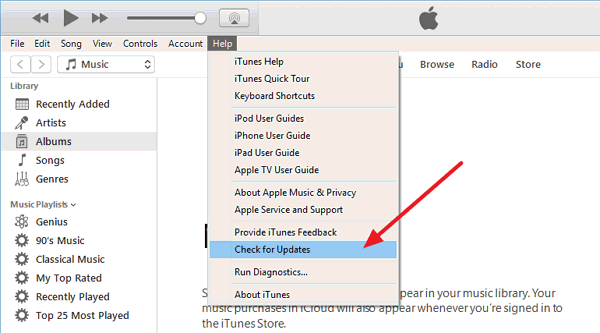
iTunes: Launch "iTunes" on PC and go to "Help" > "Check for Updates" > "Download iTunes".
iOS Device: Open "Settings" > "General" > "Software Update" > "Download and Install".
Method 2: Run iTunes as an Administrator
If you're using your computer as someone other than an administrator, you might be unable to try some features or access some programs. Therefore, it's worth trying to open and run iTunes as an Administrator.
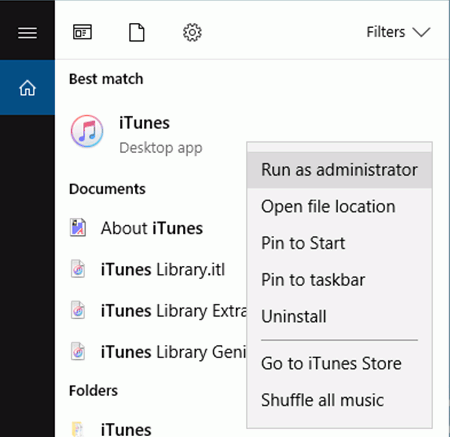
Step 1. Locate iTunes on your computer or find it with menu panel.
Step 2. Right click on the "iTunes" app.
Step 3. Select "Run as administrator".
Method 3: Remove PDF Files from the Process
You might probably not know that PDF is not supported on iOS device if you're syncing PDF files from computer to iBooks on your iPhone/iPad/iPod.
The current book file supported by iDevices is a****n ebook file format with the extension .equb. So, you'd better convert PDF files into EPUB files before you start syncing with your device.
Method 4: Sync a Small Number of Files at Once
If you're syncing a large amount of content at the same time via iTunes, the process might fail as well, for it's quite a burden for both the computer and iTunes to carry out too much files at a time. Thus, I'd suggest you to cancel the process and sync a small number of data at once.
Method 5: Take a Look at Third-Party Security Software
If a third-party security software is running on your computer, it might possibly prevent apps from making instructions on computer.
It can interfere with the sync process between your device and computer. Therefore, you might have to change thesetup of your security software (opens new window)and see whether it helps.
Method 6: Uncheck Read-only on iTunes Folder
The data you're syncing with iTunes will be uploaded and stored in "iTunes" folder. If it's set to "Read-only", new data might fail to written in the folder, so you should check out whether it's a problem with the "iTunes" folder.
Step 1. Please follow the steps to find the "iTunes" folder.
Windows 7 or later: Open "Disk C" > "Users" > "username" > "My Music"/"Music" > "iTunes".
Mac: Make sure that you're in Finder. From the menu bar at the top of your computer screen, choose "Go" > "Home" > "Music" > "iTunes".
Step 2. Right click on "iTunes" folder.
Step 3. Select "Properties" at the bottom.
Step 4. Besides "Attributes" title, uncheck the "Read-only" option.
Step 5. Click "Okay" to save the change.

Method 7: Give Authorization to Your Computer
If you fail to sync your iDevice with iTunes and the alert messages prompts, then it might probably be due to the invalid authorization of your computer with iTunes.
You should know that as private and personal as data synchronization is, both iPhone and computer you're using should receive authorization from iTunes.
For iOS devices, the authorization is done when you tap "Trust" to trust this computer. For a computer, you should follow the instruction to authorize it.
Step 1. When you connect your iDevice to iTunes, click on "Continue" when prompted to allow this computer to access information on [device name].
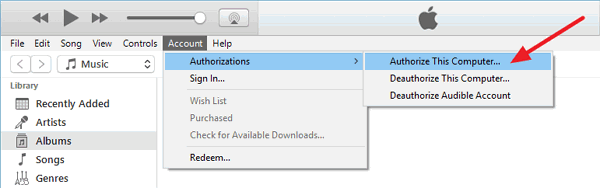
Step 2. Click "Account" from the top sidebar.
Step 3. Select "Authorizations" and go ahead to choose "Authorize This Computer".
Step 4. Enter Apple ID and Password again, and then click "Authorize".
Method 8: Use an iTunes Alternative - iOS Transfer
If you're looking for a best alternative of iTunes, why not give it a shot with FonePaw iOS Transfer (opens new window). Personally, I think this software totally outperforms iTunes in many respects.
Free Download Buy with 20% off Free Download Buy with 20% off
Perfectly compatible with all models of iPhone/iPad/iPod including the latest iPhone 7 and iPhone 7 Plus, iOS Transfer allows users to transfer a range of data from iDevice to iDevice, Computer to iDevcie and iDevice to Computereither via one click or selectively. Supported files include photos, videos, songs, movies, voice memos, contacts, messages, books and so on.
It's user-friendly and easy to use. Just connect your device with iOS Transfer and select the desired type of data. Then, you can select export or import data from/to computer/device.

If you're still having trouble using iTunes, you might really give it a try on FonePaw iOS Transfer. For solutions of more iTunes errors, please find your way on FonePaw.