


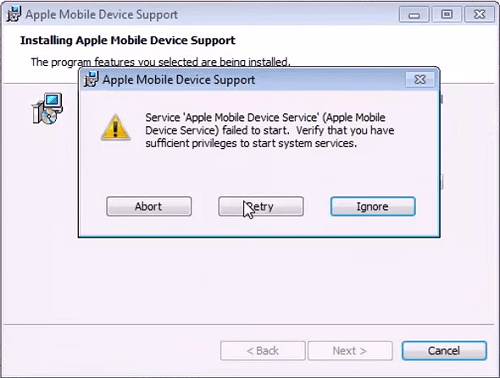
You may encounter the problem that an error message that reads "Apple Mobile Device Service Failed to Start. Verify that you have sufficient privileges to start system services" when you are installing or updating iTunes on your Windows computer. In some instances, users tried to fix the error by manually starting Apple Mobile Device service in Windows Services and ended up with the Apple Mobile Device service error 1053: "Windows could not start the Apple Mobile Device service on Local Computer. Error 1053: The service did not respond to the start or control request in a timely fashion."
This issue is quite common when the iTunes is updated to the new versions because iTunes related components and files might be corrupted or missing during the installation process, therefore in return the error is shown. To fix this problem, here provides you three solutions.
1. What Is Apple Mobile Device Service?
Apple Mobile Device Service is one of the components of iTunes, which is used to recognize and communicate with iOS devices such as iPhone, iPad, iPod that are connected to the computer. Without Apple Mobile Device Service, iPhone, iPad, iPod cannot be detected and synced with iTunes. Therefore, it is important to get Apple Mobile Device Service started for iTunes to run properly. If the service Apple Mobile Device failed to start or Apple Mobile Device Service is missing, fix it in the following steps.
2. Restart Your Computer and iPhone
If Apple Mobile Device service failed to start during iTunes installation or when you try to connect iPhone, iPad, iPod to iTunes, simply restarting your computer and your iPhone/iPad can help a lot:
Step 1 Disconnect your Apple devices and reboot the computer.
Step 2 Reinstall iTunes if there is no iTunes installed properly on your computer.
Step 3 Reboot your Apple devices. Connect your iOS devices to the computer again after the installation completes.
3. Restart the Apple Mobile Device Service(AMDS)
If restarting the Apple devices and PC still cannot solve the problem, you can try to restart the Apple Mobile Device Service by following these steps:
Step 1 Open Windows Start Menu.
Step 2 Type in services.msc in search bar, and press Enter button on the keyboard.
Step 3 In the Services window, right-click on Apple Mobile Device Service and choose Properties.
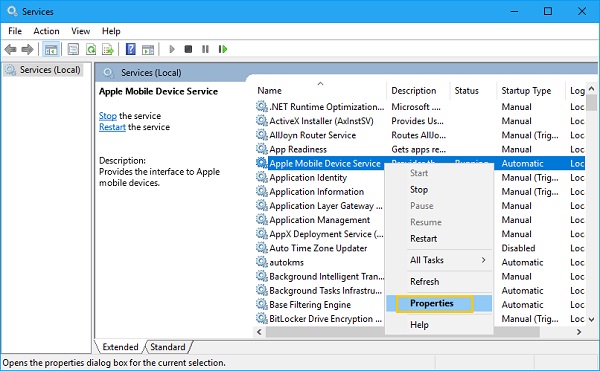
Step 4 The status of the service will show on the screen: if it's running, restart it by clicking Stop then Start. If not, simply click on Start.
Step 5 If you are told that the Apple Mobile Device Service can't be started(error 1053), check Startup type option, make sure Automatic is selected and then click on "Apply" at the bottom right corner.
Step 6 Restart your PC and reinstall iTunes, then try to connect your Apple device.
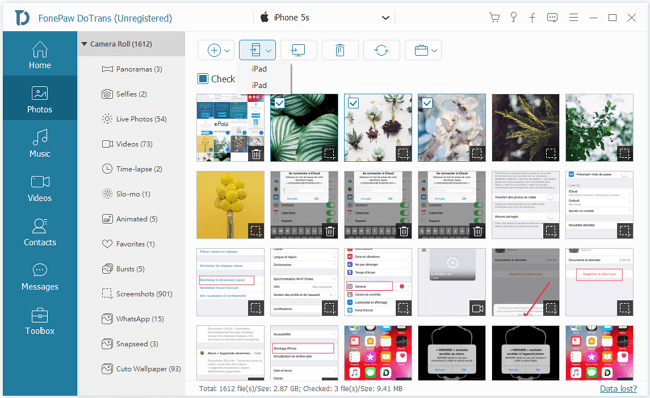
If iTunes can't connect to your iOS devices properly, you can use FonePaw DoTrans (opens new window) to transfer files from iPhone to computer as well as transfer files from computer to iPhone. DoTrans can also directly transfer data from one iOS device to another. Therefore, if what you need is to move photos, music, contacts or other data between iPhones and computer, FonePaw DoTrans is a great alternative to iTunes.
4. Reinstall iTunes and Its Components
As mentioned above, the reinstallation of iTunes can solve the problem. Before reinstalling, make sure all the iTunes and Apple components have been removed from PC, which can be done in Control Panel > Programs and Features. It is suggested to uninstall all the components in the following order:
- iTunes
- Apple Software Update
- Apple Mobile Device Support
- Bonjour
- Apple Application Support (32-bit)
- Apple Application Support (64-bit)

And then delete the following folders manually:
- C:\Program Files\iTunes\
- C:\Program Files (x86)\iTunes\
- C:\Program Files\Common Files\Apple\
- C:\Program Files (x86)\Common Files\Apple\
When all the components have been uninstalled, reboot your PC, and then reinstall iTunes back. There are two methods to reinstall iTunes and its components.
Method 1: Reinstall All the Apple Applications
Step 1 Download the latest iTunes from Apple or Microsoft Store.
Step 2 Right-click on the iTunes installation package and choose "Run as Administrator".
Step 3 Follow the on-screen instruction to complete the installation. But before clicking Finish, connect your iOS device to the PC and wait for the computer to detect the connected device. This will allow the computer to install the USB driver for the Apple device.
Step 4 You can tell that the device is detected when you see the notification popping up at the right bottom corner of your computer. Click "Finish Installation".
Method 2: Install a Special Version (For Windows 7 64-bit)
If the re-installing of iTunes is not successful, try to install a specific version of iTunes for computers with an older version of video cards. The same as Method 1, before the installation, you should make sure iTunes and Apple components have been removed completely.
And then download the special version of iTunes: iTunes 12.1.3 for Windows (64-bit - for older video cards). This version is especially compatible with older PCs that have older video cards. Follow the steps to reinstall iTunes:
- Download this special version of iTunes
- Install iTunes as you normally would do. You should be able to reinstall iTunes withou the error "Apple Mobile Device Service failed to start".
Have the solutions offered above help you solve the Apple Mobile Device Service failing to start issue? If you like this article or find it useful, share it on the social media to help more people, or if you have a better idea, comment on the below section to let us know!