


Drivers are essential for the Windows operation system to communicate with your hardware devices. When your Wi-Fi, graphics, bluetooth, USB or other driver is outdated, for example after updating your computer to Windows 10, your PC could have these problems: the PC is unable to connect to Wi-Fi/bluetooth, fails to recognize smartphone connected with USB cable or has audio or graphic issue. This post will show you three ways to update drivers in Windows 10/7.
Part 1: Should You Update Your Drivers?
When should I update my drivers? Should I always keep my drivers up-to-date? Many users have questions like that. Basically, it is not necessary to keep your driver up-to-date all the time. The latest version won't come with any dramatic performance improvement but just some simple bug fixes. You need to update your drivers only when:
- You play computer game and need to keep your graphics drivers up-to-date to ensure best gaming performance;
- The outdated drivers cause problems on your computer.
Part 2: Automatically Update Drivers on Windows 10
If you are using Windows 10, the Windows system automatically checks for latest drivers for your computer by default. The drivers will be updated automatically with Windows Update. However, the universal drivers that updated by Windows 10 are not always the best for your hardware devices and some of them may cause trouble on your computer. So many users prefer to manually updating drivers for their computers.
To disable automatic driver installation on Windows 10, you can:
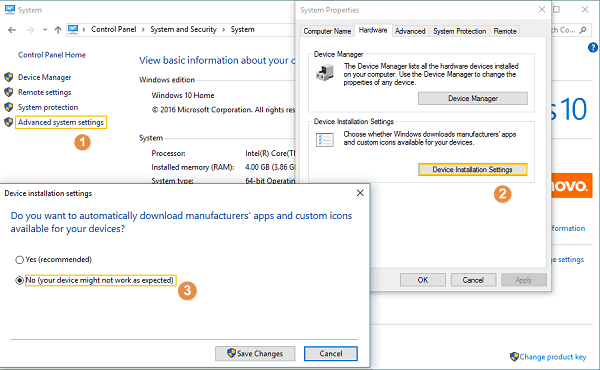
- Click Control Panel > System and Security > System > Advanced System Settings;
- From the pop-up window, choose Hardware > Device Installation Settings;
- Choose No for the question whether to let Windows to download driver software and realistic icons for your devices.
- And click Save Change.
Part 3: Manually Update Drivers in Windows 10/7
You can also manually update a driver with a suitable driver file that you download from the hardware manufacturer' website. Here is the step-to-step guide to manually update drivers in Windows 10/7.
Step 1. Find and download drivers from manufacturer websites. You should first have these information: the model of the hardware that needs updated driver, the model of your computer (Dell, HP, etc.), operating system of your computer (32-bit/64-bit version of Windows, Windows 10/8/7/Vista/XP). For example, if I need to download a driver for my Intel graphics card, I will go to Intel.com and find graphics driver for Intel (R) HD Graphics 520, 64-bit Windows 10.
Step 2. Unzip the driver file that you have downloaded if you downloaded a zip file.
Step 3. Navigate to Device Manager on your Windows 10/7.
- On Windows 10, right click on Start icon and choose Device Manager.
- On Windows 7, click Start and right click Computer > Manage. Choose Yes for permission from User Account Control and select Device Manager.
Step 4. Choose the device that you need to update driver for. For example, if you need to update the graphics driver, find the device under Display adapters category.
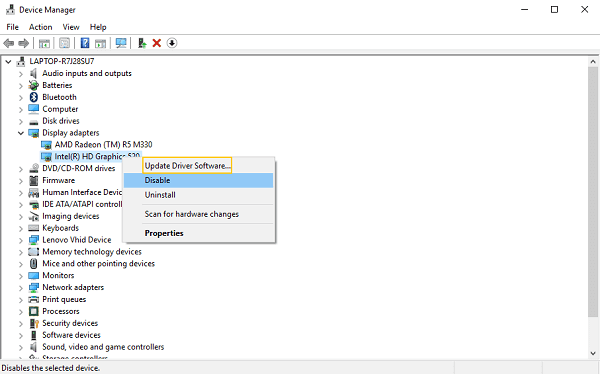
Step 5. Right click on the device and choose Update Driver Software.
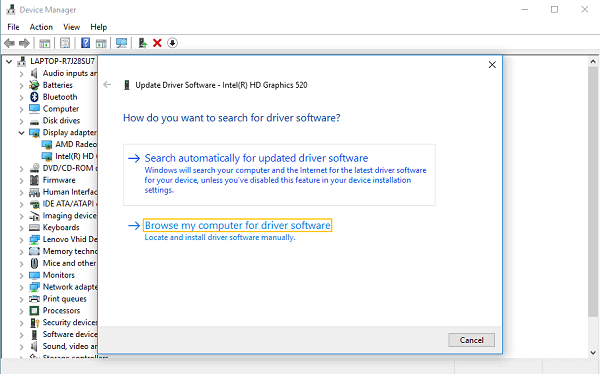
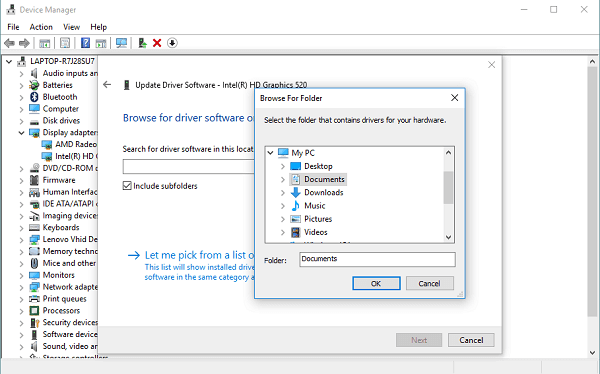
Step 6. From the pop-up window, choose Browse my computer for driver software and click Browse to choose the driver file that you have downloaded.
Step 7. Select the driver file and click Next to begin updating the driver.
Part 4: Update Drivers in Windows 10/7 with Drive Talent
If you are not tech-savvy and just need to find a simple way to update a specific driver, you can turn to a driver updater, which can automatically identify the outdated drivers on your phone and update them to a stable & newer version in one click. It will save you lots of trouble to find and download a suitable driver for your computer.
Here we recommend Driver Talent (opens new window), a comprehensive drivers management tool for Windows 10/8.1/8/7/XP/Vista. It can scan out outdated, missing or corrupted drivers for both your hardware devices and peripheral devices so that you can quickly locate the problematic driver and update it in one click. Besides updating drivers, Driver Talent also does a good job on back up drivers, fix problematic hardware like display adapter, sound card and view information of hardware such as CPU, Motherboard and more.
Step 1. Download Driver Talent. And launch the program on your PC.
Step 2. The program will show the information of your computer operation system. Click Scan for the program to begin scanning drivers from your PC.
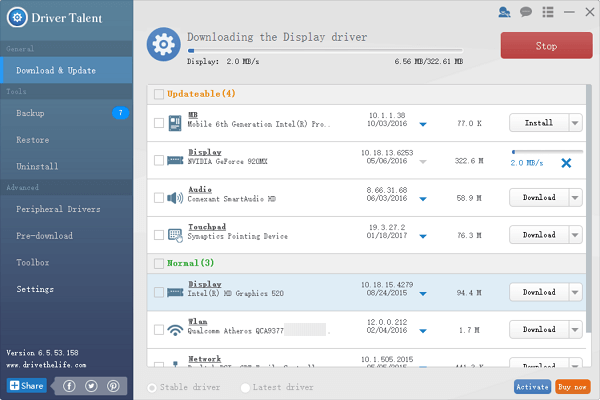
Step 3. All update-able drivers will be scanned out. Choose Stable Driver option on the bottom to filter out only the stable version. Or you can choose Latest Driver option to display only the newest version.
Step 4. Choose the one that you need to update and click the arrow down icon to select a official or WHQL driver. You're suggested to choose the first one, which is recommended by Driver Talent. Click Download to begin downloading the driver.

Step 5. After downloading, click Install to update the driver.
Note:
- If you need to update drivers for USB, keyboard, mouse, wireless device or other peripheral device, you can choose Peripheral Drivers category. If you have trouble connecting the device to your computer, click Repair to repair the drivers.
- Choose Toolbox and you will find more tools to fix drivers display adapter, sound card, game playing issue.
If you have no internet connection on your computer, tryDriver Talent for Network Cardto install the network driver without internet connection. More question about updating drivers on your computer? Leave your comment below.