


No network connection is probably the worst nightmare for anyone who tries to use a PC. There are various network connection issues that could happen to our Windows 10 PCs, for example:
- You get the error when trying to connect to a Wi-Fi network: Windows 10 can't connect to this network;
- You can access the internet through Wifi but the Ethernet via cable is not working;
- The error comes up when you try to connect to Internet via cable: Windows 10 Ethernet doesn't have a valid IP configuration;
- The computer has connected to Wi-Fi but there is no internet.
No matter what the network issue is, you can try to fix network connection on your own with these methods.
# Check Modem/Wireless Router/Port/Cable
The first thing you should do is to check your modem and wireless route, making sure that the problem is not on your Internet service provider. Restart the modem and wireless route, then connect to the network on your PC again. If the PC still fail to connect, read on.
If the Ethernet is not working on your Windows 10/8/7, check if it is the cable or one of port on the router is not working. You can try a new cable or connect the cable to other port of your router.
# Run Windows Built-in Network Troubleshooter
Windows has built-in network troubleshooter. You can bring out the troubleshooter and see if it can help you.
On windows 10, type "network troubleshooter" on the search bar at the bottom of the screen.
Choose Identify and repair network problems.
Wait till the network diagnostic is completed and follow the instruction to repair the network connection.

# Forget the Wireless Connection
If you get "Windows 10 can’t connect to this network" error when trying to connect to a wireless network on PC, you might want to forget the wireless connection and reconnect to the network.
- Open Settings > Network & Internet.
- Navigate to Wi-Fi section and click Manage Wi-Fi > Manage known networks.
- Select the Wireless network that you can’t connect to and click Forget.
- Then connect to the same wireless network again.
# Disable & Enable Wireless/Ethernet Network
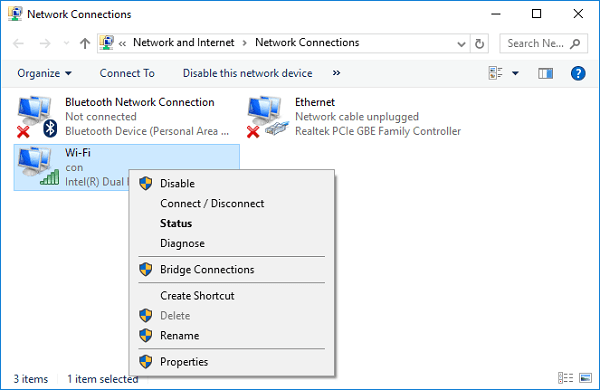
If your computer says "Windows 10 can’t connect to this network", you can try to disable and enable the wireless network to fix the network connection.
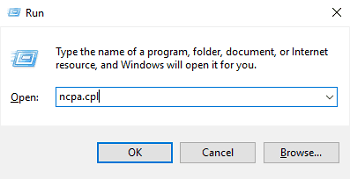
Press Win+R keys to bring up the Run window, type ncpa.cpl to open Network Connection folder.
Right click on the wireless network and choose "Disable".
After that, right click the network and choose "Enable".
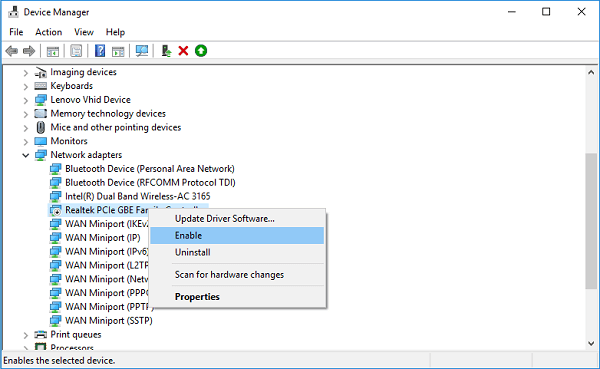
If the Ethernet connection is not working, you can disable and enable the Ethernet network in the similar steps.
Press Win+R and enter devmgmt.msc.
In Device Manager window, click Network adapters.
Right click Ethernet card device. If it is disabled, click Enable to enable the Ethernet device.
# Run Networking Commands
To fix "Ethernet doesn't have a valid IP configuration"on Windows 10/8/7, you can try to run networking commands.
- Right click Win icon on the taskbar and choose Command Prompt(Admin).
- Run the following commands in the listed order:
- Type netsh winsock reset and press Enter (Reset the TCP Settings);
- Type netsh int ip reset and press Enter (Reset the TCP Settings);
- Type ipconfig /release and press Enter (Release the IP address);
- Type ipconfig /renew and press Enter (Renew the IP address);
- Type ipconfig /flushdns and press Enter (Flush and reset the DNS client resolver cache).
You can then restart your PC for the commands to take effect and see if the network connectivity has been restored.
# Update the Network Adapter Drive
If you recently update to Windows 10, you may have an outdated or incompatible network adapter driver that makes you unable to get network connection. You need to update the network adapter driver to repair the network connection.
With no network connection on your PC currently, you need to use Driver Talent (opens new window) to install driver without network. With this driver management program on your PC, you can install network drivers on your PC without network connection.
Learn more about How to Install Driver without Internet Connection (opens new window)
# Roll Back the Network Adapter Driver
If you recently update your network driver and then have problems connecting to internet, you can try to fix the network connection issue by rolling back to the previous version.
Open Device Manager > Network adapters, choose the network adapter that is not working.
Right click the network adapter and choose Properties > Driver > Roll Back Driver.
If the button is unavailable, that means there's no driver on your Windows PC to roll back to.

But you can also use Driver Talent to download and install previous version of your network drivers without network to fix the problem. Otherwise, you need to get the models of your PC & network hardware, then on a workable PC, download the compatible network adapter driver from manufacturer’s website, and install the driver on the network disabled PC.
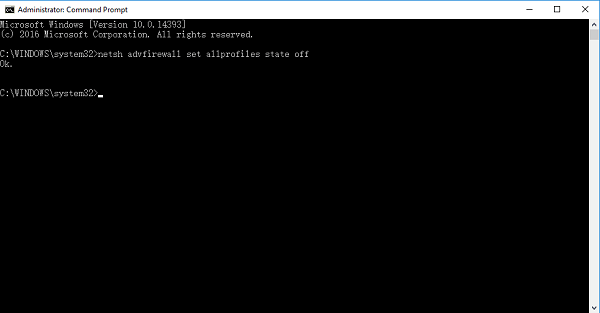
# Temporarily Turn off Firewalls
A firewall software could cause network connection issue on your Windows PC. You may temporarily turn off the firewalls and see if the problem is on the firewalls. To disable Firewalls:
Right click Win icon on the task, choose Command Prompt(Admin).
Type netsh advfirewall set allprofiles state off. Hit Enter.
Now see if you can open a web page on browser.
If you can, contact the software manufacturer to see if you can fix the problem by updating the software. You need to turn on your firewalls as soon as possible: type netsh advfirewall set allprofiles state on to turn it on.
# Temporarily Turn off Antivirus software
If you have installed antivirus or malware-prevention software on your Windows 10, it may be the software that block the network connection. If the network connection is repaired after disabling the antivirus or malware-prevention software, you may want to consider reinstalling the software. If you’re not sure if there is antivirus or malware-prevention software program on your Windows, you can check:
- Type System and security in the search box on the taskbar and select Review your computer’s status and resolve issues.
- Click arrow down icon beside Security and see if there is any antivirus or malware-prevention software listed.
# Reinstall the Network Adapter Driver
If the above steps failed, you may want to reinstall the network adapter driver. Firstly, uninstall the network driver on your PC:
- Open Device Manager and choose Network adapters.
- Right click the wireless or Ethernet network adapter, and choose Uninstall device > Delete the driver software for this device check box > Uninstall.
- Then you can restart your PC.
You need to get the latest network adapter driver from other PC or use Driver Talent to reinstall the driver to your PC. You are recommend to back up the driver beforehand. Driver Talent can actually backup, uninstall and install drivers without network.
# Perform Network Reset to Reinstall Network Devices
This is the last resort. It can help if you have network connection issue after upgrading to Windows 10 or if you can connect to the Internet but not to shared network drives. It will reinstall all network adapters and set them to the defaults.
Click Win button on the taskbar. Choose Settings > Network & Internet > Status > Network reset.
On the Network reset screen, select Reset now.
Wait for your PC to restart.

Note: To use this method, you computer need to run on Windows 10 Version 1607 or later.
If you have other question about network connection issues on Windows 10, leave your comment below.