The Notes app on Mac can be used to mark down important information in meetings, lessons, and other daily occasions. But sometimes you may run into panic when you find notes disappearing from the list, or you mistakenly delete them by accident.
Don't worry! There are 4 very simple methods to help you get them back. In the following, grasp how to recover disappeared or deleted notes on Mac with ease right away!
Where are Notes Stored on Mac?
Instead of finding notes on Mac aimlessly, knowing where they are stored on your computer can help you find them back again more efficiently.
When you create a note on Mac, the backup file will directly be stored in the path: “~/Library/Containers/com.apple.Notes/Data/Library/Notes/”. You only need to use Finder and paste this location to go search the folder, and your Mac will directly navigate you to it right away.
Now that you're aware of how notes are saved on your Mac, let's delve into the intricacies of note recovery on Mac. Whether your notes have mysteriously vanished or have been recently or permanently deleted, we'll help you successfully recover them.
How to Recover Permanently Deleted Notes on Mac
If you have searched everywhere on Mac but unfortunately find that your notes are probably deleted forever, don't worry because you still get chances to retrieve them once again, even without backup! Now, grasp the methods and try.
1. FonePaw Mac Data Recovery [Without Backup]
Before you get time to back up notes on Mac but now unfortunately find they are permanently deleted, the most efficient way to recover them is by turning to the professional recovering software to help. FonePaw Mac Data Recovery is the one you should give a try.
FonePaw Mac Data Recovery empowers the powerful ability to scan over your Mac, and detect to recover deleted files on Mac for you efficiently. Its in-depth scanning mode can be performed to find data of those permanently deleted notes without backup required. Over the years, the software has been regularly enhanced to deliver speedy scanning speed and also stabler recovery performance, boosting better efficiency and guaranteeing the highest success rate. Despite notes, FonePaw Mac Data Recovery can also help retrieve other 1000+ types of files on Mac. With the software, you no longer need to worry about losing important data or files on Mac anymore!
Free Download Buy with 20% off Free Download Buy with 20% off
Now, go through the brief guide below to retrieve permanently deleted notes on Mac via FonePaw Mac Data Recovery without hassle:
STEP 1. Install and Launch FonePaw Mac Data Recovery
To get started, install FonePaw Mac Data Recovery on Mac first. The instructions to complete installation are simple and no extra software is equipped to be downloaded anymore. Once complete, launch it and get ready to recover deleted notes on Mac.
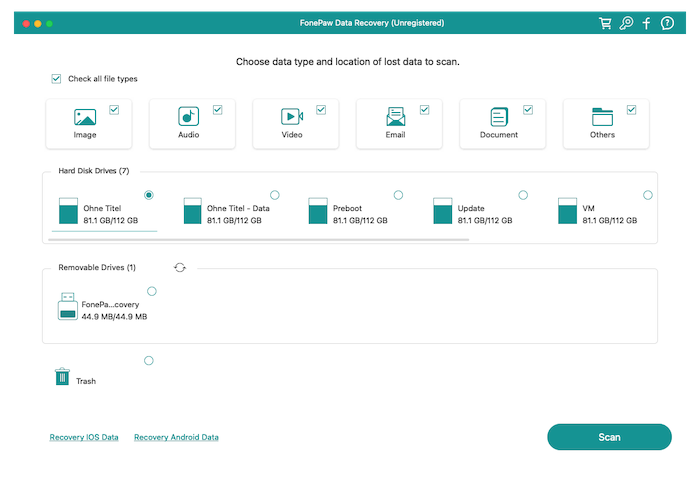
STEP 2. Scan Deleted Notes on Mac
From the main interface of the software screen, select the file type as "Notes", then hit the "Scan" icon in the lower-right of the screen to let FonePaw Mac Data Recovery scan in-depth to find the deleted notes for you.

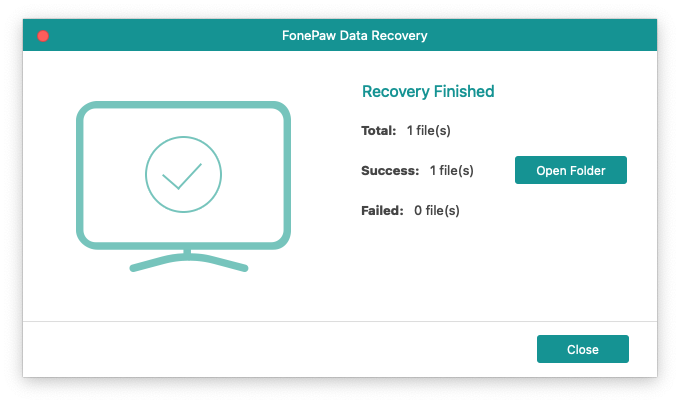
STEP 3. Recover Permanently Deleted Notes on Mac
Once FonePaw Mac Data Recovery displays all detected notes in the previewing window, simply select the exact items you desire to recover. Finally, submit "Recover" and the software will retrieve them on Mac right away.
2. Time Machine [With Backup]
It can be easier to recover permanently deleted notes on Mac if you have backed them up with an external hard drive before - simply using the built-in backup feature, Time Machine can help. Let's see how to process it step-by-step:
NOTE: Pay attention that when you use Time Machine to recover notes, the latest ones will all be overwritten by the old versions backed back before. So you'd better save copies of the latest notes before starting the recovery process.
STEP 1. Before getting started, you need to close the Note app and also disable the iCloud syncing feature for this app in advance.
STEP 2. Then, connect the external drive you used to back up Mac notes to Mac, and hit the Time Machine icon at the upper-right corner of your desktop screen.
STEP 3. Now, select the "Enter Time Machine" option and sort out all files in ".apple.notes" format. These are notes recorded by the Notes app.
STEP 4. Find the notes you deleted by accident and now need to recover. Select them and click "Restore" to bring them back on Mac once again.
How to Recover Recently Deleted Notes on Mac
For notes that were recently deleted within a couple of days or a month, the recovery can be a bit simpler. There are also two options available to try. Just keep reading.
1. Recently Deleted
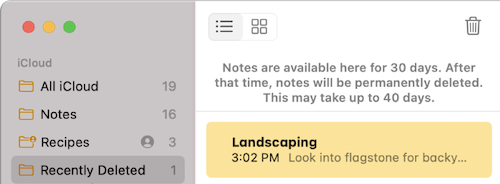
It is noted that after the notes are deleted, they will still be kept for 30 days before disappearing permanently. During this period, you can directly retrieve them from the "Recently Deleted Folder". The steps below will guide you how:
STEP 1. Tap the "Notes" app to open it from the Dock.
STEP 2. On the left sidebar within the app, you can find the "Recently Deleted" option. Hit it to open the folder.
STEP 3. When you find the note you just deleted and now want to recover, right-click on it and then choose "Move to" > "On My Mac", then the deleted note can be recovered and saved back on your desktop again.
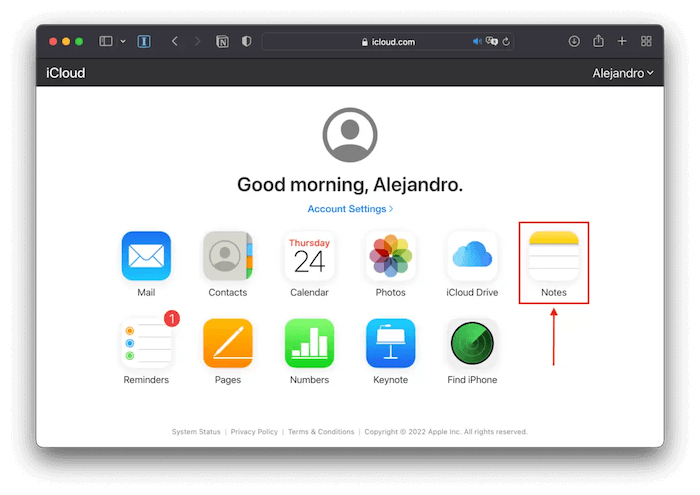
2. iCloud
Once you have synced Mac data to iCloud, it will also be simpler for you to recover deleted notes on Mac with its help. Only several easy steps need to be followed:
STEP 1. Firstly, you need or go to "Settings" > "System Preferences" > "iCloud" to unselect Notes to prevent yourself from deleting the backups from iCloud by accident.
STEP 2. Then, open iCloud.com in your browser and log in via your Apple ID.
STEP 3. Select "Notes" to find the backed-up notes on iCloud and you desire to recover them. Simply submit downloading them to Mac once again.
How to Recover Disappeared Notes on Mac from .storedata Files
Actually, when you create notes on Mac, the system will automatically store temporary files with the ".storedata" suffix in your "Library" folder. If your notes save such copies, you can also directly recover from ".storedata" files instantly. To process this, follow the steps below and try:
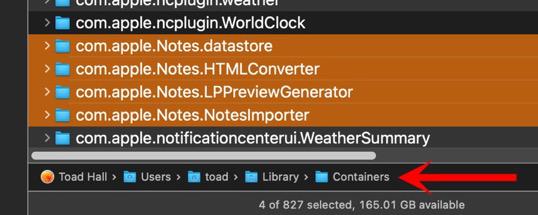
STEP 1. Open "Finder" on Mac. Then use its "Go" > "Go to Folder" function to open the path "~/Library/Containers/com.apple.notes/Data/Library/Notes/".
STEP 2. In the folder, you will see 3 files with the ".storedata" suffix listed. Copy and paste all of them to your Mac desktop.
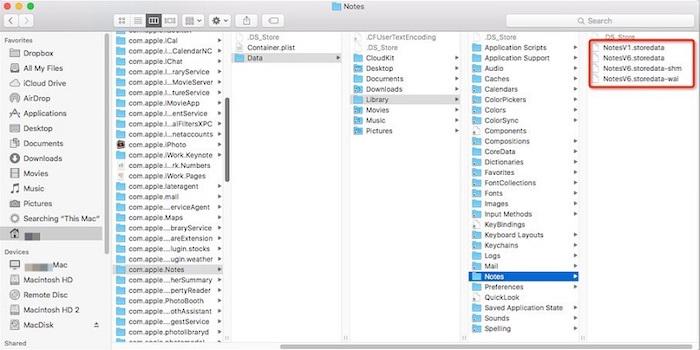
STEP 3. Now, change ".storedata" to ".html" to save as HTML files.
STEP 4. Now open the HTML files and search for your notes' contents in them. Then simply press "Command+F" to restore notes to a different folder on Mac right away.
Final Words
When any of your important notes suddenly disappear, don't worry because there are multiple ways to help you get them back. If you even have no time to back them up in advance before they disappear or permanently deleted, FonePaw Mac Data Recovery can bring the most efficient help to get them back with ease. Now, install the software and give it a try to retrieve important notes on Mac!