If your Android phone suffers from a slowdown and freeze or even gets attacked by malware, you can use Android recovery mode to restore your phone to normal. But when it comes to the recovery mode on Android, you may be taking it literally. The details of what it does and how to use it seem confusing. And if you take a wrong step, the data on your Android phone could be lost forever.
To help you out, this article explains what Android recovery mode means, what it does, how to turn it on, and how to restore Android data after using the mode. Now, let's explore Android Recovery Mode together.
What Is Android Recovery Mode?
Simply put, Android recovery mode is a mandatory measure used by Android users to deal with problems with the operation of their phones. With the combination of the volume key and the power button (This will vary by phone model), you can launch Android recovery mode. Once you enter the mode interface, you can choose the corresponding solution according to your problems. For example, you can choose to reboot your phone, clear cache, or restore factory settings. In addition to fixing problems with your phone's operation, you can also upgrade your Android by using the mode.
Though Android mode is powerful, you should aware that when you use Android recovery mode, data on your phone may be lost due to some system reasons. So before you take action, you'd better make a backup of your phone.
- Regular mode: regular mode is a mode you use every day.
- Safe mode: safe mode can help you diagnose the problem with your device.
- Recovery mode: recovery mode can be used to resolve your phone's problems.
What Can Android Recovery Mode Do?
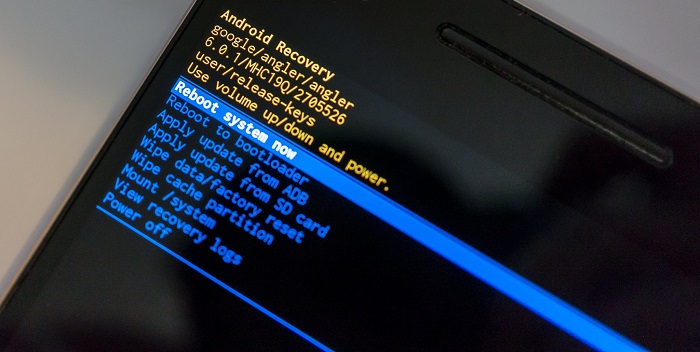
In the Android recovery mode interface, you can see ten functional options, which include Reboot system now, Reboot to bootloader, Apply update from ADB, Apply update from SD, Wipe data/Factory reset, Wipe cache partition, Mount / System, View recovery logs, Run graphics test, Power off.
If you have misgivings about these options. There is a list that most of the Android recovery mode options are explained in detail.
Option 1. Reboot system now
As the name suggests, the option Reboot system now means restarting your Android phone and reloading the system. This option can help you fix some glitches on Android, and it is the first option you should try when you choose to restore factory settings.
Option 2. Reboot to bootloader
Reboot to bootloader option can help you access the bootloader menu, in which you can flash certain files by using the ADB (Android Debug Bridge) and other tools.
Option 3. Apply update from ADB
ADB (Android Debug Bridge) is a tool used by Android developers to install the update files in Zip format from a PC to Android. If you have an update saved as a Zip on your PC, you can use this option to install and update your phone.
Option 4. Apply update from SD
Apply update from SD means you can update Android from an SD card where an available update file is stored.
Option 5. Wipe data/Factory reset
The option of Wipe data/Factory reset should be a reminder that you need to think twice before acting. Because the option can erase data on your phone and return your phone to its original factory condition when helping you handle malfunction. Therefore, try not to select this option until you have fully troubleshot your phone. If you have to need an overhaul, you should definitely back up your phone data in advance.
Option 6. Wipe cache partition
Cache is a kind of temporary file. These files will be accumulated in your phone and lead your phone to lag as the system or software runs more and more. And Wipe cache partition option can help you clean these stored temporary files.
Option 7. Mount / System
This feature is normally inaccessible, but it gives you access to core files and folders. If you want to mount your phone's storage and change core files and folders, you can tap this option.
Option 8. View recovery logs
If you want to view what previous resets and restores you have done on your phone, you can select the View recovery logs option to check.
Option 9. Run graphics test
The option is designed for developers that they can use this feature to perform different tests with the Graphical Processing Unit (GPU). This feature may not be available on every phone
Option 10. Power off
This option can be used to power off the device. When your phone dies and you can no longer turn it off with just the power button, you can select this option. Unlike the Reboot system now option, this will not restart your phone.
How to Boot Android Phones into Recovery Mode
How to turn on Android recovery mode depends on the band and model of your phone. In general, the combined usage of the volume button and the power button will open the interface of the recovery mode. If your phone has a home button, you will also need to take it into account in practice. Here are the steps to boot Android into recovery mode for different phone brands.
Enter Android Recovery Mode on Samsung
Step 1. Connect your phone to a computer with a cable
Step 2. Press and hold the Power button and Volume Up button until you see the Samsung screen.
Step 3. When Samsung pops up, you need to release the Power button but keep holding the Volume Up button.
Step 4. Now you can see the recovery mode interface. You can use the volume buttons to select options and the power button to trigger them.
Enable Android Recovery Mode on the LG phone
Step 1. Turn your phone off.
Step 2. Press and hold Volume Down Key and Power/Lock Key for approximately 10 seconds.
Step 3. Release both of the keys when the System recovery screen is displayed.
Boot Motorola Phone into Recovery Mode
Step 1. Turn your phone off.
Step 2. Press and hold the Volume Down button and keep it.
Step 3. Press and hold the Power button for a few seconds as well.
Step 4. Release the two buttons until you see the log.
Step 5. Then you can enter the recovery mode.
Get OnePlus Phone into Recovery Mode
Step 1. Turn your OnePlus off.
Step 2. Press and hold the Power and Volume Down buttons together.
Step 3. Your PIN or password may be required.
Step 4. When you enter recovery mode, you can control all options by the Volume and Power buttons.
Boot Android into Recovery Mode on Google Pixel Phone
Step 1. Press and hold the Power button.
Step 2. While you hold Power, press the Volume Up button and let go of both buttons quickly.
Step 3. Android Recovery options will be displayed.
How to Get out of Android Recovery Mode
If you have upgraded or reset your phone after entering recovery mode, your phone will automatically revert to normal mode after the settings are completed. You should be told that you'd better not operate your phone while it is automatically handling the settings.
If you enter the recovery mode without selection and want to exit directly, you can follow the steps below to get out of Android recovery mode.
Step 1. Select the Reboot system now option from the recovery menu.
Step 2. Then your phone will restart and turn to normal mode.
How to Recover Android Data After Factory Reset with Recovery Mode
Sometimes, you may be in a hurry to deal with your phone problems and then reset your phone without a backup. Under this circumstance, recovering your phone data becomes a problem. But you don't have to have misgivings about it.
FonePaw Android Data Recovery can be a shot in the arm for you. FonePaw Android Data Recovery is a computer application. It is simple to use. As long as your phone is linked to your computer, it can get data from Android's internal memory or SD card to recover multiple files. Also, Android Data Recovery has powerful features. It supports fast and deep scan modes. The deep scan mode can dig out hidden and deleted files, and then you can recover most of the files you want. The most important thing is that it is designed in a user-friendly way. FonePaw Android Data Recovery allows you to preview your phone files first so that you can very quickly distinguish which files are the ones that need to be recovered.
Steps to Recover Android Data with FonePaw Android Data Recovery
Step 1. Download the software and launch it on your computer.
Free Download Buy with 20% off Free Download Buy with 20% off
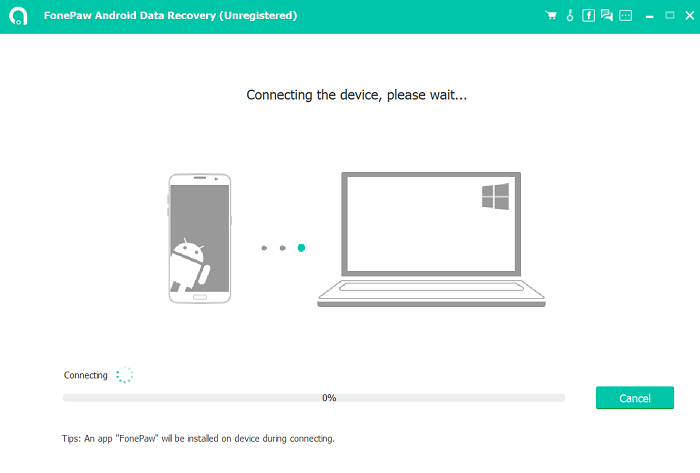
Step 2. Connect your Android phone to the software with a cable.
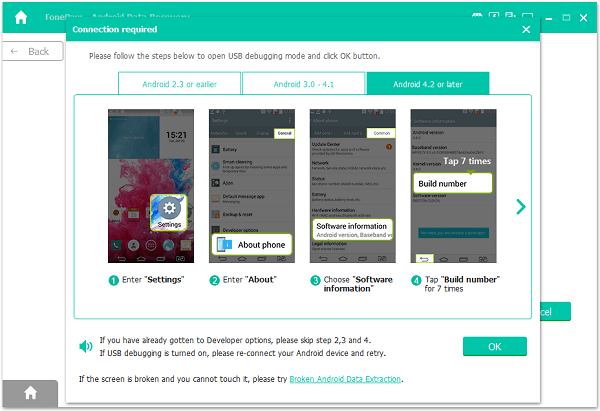
Step 3. Follow instructions to enable USB debugging for the program to detect your phone model.
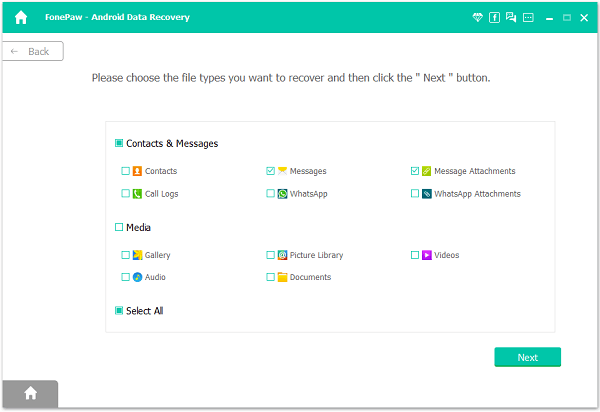
Step 4. Select the type of files to be recovered according to the options provided on the page.
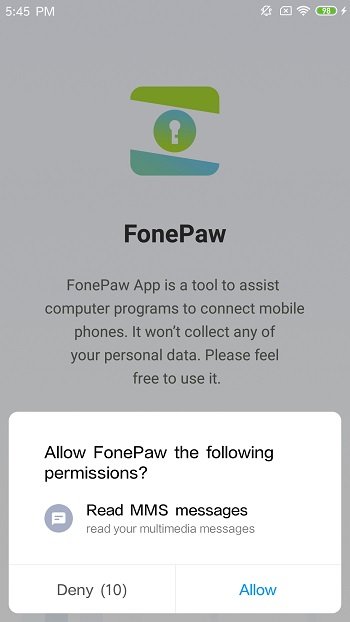
Step 5. To get permission to scan, the FonePaw app needs to be installed on your Android phone.

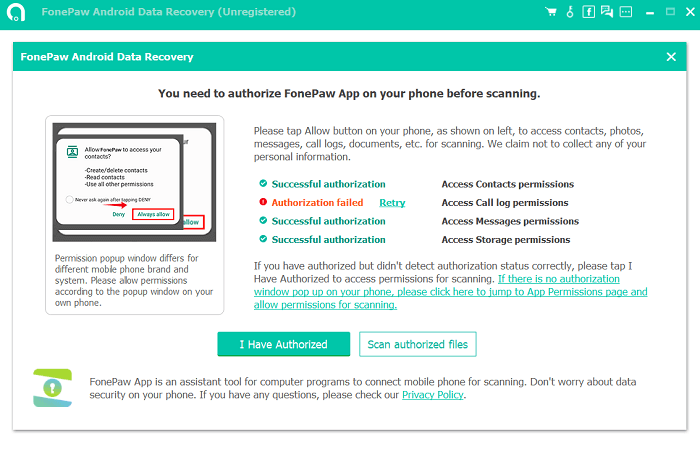
Step 6. After you install the FonePaw app on your phone, you can authorize it to scan your phone.
And you need Click "Scan authorized files" to scan on FonePaw Android Data Recovery.
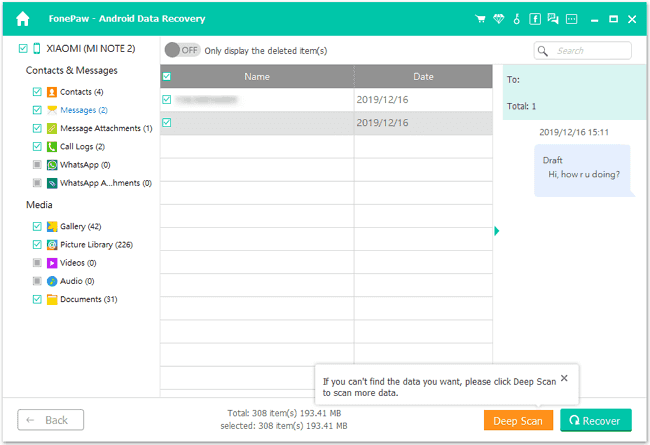
Step 7. When the quick scan is finished, you can preview those deleted videos. If you don't find what you want, you can click Deep Scan to find more. Click those you want to recover, and they will be restored on your PC or Mac.
Conclusion
Now you have a basic understanding of Android recovery mode, and these contents will help you to think wisely when choosing its options. But to avoid data loss, you are recommended to use FonePaw Android Data Recovery. With this software, you can fix your phone glitches without misgiving because it is able to scan your phone comprehensively and deeply to get data back.