iPhone Won’t Update to iOS 17 (8 Easy Fixes)
Davis Turner
Monday, September 18, 2023
Things may seem complex when you try to fix the iOS update problems by yourself. If you are afraid of misoperation or have no idea what to do by yourself, using a third-party iOS system recovery program is a great alternative, for example, Passvers iOS System Recovery.
With everyone's expectations, the long-for iOS 17 finally came into sight and was already released on 18th, September this year. To get iOS 17 profile downloaded, your iPhone needs to run iOS 16.4 or later. However, iOS 17-related updates may be trapped in something wrong, like a stuck download process. In this case, what can we do to iPhone won’t update? To help you out, 8 workable solutions have been compiled in this post. Now, let's scroll down and dive in!
Part 1. How to Fix iPhone Won't Update Problems
iPhone won’t update problems can be caused by different reasons and the fixes also vary. Here we provide 8 ways for you to try as well as to avoid data loss during the iPhone update, from basic methods to advanced ones.
1. Make sure your iPhone is compatible with the latest iOS update
Before you update your iPhone, remember to check if the new iOS system is compatible with your device. As listed on Apple's website, the iOS 17 update supports the iPhone model which is iPhone XR or later. That is to say, if your iPhone is newer than the iPhone XR which was introduced in 2018, theoretically it can be updated to iOS 17.
On the contrary, if your iPhone is an old model, it’s a pity that you cannot do the update due to the incompatibility. However, you are recommended to take the minor updates in the current system which usually include security improvements.
2. Make sure your iPhone storage is available
iPhone update failure can be caused by insufficient storage space. The iOS 17 update requires at least 2 GB of free space to download the update file. But usually, it needs more space for installation, so 10 GB storage space is recommended.
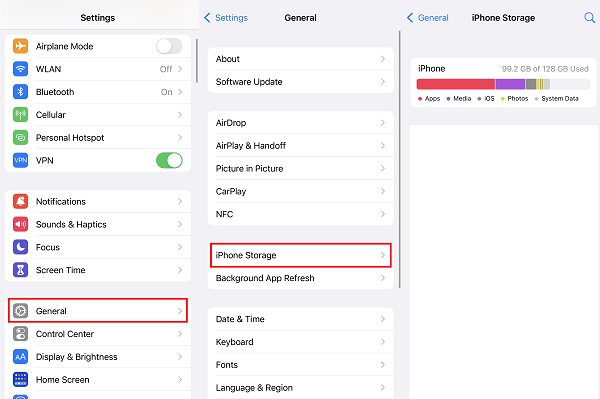
If there is not enough space on your phone, you can check your storage at Settings > General > iPhone Storage and manage the space to make it available for iPhone updates.
3. Make sure your iPhone is connected to the Internet
Internet error can also cause iPhone won’t update problem or make your iPhone stuck on update requested. There are three ways to enable and check your network for iOS 17 update.
Go to Settings > WLAN > Enable your Wi-Fi network if you haven't turned on.
- Go to Settings > WLAN > Apps Using WLAN & Cellular > Enable your network for Settingsif it shows "Off".
- Tap Settings > General > Reset > Reset Network Settings if the previous two ways don't work.

If your iPhone cannot update in one network, try to switch to another one. It may work.
4. Restart or force restart your iPhone
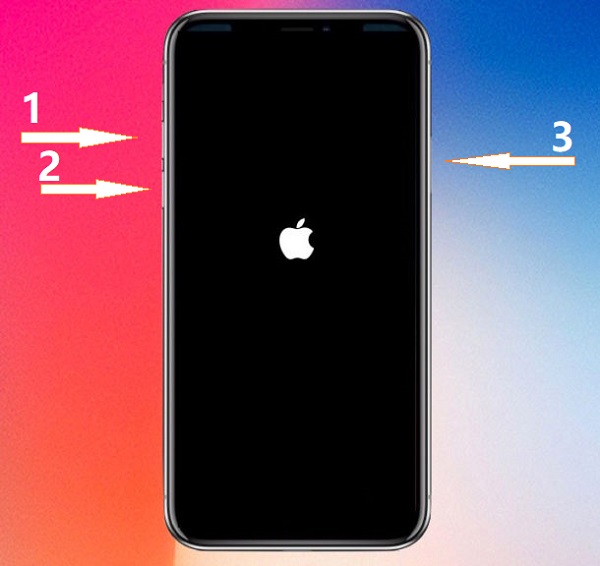
If your iPhone still encounters update problems after the basic settings, such as stuck in a process, no reaction, frozen screen, etc., try to restart or force restart your iPhone to fix some system errors.
If your iPhone is iPhone XR or newer: press and hold either volume button and the side button simultaneously, and then "slide to power off" accordingly. After the shutdown, long press the slide button to turn on the phone.
If your iPhone is iPhone XR or newer: press and quickly release the volume up button, then do the same to the volume down button, and then long press the side button until the Apple logo appears.
5. Manually upgrade to iOS 17
If your iPhone cannot update to iOS 17 automatically or is stuck in verifying installation, try to manually process the upgrade.
Go to Setting > General > Software Update. Often there is a notice in red telling you that there is an iOS update available.
- Tap “Install Now” to start updating.
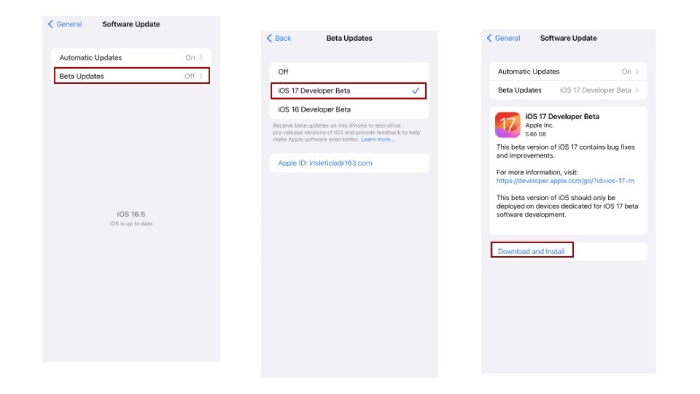
Things may happen like your phone showing that it fails on your update verifying and it doesn't work when you keep tapping "Retry". At this time, you may have downloaded the iOS update file and there is something wrong with it. Try to delete it and download the update file again.
Tap Setting > iPhone Storage.
- Find out the update file with a gear icon in the apps below.
- Select the file and choose “Delete Update”.
- Go back to Setting > General > Software Update to reinstall iOS 17.
6. Upgrade to iOS 17 with a computer
If you fiddle with your iPhone again and again and it still fails to update, there is still a way: upgrade your phone to iOS 17 with a computer.
The computer can be Windows or Mac. For macOS 10.15 or later, you can use Finder to upgrade. For macOS 10.14 or older or Windows system, iTunes will be available for the update.
Here we will take using iTunes as an example, and the way using Finder is similar:
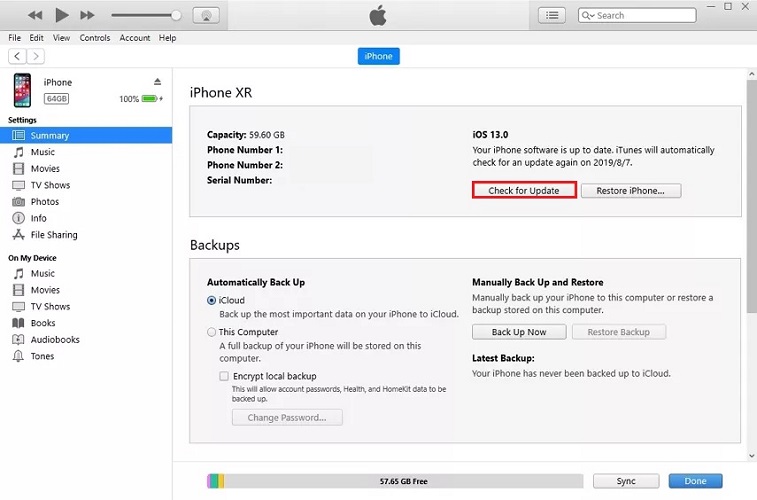
Launch iTunes (newest version).
Plug your iPhone into the computer. Using the original charging cable to connect is recommended.
- Select the iPhone icon.
- Click "Check for Update" to find iOS 17 update.
- Click "Download and Update" to install iOS 17 for your phone.
7. Reset or restore your iPhone for update
Unfortunately, the methods above may not work and you have to come to this way. It is likely that there are some system or program problems on your phone, so you should try some ways to hard reset.
Before trying to fix the iPhone won’t update problem with the ways below, do remember to back up your iPhone, because your iPhone data will be cleared. If you don’t want to try the ways manually, skip to the next method which is using a third-party iOS system recovery program to help.
This method is to clear all settings and contents in your iPhone to fix some iOS system problems.
Step 1. Tap Settings > General > Reset > Reset All Settings.
Step 2. Turn on your phone and try to update to iOS 17 again.
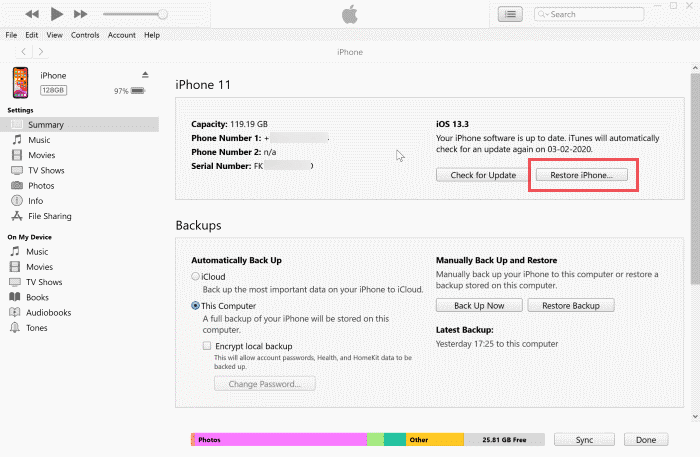
As for this method, you have to use your computer for the restoring and the latest version of iTunes is required. Here's the guide:
Step 1. Launch iTunes.
Step 2. Connect your iPhone into the computer with the lighting cable.
Step 3. Select the iPhone icon.
Step 4. Click "Restore iPhone". Again, this will clear all data in your phone.
Step 5. After restoring, turn on your phone and try to update again.
Recovery Mode is a mode that allows you to restore your iPhone as well as update your firmware to the latest version. This way is more forceful than just resetting your phone and can deal with problems like your computer not being able to verify your iPhone or your iPhone screen stuck on an Apple logo. What you need to do is:
Step 1. Launch iTunes.
Step 2. Connect your iPhone into the computer with the lighting cable.
Step 3. Turn on the recovery mode of your iPhone (pressing the buttons in the same way as forcing restart the iPhone, but if you enter the recovery mode successfully, your screen will turn black, showing the lighting cable plugging into the iTunes logo).
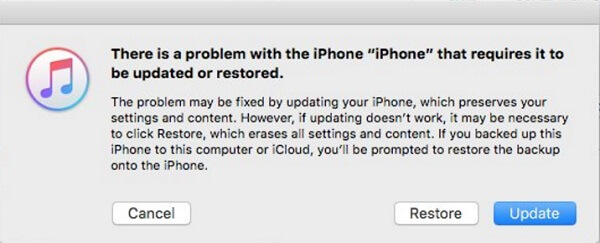
Step 4. iTunes will automatically detect your device and then a notice window pops up.
Step 5. Choose "Update" to update your phone to iOS 17.
Step 6. Exit the recovery mode after the update finish (the same way as entering recovery mode).
8. Fix update problems and upgrade with iOS system recovery software
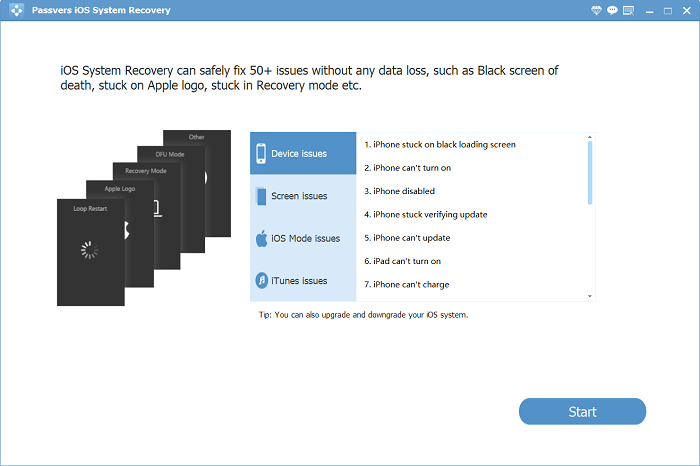
Sometimes using a third-party iOS system recovery program to fix iPhone won’t update problem is much easier and more timesaving than trying different ways again and again by yourself. Here we recommend Passvers iOS System Recovery for you.
Passvers iOS System Recovery is helpful when you want to solve various iOS system problems including the iOS update failure. To solve the iPhone won’t update problem, this tool can provide you with easy and clear instructions for you to successfully update your iOS system in a few clicks. It provides three different recovery modes to fix your iOS problems, which are quick recovery mode (free), standard mode, and advanced mode, which can usually help you out in minutes without any data loss.
Part 2. How to Downgrade iPhone System After Update
Unfortunately, your iPhone may not function well after the update, or you really cannot get accustomed to the new iOS system. There is still a way to try – downgrade your iPhone system.
However, think twice before you downgrade, because it will also erase your iPhone. Always remember to back up when you are going to do something that will affect your phone data. Also, the old iOS system available for downgrading is very limited, for the reason that Apple usually disables the sign of the old iOS version soon after an update is released.
If you really make the decision to downgrade, follow the steps below:
1. Preparations for iOS system downgrade
Your iPhone
A Computer with the latest iTunes installed
The old iOS firmware with signed IPSWs, you can look up and download at https://ipsw.me/
2. Downgrade iOS system with iTunes
Launch iTunes.
Turn off "Find My iPhone" at Settings > Profile at the top > Find My > Find My iPhone.
- Connect your iPhone to iTunes with the charging cable.
- Select the iPhone icon.
- Press "Shift" (for Windows)/ "Option" (for Mac) and click "Restore iPhone" at the same time.
- Choose the firmware to downgrade the phone.
If you think it hard to downgrade your iPhone manually, you can also seek help from a third-party program like Passvers iOS System Recovery, which can give you clear guidance and do most of the jobs for you.
Hope this passage can help you solve the iPhone won't update problem. If you have more concerns, feel free to contact us.
Fix your iOS system without losing any important files!