


iCloud Photo Sharing is a favorable service that associates with your iCloud, allowing iOS users to share their lives with beloved ones. Users can invite up to 100 people to join in, make comments, and even add their own shots together in a shared album in which it is able to hold up to 5000 photos and videos. Cloud Photo Sharing supports JPEG, RAW, PNG, GIF, TIFF, and MP4, as well as special formats you capture with your iPhone, like slo-mo, time-lapse, 4K videos, and Live Photos.
Don't Miss Out:
- How to Transfer Photos from iPhone to iPhone (opens new window)
- How to 'Freeze' Screen When Sharing Photos with Friends (opens new window)
If you're worrying about potential risk of the insufficient iCloud storage, this is totally unnecessary. The photos and videos in your shared albums are kept in iCloud, but they don't count against your iCloud storage limit. As an instant sharing feature, iCloud Photo Sharing has captured hearts over the world. If you got a crush on this feature, here's a full guide to make use of iCloud Photo Sharing on iPhone/iPad.
Tutorial 1: How to Enable/Disable iCloud Photo Sharing?
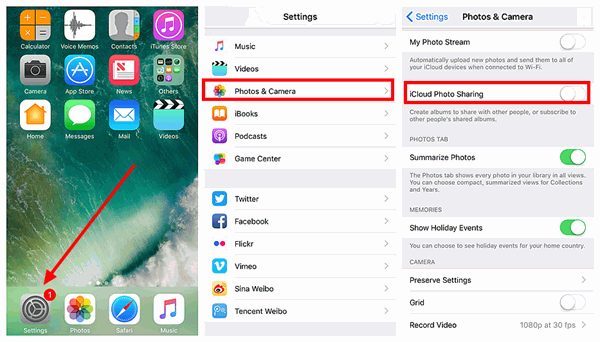
Before you head to the enjoyment with iCloud Photo Sharing, sure you have to set it up at first. Please follow the instructions below to enable iCloud Photo Sharing on your iPhone or iPad.
Step 1. Launch "Settings" app on your device.
Step 2. Swipe down the screen and select "Photos & Camera" option.
Step 3. Enable "iCloud Photo Sharing" via toggling the bar on.
Note that you can create albums to share with other people, or subscribe to other people's shared albums.
Tutorial 2: How to Create a Shared Photo Stream?
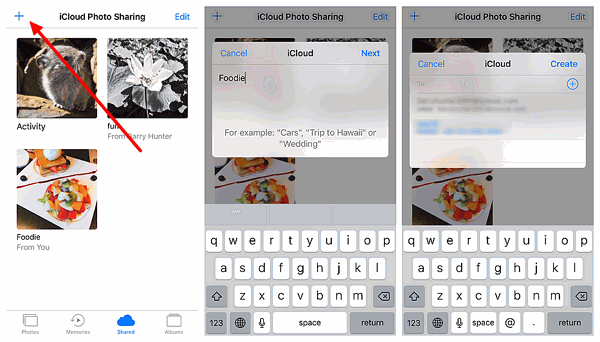
It seems as similar as a small Instagram social, isn't it? Now, how do we share favorite photos and videos with family, friends or co-workers? You should start from a shared album which serves as a photo stream. To begin with, check out the steps below.
Step 1. Open "Photos" app on your iPhone/iPad.
Step 2. Tap on "Shared" tab at the bottom.
Step 3. If you never use this before, tap "Start Sharing"; Or, tap "+" button at the top left corner of the screen.
Step 4. Type in the blank to name this album. Then, click "Next" to continue.
Step 5. Now, enter the iCloud address of your favorite ones or tap "+" to select from your contacts. When it completes, tap "Create".
Step 6. Now a new Sharing photo stream has been created, please tap on the album and tap to select photos to this album.
Tutorial 3: How to Access Photos Shared with iCloud Photo Sharing?
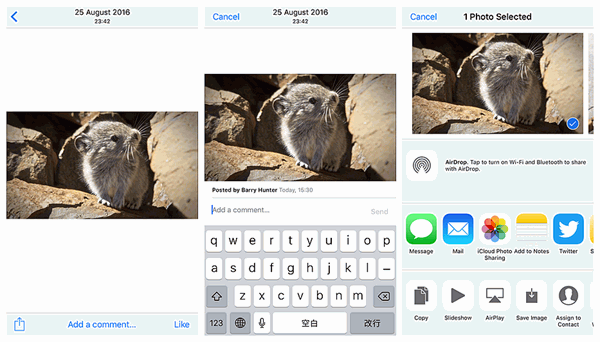
iCloud Photo Sharing allows you to share photos/videos with others as well as receive sharing from others. So, how to get access to this sharing? Take a look here.
Step 1. Launch "Photos" app on your iOS device.
Step 2. Switch to "Shared" tab and check out albums created by you or others.
Step 3. If you want to check out the latest updates, please select "Activity".
Step 4. Tap on a specific shared photo and you will be able to check out it at full resolution and the date it's captured or saved.
Step 5. If you want to add comments or like this photo, you can make your actions at the bottom.
Step 6. Also, if you like to forward and share this photo, please tap "Share" button at the lower left.
Note that if you're invited by a friend, you'll receive an invitation in "Activity". When you accept it, you can join in the sharing stream.
Tutorial 4: How to Delete Photos from a Shared Photo Stream?
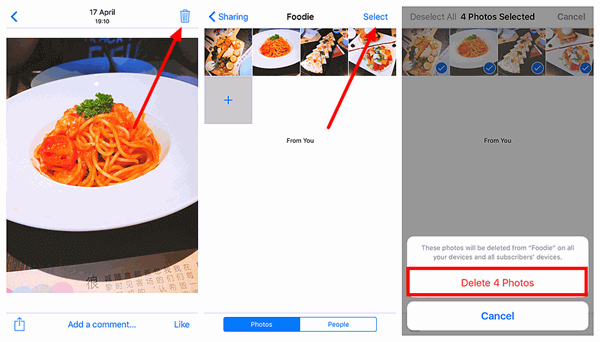
If you'd like to remove a picture you shared with others, you can try the following shot. However, it's impossible for users to delete photos shared by others.
Step 1. Open "Photos" app.
Step 2. Select "Shared" tab.
Step 3. Choose an album created by yourself.
Step 4. If you'd like to remove one photo, please choose the one and tap "Trash" icon on the right top.
Step 5. If you'd like to delete multiple photos, please tap "Select" at first and tick up desired ones you wish to delete. Then, hit the "Trash" at the lower right of the screen.
Note that if you want to remove a whole album, please select "Edit" on "Shared" screen and select the "Remove" button in red.
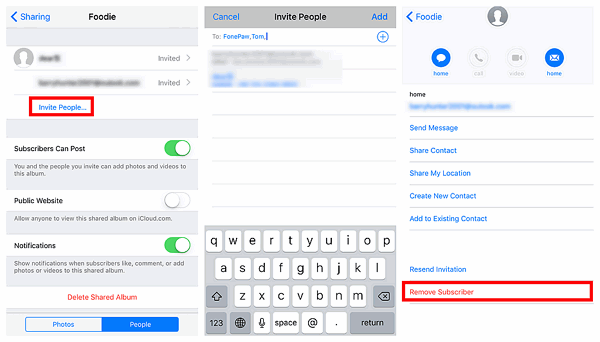
Tutorial 5: How to Add/Remove People from Shared Photo Streams?
If you'd like to add or remove people to/from the album initiated by you, please follow the instructions below.
Step 1. Open "Photos" app on your iPhone/iPad.
Step 2. Tap "Shared" tab to view all the shared albums.
Step 3. Select the album shared by you.
Step 4. Choose "People" option at the bottom.
Add People:
- If you want to add new people, select "Invite People".
- Directly type in a contact or choose from your contacts, you can select multiple people at once.
- Tap "Add" to invite them to join in your photo stream.
Remove People:
- Tap on the name of the one who you'd like to remove.
- Check out its profile and drag to the bottom.
- Select "Remove Subscriber" and confirm to "Remove".
I'm sure you've got an overall idea of iCloud Photo Sharing. Yet, action speaks louder than words. Why not give it a shot immediately? Interesting things are more interesting when shared with people.