Quick Navigation
Are you experiencing difficulties turning on your iPhone? Don't worry, you're not alone. Many iPhone users encounter this frustrating issue at some point. But before you panic or rush to a repair shop, it's essential to understand the potential solutions for an iPhone that won't turn on.
In today's post, we will provide you with a detailed introduction to 4 practical methods to solve the problem of iPhone not turning on. So let's continue watching and find out together!
Before Troubleshooting: Do You Know How to Turn on an iPhone?
Prior to revealing the solution to the issue of an iPhone not turning on, it's important to verify that your iPhone has been turned on properly. While this may seem like an obvious step, it's worth noting that various iPhone models have different booting methods, making the "check if it is on" step a critical one.
STEP 1. Press the Right Button to Turn On an iPhone
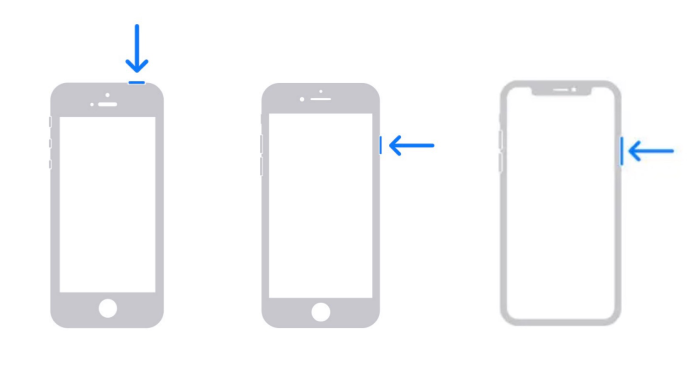
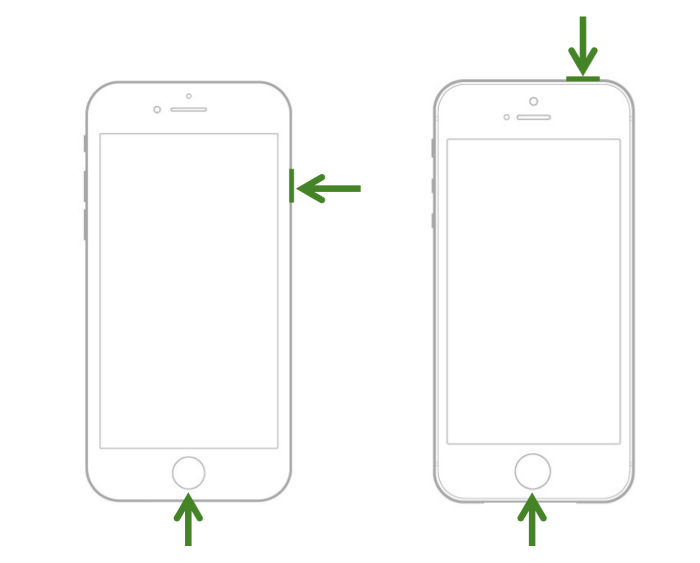
The following are some common ways to turn on an iPhone:
- iPhone with a Home and Top button: Press and hold the Top button until the Apple logo appears on the screen.
- iPhone with a Home and Side button: Press and hold the Side button until the Apple logo appears on the screen.
- iPhones without a Home button but with a Side button: Press and hold the Side button for several seconds and release it once the Apple logo appears.
STEP 2. iPhone is turned on successfully
If you press the correct buttons, the Apple logo should appear in the center of your iPhone screen, indicating that your phone is starting up. After a short wait, your phone will boot up and you will be able to use your iPhone.
What to Do If iPhone Won't Turn On
If you have followed the above steps and confirmed that you have correctly turned on your iPhone, but your iPhone still does not respond, then you may be facing the problem of "iPhone won't turn on". Don't worry, we will guide you step by step to troubleshoot the issue and provide you with suitable solutions to fix it.
Method 1: Try Charging Your iPhone
Sometimes, you may think that you have charged your iPhone fully, but due to various minor issues, your iPhone may not have charged at all.
Therefore, we suggest that you first charge your iPhone. Especially if your iPhone has not been used for a long time, it is recommended to charge it for at least half an hour. At the same time, you can ensure that the charging equipment for your iPhone is functioning properly by replacing the data cable or the charging port. After charging, try turning on your iPhone again.
Method 2: Do a Hard Reset
However, if you have confirmed that your iPhone is fully powered up but it is still not responding, then you can try the next step - force restart your iPhone.
In general, restarting the iPhone can resolve common issues related to cache or error states. This includes problems like app crashes, slow device responsiveness, and more. Additionally, performing a hard reset on the iPhone can also help resolve issues where the device can not turn on or gets stuck on the startup screen, which means performing a force restart is very likely to solve the problem of our iPhone not turning on.
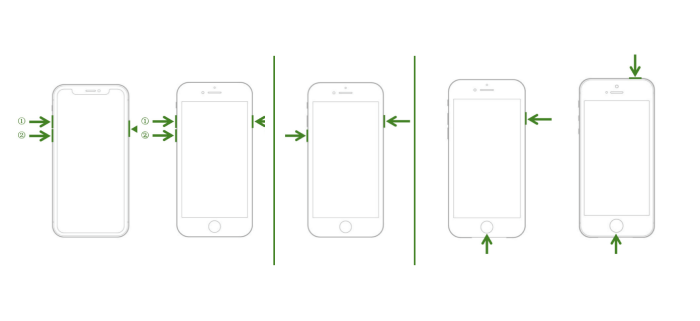
The following are the hard reset methods for different common iPhone models. You can match the corresponding model and then try to restart your iPhone:
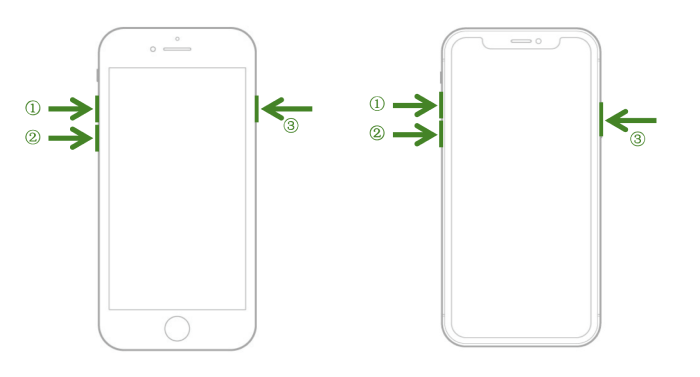
# iPhone 8 Series and later (including iPhone SE 2nd)
STEP 1. Press and quickly release the Volume Up button.
STEP 2. Press and quickly release the Volume Down button.
STEP 3. Press and hold the Side button.
STEP 4. Release the Side button when the Apple logo appears.
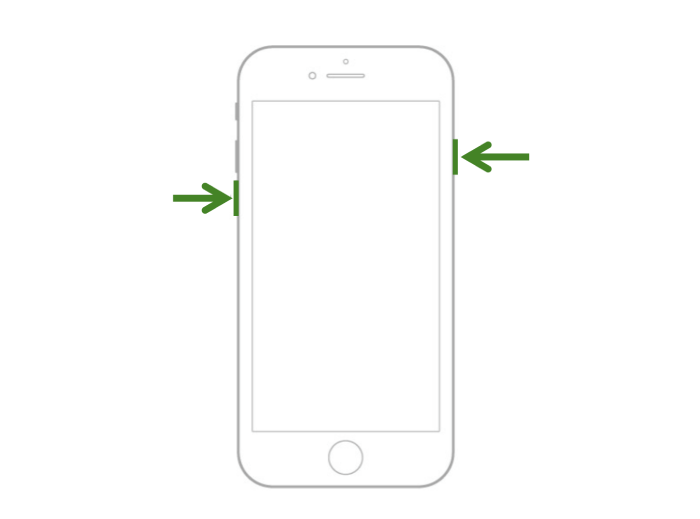
# iPhone 7 Series
STEP 1. Press and hold both the Volume Down button and the Side button simultaneously.
STEP 2. Release both buttons when the Apple logo appears.
# iPhone 6 Series, iPhone SE(1st generation), Earlier iPhone Models
STEP 1. Press and hold both the Top/Side button and the Home button simultaneously.
STEP 2. Release both buttons when the Apple logo appears.
Note :
The steps to do a hard reset on an iPhone may vary depending on the model. It is important to identify your specific iPhone model before proceeding with the corresponding hard reset procedure. If you are unsure about the model of your iPhone, you can refer to the official Apple article for clarification: Identify your iPhone model.Method 3: Fix Your iPhone in Recovery Mode with iTunes
If charging and hard reset can't solve your iPhone won't turn-on problem, you may try Recovery Mode this time. The Recovery Mode of an iPhone is a troubleshooting state that allows you to restore or update the device's firmware when it encounters significant software issues. By entering recovery mode, you can connect your iPhone to a computer and use iTunes or Finder to restore the device to its factory settings or install the latest iOS version.
Note :
Don't forget to back up your important data and files from your iPhone to iCloud prior to restoring the device using iTunes.
In most cases, utilizing the Recovery Mode involves reinstalling the phone's operating system, which results in the complete erasure of all data on your device. However, if you have previously performed data backups using iCloud or iTunes, you can easily restore your data when needed.
Here are the detailed operation steps to fix your iPhone in Recovery Mode with iTunes(the latest version):
STEP 1. Connect iPhone to Computer
Connect your iPhone to a computer(Windows or Mac) using a USB cable. And then open the latest iTunes (for Windows and macOS Mojave and earlier) or Finder (for macOS Catalina and later) on your computer.
STEP 2. Put iPhone into Recovery Mode
In certain situations, iTunes/Finder will automatically detect that your iPhone is in Recovery Mode and display the corresponding window. However, if this doesn't happen, you can manually put your iPhone into Recovery Mode using the following steps(different performing methods depending on your iPhone model)
- For iPhone 8 Series or later models: First, press and quickly release the Volume Up button, and then press and quickly release the Volume Down button. Last, press and hold the Side (or Power) button until the Recovery Mode screen appears.
- For iPhone 7 Series: Press and hold the Side (or Power) button and the Volume Down button simultaneously, and continue holding both buttons until the Recovery Mode screen appears.
- For iPhone 6 Series or earlier models with a Home button: Press and hold the Home button and the Side (or Top) button simultaneously, and keep holding both buttons until the Recovery Mode screen shows up.
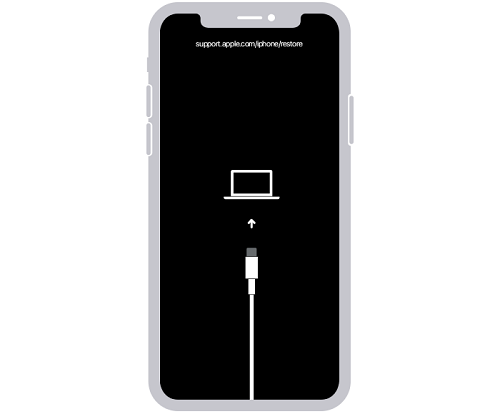
STEP 3. Restore Your iPhone
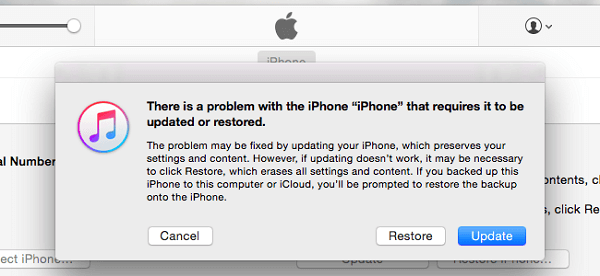
iTunes will detect your iPhone in Recovery Mode and display a prompt on the computer screen, showing options for either "Restore" or "Update." Click on the "Restore" button to restore your iPhone to its original factory settings. This will initiate the restoration process, and iTunes will download the necessary software for your device. Wait for the process to complete. It may take some time, depending on the size of the software and your internet connection speed.
STEP 4. Finish Restoring
Once the restore process finishes, your iPhone will reboot. Follow the on-screen instructions to set up your device again. If you have previously backed up your iPhone data, you can restore your backup from iTunes during the setup process. This will allow you to recover your apps, settings, and personal data.
Method 4: Use Passvers iOS System RecoveryHOT!
If you have reached this point, I understand that you have attempted the previous methods to no avail, and your iPhone still won't turn on. However, don't lose hope just yet. In this part, we will introduce you to a user-friendly and effective tool, Passvers iOS System Recovery.
Highlight Features of Passvers iOS System Recovery:
- Quick: The entire recovery process is quick and does not require iTunes or a password. Fixing the problem takes just a few simple steps, allowing you to resolve the iPhone not turning on the issue in a matter of minutes.
- Simple: Provides clear and detailed instructions at every step, making the operation straightforward and user-friendly.
- Non-Destructive: In most cases, data loss is not a concern as Passvers iOS System Recovery does not erase your data. You can proceed with the repair without worrying about losing your important information or needing additional data backups.
- Comprehensive: With three repair modes available (including a free mode), Passvers iOS System Recovery offers targeted solutions for various iPhone startup issues, ensuring a more effective resolution.
- Wide-Compatible: Supports almost all iPhone models, ranging from iPhone 4 to iPhone 15, guaranteeing compatibility regardless of the specific model.
By leveraging the professional features and broad compatibility of Passvers iOS System Recovery, you can efficiently address the iPhone not turning on problem. Next, we will introduce you to the three modes of Passvers iOS System Recovery in detail.
How to Fix iPhone Won't Turn on with Passvers iOS System Recovery
To address the situation where your phone fails to power on, Passvers iOS System Recovery offers three precise repair modes: Free Quick Fix (data-safe), Standard Mode (data-safe), or Advanced Mode (data-loss). First and foremost, we highly recommend prioritizing the use of the Free Quick Fix mode, as it is free of charge and ensures data integrity throughout the process.
Note :
The prerequisite for using the Free Quick Fix mode is that Passvers iOS System Recovery can automatically detect your device.If the "Free Quick Fix" mode fails to resolve the problem of your iPhone not turning on, or your iPhone is not being recognized, you can choose Standard Mode or Advanced Mode as an alternative. Standard Mode is capable of repairing most system issues, but if it fails to resolve the problem, you have the option to choose Advanced Mode. Here are the detailed steps to use Passvers iOS System Recovery:
Here's a video tutorial to show to how Passvers iOS System Recovery fixes the iPhone Won't turn on issue at once. Check it out before starting with the instructions.
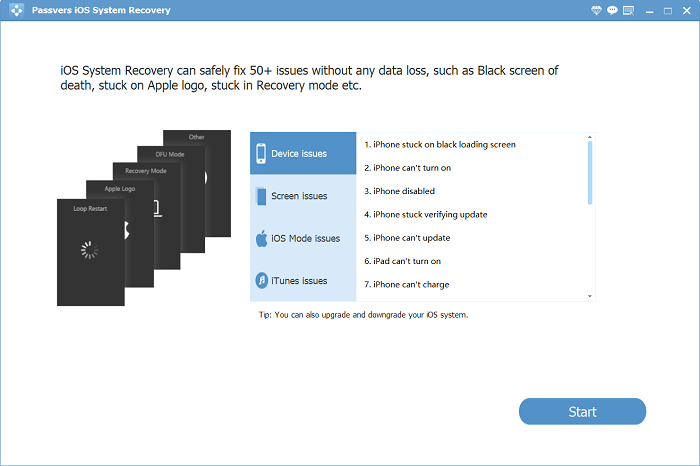
Step 1. Turn on Passvers iOS System Recovery and then click the "Start" button in the lower right corner.
Step 2. Connect your iPhone, which is experiencing the issue of not turning on, to your computer using a USB cable.
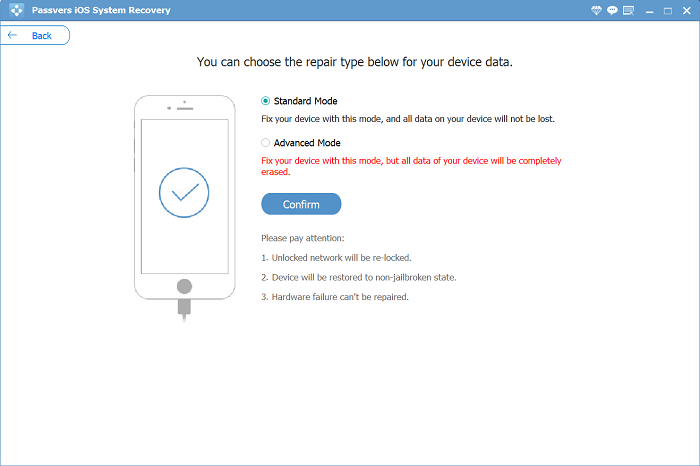
If Passvers iOS System Recovery can automatically detect your iPhone, simply click on the "Free Quick Fix" option in the middle of the screen to initiate the repair process. However, if it fails to automatically detect your device, choose the "Standard Mode" (and if the Standard Mode doesn't work, then choose the "Advanced Mode") and click "Confirm" to begin the repair.
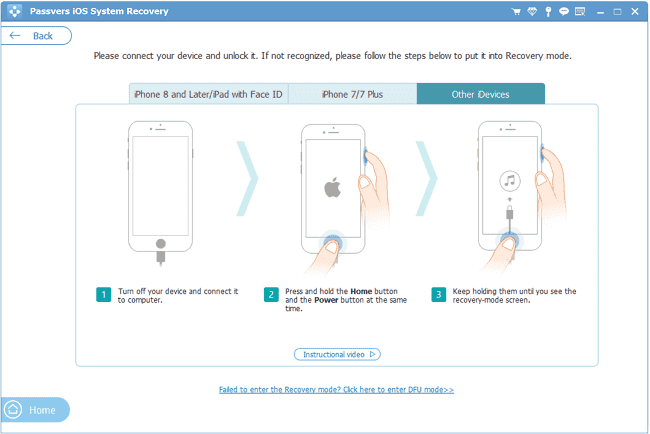
Step 3. Follow the instructions on the page to put your iPhone into Recovery Mode.
Step 4. During this step, Passvers iOS System Recovery will automatically detect your iPhone and provide the corresponding firmware package for your device. (If the automatic detection fails, you can manually select the firmware package based on your iPhone model.) Once you have made the selection, click on "Next" to initiate the firmware download process.

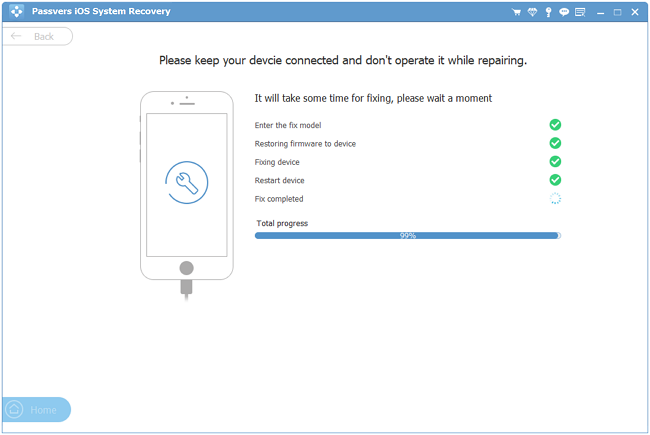
Step 5. Once the download is complete, the repair process will begin automatically, and your iPhone will be repaired. Please be patient and wait for a few minutes. After the repair is done, your iPhone should turn on successfully!
Method 5: Ask for Apple Help
Under normal circumstances, the above troubleshooting methods can resolve most issues causing an iPhone to not turn on. However, if you have tried all the ways mentioned above, but your iPhone still won't turn on, it could be due to a more severe software issue or a hardware problem with your iPhone (common causes include water damage or physical damage from a fall). In such cases, it is recommended to seek assistance from Apple official support for further help and guidance.
FAQs About iPhone Won't Turn On Problem
If you still have some lingering questions about the iPhone Won't Turn On Problem after watching this vlog, fret not. In the following text, we have compiled a list of frequently asked questions (FAQs) to offer you valuable insights and guidance in resolving this issue. Let's delve into the FAQs and find the answers you need.
Q: What Causes Black Screen of Death on iPhone?
A: There are several reasons that can lead to the black screen of death on your iPhone, which include:
- Battery Issues: A drained or faulty battery can prevent your iPhone from turning on. It's essential to ensure that your device has sufficient charge or to try charging it for a while before attempting to turn it on.
- Software Glitches: Sometimes, software glitches or crashes can cause your iPhone to become unresponsive. This can occur due to incomplete software updates, app conflicts, or system errors.
- Hardware Problems: Physical damage to your iPhone, such as a damaged power button or faulty charging port, can prevent it from turning on. Water damage or a drop impact can also affect the internal components and cause startup issues.
- Frozen or Unresponsive Screen: In some cases, your iPhone's screen may freeze or become unresponsive, making it appear as if the device won't turn on. This can happen due to software bugs or conflicts.
- Firmware Issues: Problems with the device's firmware or operating system can lead to startup problems. Corrupted or outdated firmware may require a software restore to resolve the issue.
- Overheating: Excessive heat can cause the iPhone to shut down and refuse to turn on until it cools down. This can happen if the device is exposed to high temperatures or subjected to intense usage for an extended period.
- Faulty Accessories: Sometimes, a malfunctioning charging cable, power adapter, or other accessories can prevent the iPhone from powering on. Trying a different charging cable or adapter can help rule out this possibility.
Q: What Happens When Force Restarts Doesn't Work on iPhone?
A: Encountering this issue that an iPhone refuses to turn on even after a hard reset indicates a problem with the iPhone's software or hardware. No matter which kind of problem your iPhone is facing, you can start by referring to the steps mentioned above in our vlog, systematically troubleshooting, and attempting to resolve the problem.
Alternatively, if you want a quick solution to this problem, we recommend using Passvers iOS System Recovery. It can fix most iPhone issues with clear instructions and easy operation. However, if your iPhone is facing more serious hardware issues, we recommend seeking official assistance from Apple.
Q: Can I fix the issue of iPhone not turning on and still keeping my data?
A: Yes, but it cannot be guaranteed 100% as every situation is unique. Therefore, it is highly recommended to back up your important data before attempting any repair procedures. This way, even if any issues arise during the repair process, your data can be safely preserved. However, if you use Passvers iOS System Recovery, the Free Quick Fix mode and the Standard Mode can fix the problem of an iPhone not turning on while preserving your data, preventing any data loss.
Conclusion
Having trouble turning on your iPhone can be incredibly frustrating. But don't worry, if you have followed the detailed guide above in today's post, we'll walk you through the possible causes and provide effective solutions to get your iPhone up and running again.
Also, It is worth highlighting that if you don't have any backups of your data, You can try Passvers iOS System Recovery. This amazing tool is specifically designed to fix the iPhone Won't Turn On issue without risking your precious data. With its advanced iOS repair technology, you can trust this software to deliver a seamless recovery experience. Say goodbye to frustration and get your iPhone back on track!